...
Archivematica has specific metadata files that can be added to the transfer package so metadata is transferred correctly. If you have analyzed the transfer files already for possible restricted content and found that there is a restriction, proceed to the Creating and adding the rights restriction file section. If you have found no restrictions you can proceed directly to the Creating and adding the metadata file section.
Creating and adding the rights restriction file
- Adding information about restrictions is done through a CSV file called "rights.csv". DDC uses this file for the options included for recording restrictions but there are also options for actual usage rights (licenses, copyright, etc.) that we generally do not use but is the origin of the name of the file.
- There is a template included in the Transfer folder that you can edit for your needs, which is titled metadata.csv, this is the same as what the file will be named that you include in the package.
- If you are doing a bag as a whole,
Creating and adding the metadata file
If you have analyzed the files already for possible restricted content and/or have determined what level of digital preservation commitment these files require, you should create a metadata csv file with this information to be included with the package(s) going through Archivematica. If you have not analyzed the files yet, go to the section above. If you are just transferring the files into Archivematica Backlog for processing later, continue to step 2.
- There is a template included in the Transfer folder that you can edit for your needs, which is titled metadata.csv, this is the same as what the file will be named that you include in the package.
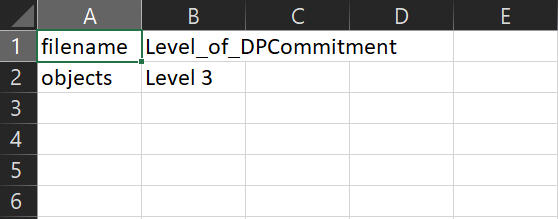
Open the template, there should be at least two heading columns.
- Column 1 is the “filename”, this should always be “objects”.
- Column 2 is the “Level_of_DPCommitment” which should be the appropriate level for the specific package, such as “Level 3”.
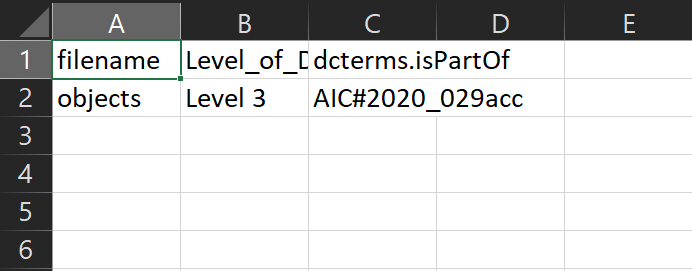
- If you are putting through multiple packages (each with it’s own metadata file) as part of the same transfer (e.g. 2020_029_001, 2020_029_002, etc.), you will need a third column called “dc.isPartOf”. In that field you will enter the identifier for the group of packages, adding “AIC#” to the beginning. For instance, “AIC#2020_029acc”.
Save the file as a copy in the “metadata” folder within the package you are transferring in Archivematica.
Info title Note If you have a bag where the “metadata” folder was created within the “data” folder or if you have not determined the level of digital preservation commitment because you are waiting to analyze the files in Archivematica, adding the CSV metadata will wait until a later step in Archivematica (see Archivematica processing step 6 under Ingest. (link) In the case of the bag, adding it now would cause the bag to be invalid.
- Open Archivematica and click “Browse” and make sure the folder is available. Now you can proceed to the Archivematica processing steps (link)