Original by James Wall, G
Introduction
3D printing is a useful tool for props and small set pieces when used strategically. Don’t be discouraged if you don’t have CAD (computer-aided design) or 3D printing experience; free 3D models exist online, and usually at least one person in the production has access to a 3D printer (this is MIT, after all). The following guidelines are intended to be accessible to a beginner 3D printer. Intermediate/advanced 3D printers may still benefit from the props-specific commentary.
...
Props can be custom-designed, found online, or some combination of the two. Thingiverse is a great database of free designs. For custom design, Fusion360 has free student licenses, is better for collaborative design than other software, and saves files to the cloud (it’s basically the Google docs of CAD). The interface and restricted capabilities can be frustrating for the advanced designer, but it is great for rapid prototyping and thus prop-making. Here are some beginner Beginner Fusion360 tutorials are available online.
If combining existing designs and custom designs, merging bodies will be your friend. Often, designs you find online will be .stl or .step files, which are covered in triangular surfaces (i.e., you don’t have a large flat surface on which to cut and extrude), so they are difficult to edit. For example, to make the Hello Kitty cupcake for . Instead, make a new body, move it to overlap with the .stl body, and combine.
Sometimes you will want to integrate the 3D printed piece with another material. Keep in mind that 3D printed pieces turn out slightly larger than your design (it's like they puff up). For this reason, it's helpful to print prototypes of just the parts that interface. For example, levers for both Karnak's box in Ride the Cyclone (Summer '25), a Hello Kitty head was found online, a cupcake base was custom-designed, and the two bodies were overlapped and merged2025) and The Rocky Horror Show (Fall 2025) were PVC pipes. The handle at one end and the noisemaker/hinge at the other end were 3D printed and designed to slide inside the pipe. The inner diameter of the pipe was 1.033 inches. Some small cylinders were printed at varying diameters from 0.9 to 1.03 inches, and it was found that a 1.015 inch diameter cylinder fit snugly.
Where do I 3D print my prop?
Currently, MTG prints at Metropolis Makerspace, where printing is free and PLA filament is provided. Any student can sign up for a quick training/orientation. Keep in mind there is one print per person at a time. If you want to print in parallel, recruit your friends who are also makerspace trained!
...
You first need your design in .stl format. If a CAD file is analogous to a Microsoft Word document, the .stl file is analogous to a pdf (i.e., you can still open it and stick "pages" (bodies) together, but you can't edit the actual "text" (shape)). If downloading an existing design online, there is often an .stl option. If using Fusion360, right click on the body, then click “save as mesh.” The format should be “stl binary” and the unit type should be “millimeter.” Important: change your default units in Fusion to millimeter in advance (you can do this under document settings at the top of the browser tree on the left).
A “slicing” software converts your design to a file the 3D printer can interpret (a .gcode file). If using Prusa - brand printers (like those in the Metropolis Makerspace), use PrusaSlicer software. Other slicer softwares exist that are compatible with a range of printer brands.
...
Hello Kitty Cupcake (Ride the Cyclone, Summer 2025)
(1)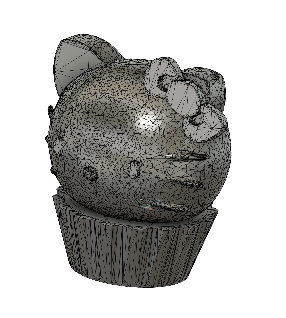 (2)
(2)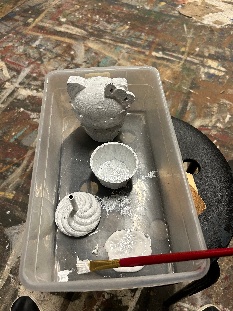 (3)
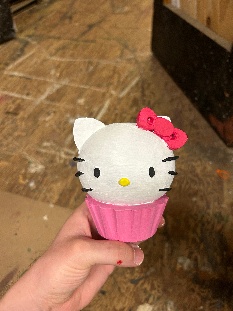
(3)
(1) Two separate .stl files were downloaded online: a hello Kitty head and a cupcake base. The two bodies were overlapped and combined into one in Fusion360.
(2) The piece was printed in black (yikes) so a base coat of white paint was applied after sanding.
(3) Final product
Hand Mirrors (Natasha, Pierre, and the Great Comet of 1812, IAP 2026)
(1)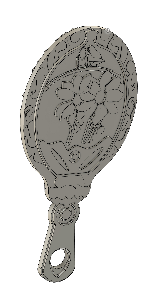 (2)
(2) (3)
(3)
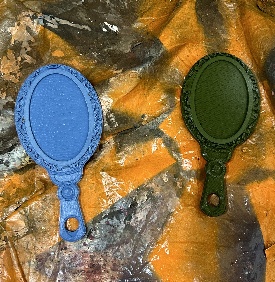
(1) The .stl file was downloaded from online
(2) There were raised details on both sides, so the print required supports. Because the details were shallow, rectilinear, not organic, supports were used. It was not feasible to sand within the details, so a base coat of spraypaint was applied.
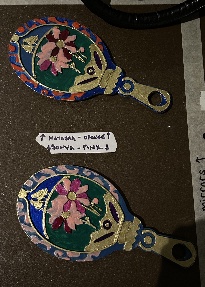
(3) The mirrors were made colorful with nail polish.