Getting Started - Setting up your Home Screen
Using the Table of Contents
This Table of Contents contains links on which you can click to help navigate the manual.
| Table of Contents | ||||
|---|---|---|---|---|
|
Anchor Home Screen Home Screen
Home Screen
| Home Screen | |
| Home Screen |
| Section | ||
|---|---|---|
|


The Home Screen is the default e-Builder landing page. Current and actionable information is displayed about your projects each time you login or refresh the Home page.
Take a minute to identify the following on the Home Page.
- Tabs across the top of the page that open different modules
- The Recent Pages drop down menu located on the left side of the page
- The Quick Start links on the left side of the page
- Workflow in your court
- My first 10 tasks
- Submittal items in your court
- Items pending approval
- The project selection drop down
- The Announcements area
- The Calendar area
...
e-Builder determines items that are most important for you to look at or work on by pulling information from e-Builder modules for all of your projects. Those items are considered "Workflow in your court". Each time you access this module or refresh the Home page, the most current data is populated; ensuring that all information is accurate and in real time. The graphic is an example of Workflow in your court.

You can control the number of items that appear in Workflow in your court, Submittal items in your court and Items Pending Approval by using the Show drop down above each respective table.
The table for Workflow in your court displays the Project, Name, Subject, Step and Due Date.
- To access the process or form on which your action/comment is required click on the blue link in the Name column and a popup will display with process details.
- To go the processes/form page for that project click the blue link in the Project column.
...
This area of the product is not currently used by MIT DoF.
The first 10 tasks which you have been assigned as a resource or manager will be listed in chronological order. If you are a manager who receives notification when tasks reach a certain level of completion, these tasks will display in your court as well.
Use the Show option to control the number of tasks that appear in the list.
The table for My First 10 Tasks displays the Project, Task, Finish Date, Completion percentage and Manager.
...
This area of the product is not currently used by MIT DoF.
This table displays submittal items. There are two filters for this table:
Filter by Action allows you to see either All in my Court, Action Required or Forwarded and No Response. The latter option displays items that have been forwarded for review on which action not yet been taken. Show allows you to determine the number of Submittal items displayed.
The table for Submittal Items in Your Court displays the Project, Title, #, Rev #, Package #, Status, Due Date and Held By information.
...
The left side panel of your home page is also customizable as you can see in figure 2. Note in figure 1 how the user has selected 3 of the 4 widgets available for the left side panel.
In both the center and the left side panel you can set the order of the widgets. You cannot move a widget between the two.
In the setup starting with the left panel shown we have:
- The Recent Pages links which display the last items you looked at in eBuilder
- The Quick Add links on the left side of the page - great for starting a process quickly
- Announcements
- Events
In the Center we have:
- My Processes - want to see everything currently awaiting your role to take action? This widget a great way to see the workflow in your court. Please note, processes contain steps and steps are assigned at the role level, not the individual user. If you are sharing responsibilities on a project at the role level, you may see item sin this section that your role "peer" is working on in addition to the work in your court. Your peer will see the same. This is normal.
- My Forms - have a form you created or were assigned to that you want to keep "tabs" on? This widget is a great way to see the forms you created or were assigned to respond to.
Did you know that you can now control multiple aspects of your landing page user experience? The above image represents an example of a custom landing page curated by the user. By clicking on "Edit My Home" found on the right-hand side of the screen on the landing page you will see the following:

figure 2
All options are turned "on" when you first log into eBuilder. Take a moment to customize your Home Page so that it best suits the activities and notifications you require to perform your job. Reach out to an eBAdmin for any assistance you may need.
Anchor Navigation Navigation
Navigation
| Navigation | |
| Navigation |
- Tabs across the top of the page that open different modules - you can add or remove any of these tabs by clicking on the ellipsis (the three dots, "..." to the right of the top navigation tabs)

figure 3
| Anchor | ||||
|---|---|---|---|---|
|
Common question folks have is, "What do I do with all of my work when I am not in the office and need a step in a process I and a peer are on to move along?"
What to do if you are going on vacation, out sick, or, simply want to "task share" with a peer you work closely with. Dependent upon the length of your absence you can do the following:
| Anchor | ||||
|---|---|---|---|---|
|
This area of the product is not currently used by MIT DoF. Approvals are handled by workflow within processes.
This table displays cost items that are awaiting approval. MIT Facilities uses processes to obtain most approvals so this table is not being used at this time.
This table displays the Project, Item Type, Item #, Approval Requested by, Date Approval Requested and Amount.
...
Access Delegation
Acting in a timely manner on items that are in your court is important. When you are not going to be able to monitor and take action on e-Builder for Items in your court, for example during vacations, you should delegate your authority in e-Builder.
...
On your e-Builder home screen, click on the arrow next to your name.
Click on Setup.

In the left hand column under “My Settings”, go to “Personal Information.”

Click on “Access Delegation.”

Steps:
Grant Access
Set the user and duration (Start/End Date & Times are required).
Click “Grant.”
| Anchor |
|---|
...
On the right side of the Home page are MIT specific announcements including contact names should you have issues with e-Builder as well as Help Desk session times and locations.
Under announcements are the calendar events occurring for today’s date created in e-Builder. Events are created through the Calendar module in a project. Click on the event for more information.
...

Top Tabs vs Left/Project Menu
Module tabs open modules at the summary level. The summary level typically aggregates and displays information for multiple projects. If you wish to see information for a single project you must select the project from the Project drop down menu.
Left/Project Menu options are project specific. In other words, you must first select a project to view these options. If from here you click on one of the top tabs, you will exit the project and will need to re-select it.
Once you have opened a project you can navigate through the folders for which your role has been given permission. See the section of this manual devoted to Project Documentation for more information.
Recent Pages
Displays a list of recently used e-Builder pages.
Quick Start
This menu allows you to start any form or process instance. The default menu options contain a combination of the first ten processes/forms that you have permission to modify. The ten listed forms/processes will automatically update based on your usage. The most recently created instances will append to the top of the menu list.
First select the desired form or process type from the Quick Start menu. Then from the popup window select the corresponding project and create your instance.
If the form or process you are looking for is not displayed in the defaulted menu list, click the ‘More’ link. The ‘More’ link gives you access to the remaining instances you have permissions to modify.
Once the form/process has been created you will need to access it by first opening the project.
...
|
From any process that you are a responsible actor on a current step you will be given a "Delegate" (figure 4 below) button which you can use to assign the task to another individual on the project.

figure 4
When you click on the "Delegate" action you will see the following (figure 5 below):

figure 5
The only criteria for delegating a step is that the user must be associated to the project as a member. Please reach out to the eBAdmins if you have any questions about this.
| Anchor | ||||
|---|---|---|---|---|
|
On the right side of the Home page are MIT specific announcements including contact names should you have issues with e-Builder as well as Help Desk session times and locations.
Under announcements are the calendar events occurring for today’s date created in e-Builder. Events are created through the Calendar module in a project. Click on the event for more information.
Another question often asked is often started with a statement such as, "there's a lot of information in the system and lots of users and processes add artifacts to the document folders every day. What's the quickest way to find what I am looking for even if I only have partial information? (e.g. an SAP PO # but no eB project number of project name, or a vendor invoice submitted to a project that you want to reference) "
| Anchor | ||||
|---|---|---|---|---|
|
By
The project dropdown menu allows you to open and switch between projects to which you have been granted access.
To quickly find your project you can start typing the project name or project number and it will narrow the list in the menu.
...
By default the search prioritizes words from left to right unless one of the search methods listed below is used.
...
• Ignore any of the noise words listed below.
Use e-Builder Search
...
• Phrase search (""): Double quotes around a word or phrase will search for an exact match to what's in the quotes.
• Exact word search (+): Placing a plus sign immediately before a single word is the equivalent of putting double quotes around that single word. By default the search will look for other forms of a search word. ex: A search of 'test' will look for test, testing, tests, etc. This will eliminate searching for those other forms.
• Terms to exclude (-): Putting a minus sign immediately before a single word will exclude that word from the search results.
• AND operator: Placing AND in all caps in between words/phrases will search for both phrases/words equally.
• OR operator: Placing OR in all caps in between words/phrases will search for either phrase/word.
• (): Parentheses can be used in conjunction with AND and OR to further specify what needs to be searched for ex: (word1 AND word2) OR word3.
Noise Words
$, 0, 1, 2, 3, 4, 5, 6, 7, 8, 9, a, b, c, d, e, f, g, h, i, j, k, l, m, n, o, p, q, r, s, t, u, v, w, x, y, z, about, after, all, also, an, and, another, any, are, as, at, be, because, been, before, being, between, both, but, by, came, can, come, could, did, do, does, each, else, for, from, get, got, had, has, have, he, her, here, him, himself, his, how, if, in, into, is, it, its, just, like, make, many, me, might, more, most, much, must, my, never, now, of, on, only, or, other, our, out, over, re, said, same, see, should, since, so, some, still, such, take, than, that, the, their, them, then, there, these, they, this, those, through, to, too, under, up, use, very, want, was, way, we, well, were, what, when, where, which, while, who, will, with, would, you, your
Search Notes
- Search allows you to complete a key word search on any area of a project across all projects.
- Documents search is restricted to a single project due to the number of results a key word can cause.
- The search can be narrowed down by first selecting a project.
...
All project participants have access to the Project Details page. Key information about the project, including status and target dates can be found in the Project Details. While all project participants can view information, only those with appropriate roles and permissions for the project can edit the details.
Project details should be kept up to date throughout the life of the project. The Project Manager has primary responsibility for updating this information.
To open the Project Details page:
Select a project.
Locate the Project Menu on the left side of the page and click the Details link.
If you are able to edit Project Details an Edit button will appear on the page.
To edit Project Details:
Click on the Edit button
Update the project information in the details page.
Project roles cannot be updated here.
To change project members, please use the 01.03 - Add Existing User to a Project (ADDRE) process or an Action Item form.
Click the Save button.
Edit Project
The Project Details include:
- The project name
- The name of e-Builder Project Administrator
- The project status
- Address
- Country
- Start Date
- Target Date
- Description
- Project Webcam
- Last Modified By
- Date Last Modified
| HTML Comment | |||||||||||||||||
|---|---|---|---|---|---|---|---|---|---|---|---|---|---|---|---|---|---|
|
Notes can be added to the project here
...
| Note |
|---|
The Project Documents section is being rewritten and should be completed on or about 4/30/2018. Please contact an eB administrator for assistance with project documents. |
...
Access to Documentation
There are two ways to access project documentation.
If you have already opened and are working with a project, click the Documents link in the left side Project Menu.
You may access documents from the Documents tab at the top of the Home page, but you will need to select the project before viewing its documents.
Document (Folder) Structure
A standard set of folders is added to each new project. All project documentation should be placed into an appropriately named folder. The image below shows the top level folder structure. Use the Expand All option to see the complete structure in your project or use the + option to expand only one part.

Your role on the project determines:
- the folders you are able to view and use
- your ability to edit, rename or change folders or documents
Folders accessible to external users who are part of the project, for example designers or contractors, are identified with an (E). When adding documents to folders marked with an (E) be sure that you want external users to have access to the information contained in the document.
Upload Multiple Documents
Upload multiple documents into a folder in one step by dragging documents from the folder on your computer to the right hand side of the e-Builder screen.
Menus
The menu under folder name on the right side is for multiple documents. You would select the checkbox to one or more documents and click on an option (Download, Send, Compare, etc.)
The menu under the file name is just for that file.
...
Anyone can email messages/documents into certain e-Builder folders.
The domain for emailing to a project folder is: docs-us2.e-builder.net
The folders enabled for email are identified by a folder/email icon in the folder list. (see below)

To share the email address for a folder:
Click on the folder name.
- Click on Properties.
Copy and share the folder address.
If you wish to enable email into a folder that is not set up for it contact an e-B administrator for assistance.
Sending Documents
Within the documents module you have the ability to send the document to users or nonusers of e-Builder from within the folder.
From the project documents page:
Select the document or documents you want to send.
Click the Send link (top link if multiple documents, link under document name for just that one)
You will have an option of
Fax: Sends to a fax machine anything that can be converted to a PDF
Email: Send the native file or a PDF to any valid email address
As Attachments – will physically attach the document to the email
As Link – will provide a link to the document in e-Builder. They do not have to be an e-Builder user to access. This is recommended if sending large files that may be rejected by the recipient’s IT.
Notify: Use inform another e-Builder user that the file is in the folder. They will be provided a link to that folder and will be required to login.
In your email message, paste the email address.
Check Out versus Download
A document that has been checked out by a user is temporarily locked by that user. Another user will not have the ability to upload a new version of the document until that document has been checked back in. This helps prevent multiple people updating different versions of the same document.
A document that has been checked out will have a check mark in over the document icon next to the document name. If you hover over that icon it will list the person’s name who checked out a document. To check the document back in, a new file with the same name can be uploaded to the folder by the user that checked out the document and it will automatically check the file back in.
Download is used when you do not need to make any updates and would like to review or distribute the file outside of e-Builder.
From time to time it may be necessary to review information about projects to which you are not assigned. To do so you should use View Only rights.
View Only: Access Documents for Other Projects
...
e-Builder's global Search functionality helps you find documents, contact information, forms, processes or other data using one or more search criteria.
By default, performing a search will do the following:
- Prioritize the words from left to right .
- Search through the custom field values, notes and descriptions where applicable.
- Search the contents of certain file types uploaded to the Documents module (including PDFs). File types listed below as excluded from Optical Character Recognition (OCR) will not be searchable for internal content.
To perform a global search
- Click the search button on the top bar. The Search Results page is displayed with a Search Options area.
- In the Search For field, enter the search term(s). This field is required.
- From the Limit Search To drop-down list, select a project to search in.
Click Clear to remove the selected project.
- In the Search In field, select one or more areas to specify the types of information to search in.
You must specify at least one type of information to search in. Click Select All to select all the check boxes and specify the search areas.
—Or—
Click Deselect All to clear all the check boxes. - Click Continue Search. The search results, if any, are displayed in the search results grid. If no results are found in certain search criteria, a notification message is displayed.
To re-do the same search with different search filters, update the search criteria and then click Refine Search.
 To filter the results
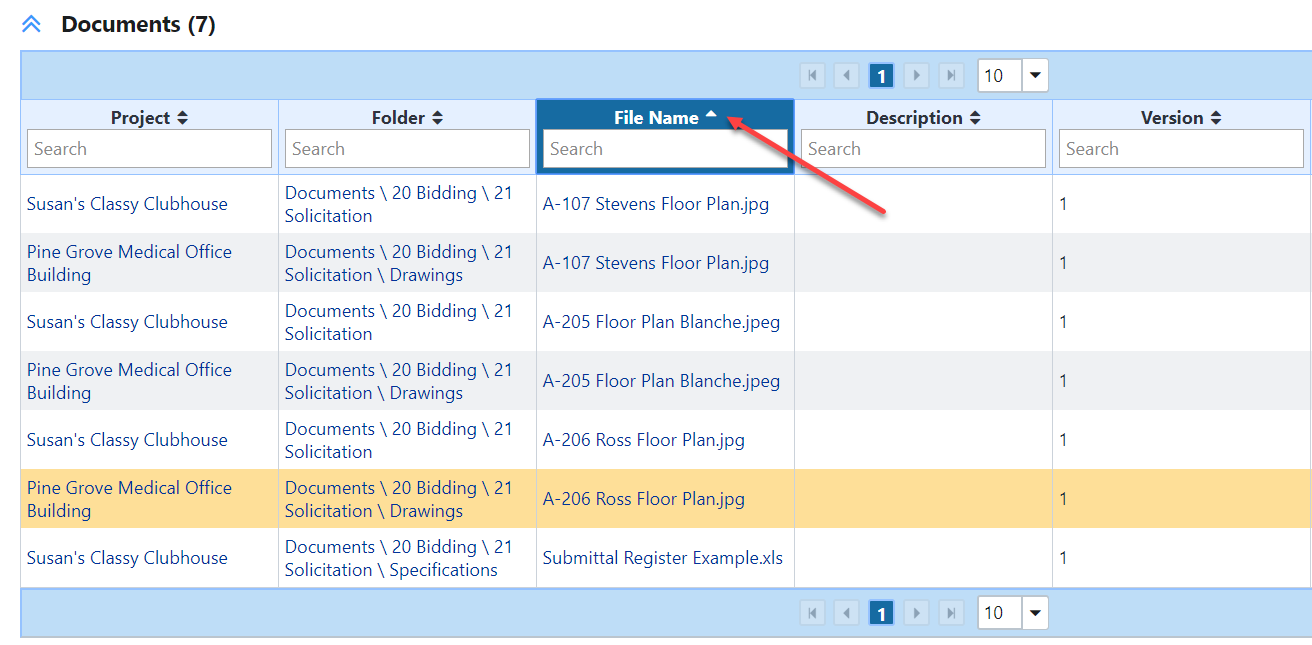
In the search results section, filter the search results by entering the filter criteria in the Search box under each column name. You can enter filter criteria in more than one column at a time. Only the results that match the filter will be displayed.
 To sort the results
In the search results section, sort the search results by clicking the name of a column.
 To export the results
In the search results section, click Explore All Data to export all the search results from a particular module to an MS Excel spreadsheet (.xlsx format).
Anchor Project Details Page Project Details Page
Looking at a Project Details Page
| Project Details Page | |
| Project Details Page |
| Anchor | ||||
|---|---|---|---|---|
|
All project participants have access to the Project Details page. Key information about the project, including status and target dates can be found in the Project Details. While all project participants can view information, only those with appropriate roles and permissions for the project can edit the details. Dependent upon your role, the amount of fields/information will vary.
Project details should be kept up to date throughout the life of the project. The Project Manager has primary responsibility for updating this information.
To open the Project Details page:
Select a project.
Locate the Project Menu on the left side of the page and click the Details link.
If you are able to edit Project Details an Edit button will appear on the page.
To edit Project Details:
Click on the Edit button
Update the project information in the details page.
Project roles cannot be updated here.
To change project members, please use the 01.03 - Add Existing User to a Project (ADDRE) process or an Action Item form.
Click the Save button.
Edit Project
The Project Details include:
- The project name
- The name of e-Builder Project Administrator
- The project status
- Address
- Country
- Start Date
- Target Date
- Description
- Project Webcam
- Last Modified By
- Date Last Modified
| HTML Comment | |||||||||||||||||
|---|---|---|---|---|---|---|---|---|---|---|---|---|---|---|---|---|---|
|
Notes
Notes can be added to the project here
| Anchor | ||||
|---|---|---|---|---|
|
Access to project documents is limited to e-Builder users who are assigned to the project. Project documents are where all of your project information is recorded and stored. Processes for example, generate artifacts such as PO mail merges and these are filed automatically into to your project folders. Note: at the beginning of setting up a project you are provided with a uniform project folder template. It is important to get to know the layout of the folders as this will help you navigate them when searching for artifacts. Documents stored by processes always have a "properties" setting. If you are not sure where to find a document directly in a folder, open the process it was created in, locate the file and click on the properties link, A window will open. You will see a field named "Location". This tells you where the document is located.
Access to Documentation
There are two ways to access project documentation.
If you have already opened and are working with a project, click the Documents link in the left side Project Menu.
You may access documents from the Documents tab at the top of the Home page, but you will need to select the project before viewing its documents.
Document (Folder) Structure
A standard set of folders is added to each new project. All project documentation should be placed into an appropriately named folder. The image below shows the top level folder structure. Use the Expand All option to see the complete structure in your project or use the + option to expand only one part.
Your role on the project determines:
- the folders you are able to view and use
- your ability to edit, rename or change folders or documents
Folders accessible to external users who are part of the project, for example designers or contractors, are identified with an (E). When adding documents to folders marked with an (E) be sure that you want external users to have access to the information contained in the document.
Upload Multiple Documents
Upload multiple documents into a folder in one step by dragging documents from the folder on your computer to the right hand side of the e-Builder screen.
Menus
The menu under folder name on the right side is for multiple documents. You would select the checkbox to one or more documents and click on an option (Download, Send, Compare, etc.)
The menu under the file name is just for that file.
| Anchor | ||||
|---|---|---|---|---|
Anyone can email messages/documents into certain e-Builder folders.
The domain for emailing to a project folder is: docs-us2.e-builder.net
The folders enabled for email are identified by a folder/email icon in the folder list. (see below)
To share the email address for a folder:
Click on the folder name.
- Click on Properties.
Copy and share the folder address.
If you wish to enable email into a folder that is not set up for it contact an e-B administrator for assistance.
Sending Documents
Within the documents module you have the ability to send the document to users or nonusers of e-Builder from within the folder.
From the project documents page:
Select the document or documents you want to send.
Click the Send link (top link if multiple documents, link under document name for just that one)
You will have an option of
Fax: Sends to a fax machine anything that can be converted to a PDF
Email: Send the native file or a PDF to any valid email address
As Attachments – will physically attach the document to the email
As Link – will provide a link to the document in e-Builder. They do not have to be an e-Builder user to access. This is recommended if sending large files that may be rejected by the recipient’s IT.
Notify: Use inform another e-Builder user that the file is in the folder. They will be provided a link to that folder and will be required to login.
In your email message, paste the email address.
Check Out versus Download
A document that has been checked out by a user is temporarily locked by that user. Another user will not have the ability to upload a new version of the document until that document has been checked back in. This helps prevent multiple people updating different versions of the same document.
A document that has been checked out will have a check mark in over the document icon next to the document name. If you hover over that icon it will list the person’s name who checked out a document. To check the document back in, a new file with the same name can be uploaded to the folder by the user that checked out the document and it will automatically check the file back in.
Download is used when you do not need to make any updates and would like to review or distribute the file outside of e-Builder.
From time to time it may be necessary to review information about projects to which you are not assigned. To do so you should use View Only rights.
View Only: Access Documents for Other Projects
| Anchor | ||||
|---|---|---|---|---|
|
View only is a mode which you must enable. When finished you must disable the view only mode and return to using your login account.
To use View Only mode:
Open e-Builder.
In the top right corner, click on the arrow by your name.
Click on “View Only”

To exit from View Only mode, go back to the top right and click on your own name.

All project documentation should be added to/stored in e-Builder. When internal or external participants are uploading files into the system, they are required to specify a folder in the document structure, which ensures that all files within the system are stored in a central location.
The advantages of using the e-Builder documents module are:
- All project members are able to access the most up-to-date files from any location, at any time.
- The Documents module makes it easy to share documents via email, fax or through notification.
- Collaboration is enhanced as team members are able to work on files collectively, check files in and out of the system, and redline documents while maintaining document version control.
Forms
Forms are used to have a ball-in-court communication. The initiator selects and submits a form and sends it to another e-Builder user. That person becomes responsible for responding. They need to either complete the form and send it back or they have the ability to send it to others for additional comments or information. Each send makes a new person responsible to complete the item until the initiator or a role with permissions marks it complete.
Creating a Form
Select a Project:
Click on Forms in the left-hand column
Click on Fill Out Form on the right side of the screen.
Note: You will only be able to fill out forms you have access to.
Select a Form.
Fill out the details of the form and select the recipient. Recipients must be e-Builder users.
Note: All fields with a red asterisks are required before sending.
Click the documents, processes or forms tab to attach supporting documentation.
Click “Post Form”
Replying to a Form
To find forms created related to a project:
In the Filter Forms: Select Forms In My Court” , “Opened” and
‘All Workflow and Static Forms” and click filter
Select a Form in the grid.
Fill out the details of the form click Reply. This will allow to send the form back to the originator and add comments.
Click “Reply” again.
Note: You can also forward the form to another user if additional review or action is needed.
Closing a Form
From in the Project Form Page:
In the Filter Forms: Select Forms In My Court” , “Opened” and
‘All Workflow and Static Forms” and click filter
Select a Form in the grid.
Review the details, if everything looks complete, click “Close Form”.
EXAMPLE: Opening an Action item
Every project has a left hand navigation panel:
Forms is the SECOND Icon
Click the FORMS ICON
And you will see this in the main panel of the web page:

Then, click the button Fill Out Form
And you will see this:

Action Items is the first choice – click it and you will see this form that you can fill out:

Once you've filled the Action Item form out, click "Post Form".
This will create a ticket that goes straight to an eBAdmin's court. When the eBAdmin completes the work you get notified by the system that the work has been completed. You will always be able to see it. Any comments added to it (by any eBAdmin) will notify you as well that there’s been activity on your request.
...
| Anchor | ||||
|---|---|---|---|---|
|
About the Cost Module
The e-Builder Cost module facilitates the cost management process for owner participants, as well as external program participants that are involved in the finances of the program and its individual projects. It standardizes the tracking of costs across an entire program including income collected in funding sources, budget changes, commitment changes, and actual costs.
The capabilities of this module streamline the cost management process between all parties while reducing the effort, time, and cost associated with the typical manual process. Actions throughout this module are permissions based, therefore some data and actions are restricted from users that do not have the appropriate permission to view or take specific actions. If you do not see features or data that you think you should have access to, contact your account administrator so they can adjust your cost permissions accordingly.
Key Concepts
Before you start using the e-Builder Cost module online help, you should familiarize yourself with some key concepts used throughout this section.
Most everything in e-Builder takes place within the context of a project. In order for you to begin your budget process you first have to create a project. Each real world project is associated with a project in e-Builder. If you are working on the real world project, your project administrator or manager can add you as a member of a project in e-Builder.
Account codes are the codes used to categorize the costs on all projects. A collection of codes are used to create the budget for the project and specific costs are assigned to the account codes in the budget. By using these consistent account codes across all projects you can consistently associate all of the costs on one or more projects with specific categories and easily report on these costs.
Every commitment and actual cost that is entered is associated with a company. The company must be created in the Contacts module of your account. The companies listed in the contacts module can also be used as a reference for all users that have access to view contacts.![]() Funding Sources
Funding Sources
A budget is the original detailed cost estimate for your project.
A commitment is a promise that you make to a seller to purchase goods or services in exchange for money in accordance with specific terms and conditions. The most common types of commitments are contracts and purchase orders.
Actual Costs are project expenses and invoices that have been approved for payment. Examples include invoices, reimbursable expenses, and contractor applications for payment.
Cash Flow is used to project the amount of money that will be expended each month in the remaining life of a project. These forecasts can be reported at the program level in the Reports module to plan program wide cash flow needs in future months, quarters, or years.
In the Cost Summary for a project the (Over/Under) shows the expected variance to budget for the project. For example, an over/under of zero means that a project is expected to be exactly on budget. The over/under is automatically calculated based on the data entered for the project.
In the Budget, Commitment, and Actual Cost areas of the Cost module each item that is entered has a status which indicates whether or not it has been finalized. Every item is first placed in draft status so that it can be reviewed before proceeding. Depending on what type of item is being entered, its status can move through intermediate steps before it becomes approved.
Projected is a status indicator that is available for commitment and budget changes. It is used to indicate when there is a possible change to an existing commitment or line item in the budget. By entering these items the team can gain visibility into any anticipated changes before they occur.
Pending is a status indicator that is available for commitments, commitment changes, and budget changes. It is used to indicate when there is a likely change to an existing commitment or line item in the budget. It is also used to record commitments that are likely to occur, but are not yet finalized- such as a verbal acceptance of a contract but the signed copy has not been received. By entering these items the team can gain visibility into any anticipated changes before they occur.
A commitment Invoice is an actual cost associated with an existing commitment. For example, a request for payment from a vendor that you have a contract with would be entered as a commitment invoice.
A general invoice is an actual cost that does not have an associated commitment. For example, a fee paid to the city for a permit is typically entered as a general invoice.
To use View Only mode:
...
Open e-Builder.
...
In the top right corner, click on the arrow by your name.
...
All project documentation should be added to/stored in e-Builder. When internal or external participants are uploading files into the system, they are required to specify a folder in the document structure, which ensures that all files within the system are stored in a central location.
The advantages of using the e-Builder documents module are:
- All project members are able to access the most up-to-date files from any location, at any time.
- The Documents module makes it easy to share documents via email, fax or through notification.
- Collaboration is enhanced as team members are able to work on files collectively, check files in and out of the system, and redline documents while maintaining document version control.
Forms
Forms are used to have a ball-in-court communication. The initiator selects and submits a form and sends it to another e-Builder user. That person becomes responsible for responding. They need to either complete the form and send it back or they have the ability to send it to others for additional comments or information. Each send makes a new person responsible to complete the item until the initiator or a role with permissions marks it complete.
Creating a Form
Select a Project:
Click on Forms in the left-hand column
Click on Fill Out Form on the right side of the screen.
Note: You will only be able to fill out forms you have access to.
Select a Form.
Fill out the details of the form and select the recipient. Recipients must be e-Builder users.
Note: All fields with a red asterisks are required before sending.
Click the documents, processes or forms tab to attach supporting documentation.
Click “Post Form”
Replying to a Form
To find forms created related to a project:
In the Filter Forms: Select Forms In My Court” , “Opened” and
‘All Workflow and Static Forms” and click filter
Select a Form in the grid.
Fill out the details of the form click Reply. This will allow to send the form back to the originator and add comments.
Click “Reply” again.
Note: You can also forward the form to another user if additional review or action is needed.
Closing a Form
From in the Project Form Page:
In the Filter Forms: Select Forms In My Court” , “Opened” and
‘All Workflow and Static Forms” and click filter
Select a Form in the grid.
Review the details, if everything looks complete, click “Close Form”.
EXAMPLE: Opening an Action item
Every project has a left hand navigation panel:
Forms is the SECOND Icon
Click the FORMS ICON
And you will see this in the main panel of the web page:
Then, click the button Fill Out Form
And you will see this:
Action Items is the first choice – click it and you will see this form that you can fill out:
Once you've filled the Action Item form out, click "Post Form".
This will create a ticket that goes straight to an eBAdmin's court. When the eBAdmin completes the work you get notified by the system that the work has been completed. You will always be able to see it. Any comments added to it (by any eBAdmin) will notify you as well that there’s been activity on your request.
...
Click here for e-Builder documentation for the Cost module.
Other information about the cost module is below.
| Document | Description |
|---|---|
| Unallocated Reserve Calculations.docx | This document describes the calculation of unallocated reserve in the Cost module and the impact on calculating the Estimate at Completion. The document contains best practices that will ensure accuracy in reporting. |
...
| Anchor | ||||
|---|---|---|---|---|
|
...
Once you have reviewed the item in your court, click on one of the buttons to initiate the appropriate action. You will see only actions that apply to the process given the designed workflow and your role.
| Field | Description |
|---|---|
Accept/Decline | The option to accept or decline to act on a process step is only available if there are multiple actors on the step and this option is configured in the account settings. If you click Decline, the process step will no longer appear in your court. |
Workflow Override | This button displays only for administrators and users with manage workflow permissions. Click this button to override the step and move the process instance to another step in the process. - eBAdmins only |
All Fields View | This button displays for administrators and user with manage workflow permissions only. Click this button to view a list of all data fields and their values for the process. - eBAdmins only |
Help | Click this link to view instructions for the process written by the process creator. If a data field has a question mark icon displayed to the right of the field name then hover over it for additional help content for that field. |
Show History | Click this link to open the routing history page and view an audit trail of the process. |
Show Workflow Diagram | Click this link to view the workflow diagram. The current step will be highlighted. |
Current Actors | Click this link to view current actors on the process steps. |
Take Action | Click the drop-down arrow to the left of this field to select an action to take, and then click this button to take the action. Taking action will move the process to the next step in the workflow. See Action Dropdown below |
Check Spelling | Click this button to check the spelling of data fields on this page. |
Submit | Click this button to complete the start step when initiating a process. |
Forward | This button only display if the step has been configured for flexible routing by your account administrator. Click this button to forward the process to another user on the project. |
Reply | This button only display if the step has been configured for flexible routing by your account administrator. Click this button to reply to the user on the project that forwarded the process to you. |
Click this button to print the process step. Based the settings for this step, this button may or may not appear. | |
Copy | This button displays for processes that are already in progress. Click this button to duplicate the process instance. This capability allows you to carry over existing, reusable information, reducing data entry efforts. Once a process instance is copied, data entry fields are copied as well, such as custom fields, data fields, company and contact information and reason codes. If this is a cost process, all cost data is also carried over with the exception of line items and dynamic line items. |
Delegate | Click this button to delegate the current step to another user on the project. |
Save | Click this button to Save the current filled out data and return to it at a later time. |
Delete Draft | This button displays only for account administrators, the process initiator and users with the permissions to access draft processes. Click to delete the draft. |
Cancel | Click this button to cancel the current action. All unsaved data will be lost. |
Details Tab | The Details tab list all data fields for the process. |
Comments Tab | Click the Comments tab to view a list of comments added to the process in chronological order. Date and time stamps are included. If a document or process is attached it also can be referenced here. From here you can also add and request comments. |
Attached Documents Tab | Click the Attached Documents tab to download and view a list of documents attached to the process. From here you can also attach documents as a reference or supporting evidence, such as a sketch, plan, specification, or budget. |
Attached Processes Tab | Click the Attached Processes tab to view a list of documents attached to the process. From here you can also attach documents as reference or supporting evidence, such as a Request for Information to a Potential Change Order. |
Attached Forms Tab | This tab will only display if the Forms module is enabled on your account. Click the Attached Forms tab to view a list of forms attached to the process. You can also attach forms as reference or supporting evidence. |
Attached To Tab | Click the Attached To tab to view a list of processes that this process is attached to. |
Action Dropdown

If you are an actor on a step and are responsible for completing the task you will see this drop down with the actions you may take. Use the Show Workflow Diagram button if you wish to see the next process step.
...
Click on the comments tab to add a comment or see comments from others. In addition, any documents, another form or another process can be attached in the following tabs.
| Anchor | ||||
|---|---|---|---|---|
|
Schedules provide a mechanism for tracking project tasks, duration, milestones and resources. All projects are provided with a standard project timeline. Note: you are responsible for adjusting start and end dates to match your projects notional timeline and then to set a baseline for the schedule. While you are encouraged to add additional subtasks to the master tasks presented, in the spirit of consistency across reporting, you are discouraged to kindly leave the naming conventions of the existing tasks as providedSchedules provide a mechanism for tracking project tasks, duration, milestones and resources.
Actors and Responsibilities
| Who | Event |
|---|---|
| e-B admin | When a new project is created in e-Builder the e-Builder admin applies an MIT-specific template to the project schedule. The template helps ensure consistency at the highest task levels across all projects in e-Builder. This is necessary for reporting across the project portfolio. |
| Schedule Mangers | The schedule manager has responsibility for maintaining the project schedule. |
It is common to assign a project manager |
as the schedule manager |
. All members in a role that has at least one person assigned as schedule manager will have schedule access and privileges to edit a schedule can also adjust the schedule manager assignment without having to contact an eBAdmin. Reach out to the eBAdmins if you have any questions about this. | |
| Project Resources (participants) | Update the schedule for tasks to which they are assigned. |
Opening a Project Schedule
...
Right button click on the task and choose Add to add a sub-task.
Activate the Schedule
By design, when a PM begins to work in a schedule it is viewable only to the Schedule Manager (the Project Manager) and the e-Builder administrator. This allows the Project Manager to develop the schedule and choose when to make it available to the rest of the project team.
...
Complete the fields required for this bid package. Only fields with an asterisk are required, however it is likely that you will use more than only the required fields. Each field on the page appears in the below table with an explanation of the field.
| Field | Description |
|---|---|
| Bid Package Name | Enter the name of the Bidding Package. The name will be seen by bidders and identifies the bid package to them. |
| Bid Package Description | A description of the bid that is seen by invited bidders in the bidding portal. |
| Pre-Bid Meeting Date Time | The date and time for the pre-bid meeting or site walk. |
| Pre-Bid Meeting Location | The location of the pre-bid meeting or gathering point if the meeting includes a site walk. |
| Required to attend pre-bid meeting. | Check the box if you are requiring attendance at the pre-bid meeting in order to accept bids from potential bidders. |
| Bidding Contact | This field defaults to the project manager as assigned in e-Builder. |
| Bid Start Date/Time | The time that the bid will be visible to invited bidders in the e-Builder bidders portal. |
| Bid Due Date/Time | The date and time that bids are due. |
| Bid Time Zone | The time zone for the above time related items. In most cases this field will remain unchanged as it defaults to Eastern time. |
| Tentative Award Date | The expected date of the reward. |
| Tentative Work Start Date | The planned start of the work. |
| Tentative Work Finish Date | The planned finish date. |
| Allow Bids After Due Date | Use this option to allow bids to be submitted after the due date has been reached. Bidders do not see this date but using it will make it possible to accept late bids. |
Bid Sq Ft | Enter the square footage of the project. This may not be applicable to all bids. |
| Bid Instructions Document | If you wish to add a document containing specific bid instructions for the bidders you may upload it here. |
| Allow Electronic Bid Submission | Always enable this option as MIT Facilities wishes to accept only electronic bid submissions. |
| Bid Documents Folder | The folder into which bid documents are placed. These are documents intended for review by the bidders. All documents in the Bid Documents folder will be accessible to all bidders. Prior to releasing the bid this folder should be reviewed to ensure that all bid documents are included and that any documents not intended for review by bidders are removed. |
| Bid Response Supporting Documentation Folder | The folder into which supporting documentation from bidders will be placed. The bidder provided documents will be placed into a system generated sub-folder within the folder specified. This will separate documents by bidder for easier review and help ensure confidentiality between competing bidders. |
| Supporting Documentation Required | Check to require the bidder to include at least one supporting document at the time they submit their bid. When this option is used the bidder cannot submit the bid until at least one document has been attached. |
| Bid Submission Custom Fields | Bidding custom fields are definable fields that drive reporting for bids when bidding and sending invitations. Custom fields are created to contain additional event information that is not part of the standard bid information or used in reports to define or separate bids. There are two options for bidding custom fields: Bid Package and Invitation. |
| Allow Public Bids | Do not check this box. MIT DoF typically does not use a public bidding system. |
| Bid Award to Commitment | When a bid is awarded a purchase order/commitment will be generated. When released, this will start the 04.04 Issue PO process. This setting is enabled for all bids through a system admin setting. |
| Check this box to include such attachments. |
| Bid Item Custom Field 1 | You may create a custom field to which the bidder will need to respond as part of the bid response. |
| Bid Item Custom Field 2 | Same as above. |
| Bid Item Custom Field 3 | Same as above. |
Access Bid Package Details Page for Existing Bids
...
 The Bid Package Details page is a central location in the Bidding module There are multiple tabs on the page from which you are able to manage the entire bid process. The tabs appear after the Bid Package Details are saved or when you access an existing bid package for editing/further development.
The tabs are:
| Tab | Function |
|---|---|
| Bidding Details | Displays a page containing the bid package details. |
| Bid Scope | Displays a page on which you define the scope of the bid. |
| Potential Bidders | Displays a page of designated potential bidders. For MIT Facilities projects the bidders entered should be those approved in the 04.0 Bidding Process. |
| Invited Bidders | Displays a page of the Invited Bidders, their status with respect to the bid ... |
| Bid Documents | Displays a page on which documents related to the bid are designated to be included in the bid portal where they are viewed by bidders. |
| Questions/Responses | Provides a mechanism for receiving questions from bidders and for responding to one or all bidders with an answer. |
| Bid Tabulation | Displays a page containing the bids and provides the project manager with tools to tabulate the bids. |
| Permissions | Allows certain users to set bid permissions. |
| Bid History | A time-stamped history of steps and actions on this bid package. |
Working with the Bid Scope
...
There are three Status settings.
| Status | Definition |
|---|---|
| Pending | All bids are set to this status at the time the invitation is sent and prior to any response from the bidder. |
| Will Bid | When the system automatically sets the status to Will Bid that indicates that the bid has been opened and that the bidder has set the status to Will Bid indicating an intention to bid on the project. |
| Will Not Bid | When the system automatically sets the status to Will Not Bid that indicates that the bid has been opened and that the bidder has set the status to Will Not Bid indicating that no bid will be submitted on the project. |
If you wish to manually set the status:
...
- Re-Invite
- Revoke
- Award
- Delete
| Option | Definition |
|---|---|
| Re-Invite | Select this option to resend an invitation to bid. |
| Revoke | Select this option to remove the bidder from participating in the bid but keep them in the invited bidders list for historical purposes. |
| Delete | Select this option to remove the bidder entirely from the bid. No history will be retained. A bid manager will likely only use this option for bidders invited in error. |
Working with Bid Documents
...
Adjusted values will be used for PO's and commitments.
| HTML Comment |
|---|
Reports Access to Reports Reports are accessed through the Reports Module. Click on the Reports Tab to open the module. The Reports page appears The Reports Page
Filter By default the e-Builder system displays all reports by category. You may filter the type and number of reports you view on the page by using the Filter dropdown menu or by searching for a specific report. Report Actions To run a report click on the report name. The results of the report will be displayed. You may find that an existing report meets most, but not all, of your needs. In those cases it may be easier to edit the existing report. You may edit a report either before or after it has run. To edit the report prior to running Click the Edit link to change the parameters used to run the report. |
