Survey PipingPiping feature allows to insert/replace texts in the survey while respondent is answering the survey. Piping is a way to make a survey dynamic and more personal. Example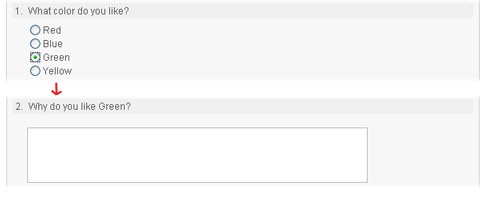
The respondents answer to the question "What color do you like?" is used as part of the following question "Why do you like ____?". In this example the respondent chose "Green" for the source question, therefore the piping question becomes "Why do you like Green?". This is an example of a "Question Response" type of piping.
| Background Color |
|---|
| Piping Types |
There are three types of piping:Question ResponseThe piping value is taken from a response to a previous question. The above example is a "Question Response" question. Things to remember: - The piping source question must be set before the piping can be used, I.E. the source question must come before any piping questions.
- The source question must be on a separate page from piping questions. See Working with Page Breaks.
Invitee DataThis piping type pulls a value from the invitee list. The value can be: - Invitee name - Name of the invitee.
- Invitee email - Email of the invitee .
- Invitee ID - The unique ID that is determined by the system.
- Invitee attribute - This is custom data that is set when the invitee list is created.
For more information on invitations and invitee lists see, Working with Invitations. Fixed ValueFixed value piping is useful for creating survey templates where unique pieces of text, such as class name, number, department, etc, are piping values. The same survey can be used for multiple groups of respondents - the piping values being the only piece of the survey that needs to be changed. | Background Color |
|---|
| Creating New Piping |
Directions to Create New Piping- Select "Piping" on the navigation bar.
- Select "New Piping".
- Enter the name of the piping and which type of piping you want to create.
- Click "Continue".
- Select the "Source Question".
- The name of the piping, the source question number, and the type of source question will be displayed.
- Click "Save" to create the piping.
- Click "Continue".
- Select the invitee data to use as piping: invitee name, invitee email, invitee ID, or custom invitee attribute. If you choose "invitee attribute", enter the name of the custom attribute.
- Click "Save" to create the piping.
- Enter the value.
Note: This is what will appear on the survey in place of the piping tag. - Click "Continue" to create the piping.
| Background Color |
|---|
| Utilizing Piping |
You must create piping before you can use it within a question.Directions to Use Piping Within your Survey- Create a question where piping is to be used.
- Enter the piping tag where you want the piping to appear in the question:
| Code Block |
|---|
${Name_of_Piping} |
This can be done by: - Entering the whole piping tag, including the name of the piping.
- Typing the first half of the piping tag "${" will create a list of all available piping associating with the survey. Click on the piping you want to use.
- Click "Save".
| Background Color |
|---|
| Renaming and Deleting Existing Piping |
Directions to Edit Existing Piping- Select "Piping" on the navigation bar.
- Select the corresponding "Delete" or "Rename" link of the piping you want to edit.
- Click "Save".
|