BL2-level safety at the microscopy core. Users who need to image live human and non-human primate samples MUST read these instructions.
Who should read this?
BL2 users must read these safety policies and take a short training session in BL2 imaging practices with core personnel.
Make sure to read the BL1 Safety Policies [link] before continuing.
Key Points for BL2 Usage
- Determine whether your sample is BL1 or BL2 (see below). Ask us if unsure!
- BL2 sign and extra preparation are required while imaging BL2 samples
- Don't pipette or add to your samples on the microscope stage!
- Use our local BL2 manipulation area for that
- Transport samples in airtight secondary containers with latching lids.
- MIT users must amend their BRR to include the microscopy core.
- You need ~30 min of additional training to image BL2 samples!
- You must bring your PPE and secondary container for BL2 training! We will postpone your training if you do not bring these items.
Is my sample BL1 or BL2?
BL2 (Risk Group 2) material contain potentially harmful agents such as oncogenic rDNA, human materials, human and non-human primate cell lines, human pathogens, or live rodents with human xenografts.
After fixation, most human and mouse tissues and cells are no longer pathogenic and therefore Risk Group 1. Fixed samples may be observed under standard BL1 laboratory safety conditions. Live non-human specimens such as mouse cell lines that do NOT contain human pathogens are also BL1.
Unfixed samples that include ANY human tissue or live human or primate primary cells or cell lines are considered Risk Group 2 agents and require BL2-level imaging. Imaging of live Risk Group 2 (BL2) samples is strictly controlled.
What the HEK?
What about cell lines like HeLa, MCF7, MEF, U2OS, OVCAR-3?
- Is it human? Is it alive? Then it requires BL2.
- Is it a rodent line? Then BL1 is fine.
- If you are unsure whether your cell line is of human or non-primate origin, search for it on ATCC.
Yes, imaging live HEK or HeLa cell lines requires BL2 and extra training! ALL live human or primate derived cell lines require BL2.
Still unsure? Please check with core personnel if you are unsure whether your sample is BL1 or BL2.
BL2+ specimens such as cells with active or live lentivirus are not permitted in the KIMCF.
Elevated BL2 Operation Requirements
Elevating a room to BL2
BL2 specimens such as live human-derived cells require the temporary raising of a room to BL2 status with proper signage and decontamination at the end of your session. See below.
Pay attention to BL1 and BL2 signs outside of each microscope room.
Research Registration Requirements
MIT researchers (internal users) must have approval under their biological research registration (BRR) for use of the materials. BRR status will be verified and you must amend your BRR to include the KI-MCF (rooms 76-280 and 76-281) as a location in Section 2. Here is the current BRR location amendment form [⬇️ download]. Please coordinate the amendment with the EHS rep for your home department and CC core director Jeffrey Kuhn (jrkuhn@mit.edu) in your email. We need to screen the form too.
We cannot provide BL2 services to external entities. All BL2 entities MUST have an existing BRR to amend.
Training Requirements
All BL2-level work requires blood-borne pathogen training with NO exceptions.
All BL2 users must take a short training session in BL2 imaging practices with core personnel.
You must bring your lab coat, safety goggles, and secondary container for BL2 training! We will postpone your training if you do not bring these items.
Elevated Risk Signage Requirements
- BL2-level work in individual microscope rooms must be disclosed to other facility users.
- While BL2-level live cell experiments are being performed, the microscope room door shall remain closed and a BL2 sign placed outside the instrument room door.
- A BL2 sign is stored inside the door of each room. Place the sign on the Velcro strips outside of the door, such that the BL2 sign is clearly visible and covers the BL1 sign.
- Read through the BL2 laboratory practices sign on the inside of the door to refresh your memory.
- After decontamination and cleanup, individual rooms must be returned to BL1 status and sign removed.
Imaging BL2 Samples at the KI-MCF
Personal Protective Equipment
- All BL-2 level work, REQUIRES lab coat, gloves, and safety goggles.
- Gloves are provided by the core facility. Users must bring any other PPE they require.
- Some BL2-level work requires a face mask. Consult the exposure control plan in your BRR.
Sample Preparation and Transport
Secondary containers
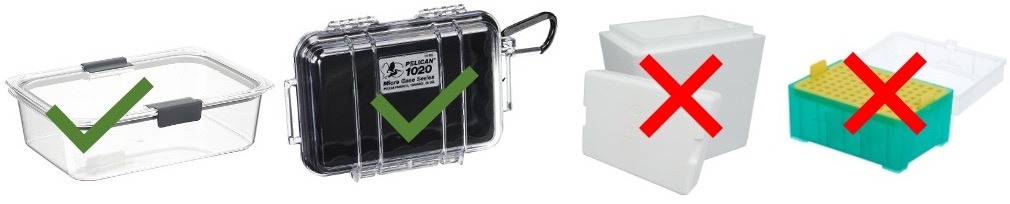
Secondary transport containers are one of the most important aspects of BL2 operation. They should contain any spills while transporting your sample to, from, or within the core. The lids must stay on and the container must remain sealed if it is dropped! The secondary container must be liquid tight, have a latching lid, and tough hinges that will not break. You can find airtight plastic food storage containers with latching lids at many stores. Pelican also makes great safe secondary containers in their Micro Case series.
Do NOT use styrofoam containers or pipette tip boxes as secondary containers.
Sample Requirements
- Samples should be prepared and sealed in the user's home lab.
- Well-plates should be sealed with adhesive film and lids replaced. Apply parafilm to secure lids in place.
- Sample liquid volumes for BL2-level work shall be less than 0.5 mL per sample well, totaling to a maximum of 5.0 mL per sample plate.
- If preparing slides, coverslips should be sealed in place using nail polish or wax sealant such as VALAP.
- Consult with core personnel for alternate imaging chambers.
- All specimens MUST be transported to, from, and within the core in approved secondary containers. Well plates must be carried in a container with a locking lid. Slides may be placed within a 2nd container like a petri dish with lid which can be secured with parafilm during transport. For other cases, do not assume your secondary transport container is adequate. Always consult with core personnel for appropriate secondary containers prior to starting BL2-level work.
Sample Manipulation Area
- The fume hood in 76-280 may be used for brief manipulation of samples, including adding reagents or pipetting from well-to-well.
- Use pipettes and tip waste container kept within the fume hood. Do not remove. If you need additional equipment, please arrange with core staff.
- As with sample prepared in your home lab, samples must be transported within the core facility in a secondary container. Place your plate back in its secondary container to carry it to the imaging room!
- As with microscope rooms, a BL2 sign must be placed on the fume hood while it contains BL2 material.
- Use a fresh square of blotting paper for sample manipulation.
- Use the sink next to the fume hood for any emergencies. We will keep a supply of bleach under the sink in 76-280 and large buckets for sample decontamination above the sink.
- Small spills within or near the fume hood will be blotted and disinfected with 10% bleach using the spray bottle within the fume hood. Contact for at least 10 minutes, and dispose of any waste in the biological waste containers.
- When done, spray the blotting paper with 10% bleach, let sit for 2 minutes, and dispose in the biological waste container. Then spray the work surface of the fume hood and pipettes with 10% bleach, let sit for 2 minutes, wipe clean with a paper towel. Spray again with 70% ethanol and wipe clean to remove residual bleach.
- Dispose of sharps and pipette tips in the sharps box in the hood. Dispose of larger solid waste (paper towels, blotting paper) in the biological waste container.
37º Incubation
- You may temporarily keep samples in the CO2 incubator in 76-280.
- Most microscopes have an enclosed warming chamber for 37ºC live imaging.
- Turn on the scope warming chamber 30 minutes before you need to image to equilibrate. Or pre-arrange with core staff if you are not local.
- Most scopes also have CO2 for bicarbonate-based imaging buffer.
- Do not use phenol red in your buffer for fluorescent imaging.
Imaging
Aerosol generation or spillage might occur during imaging if (1) the chamber is overfilled or not adequately sealed, (2) the chamber handled too forcefully while placing on or removing from the imaging platform, or (3) the objective lens is raised so far that the glass coverslip holding the sample is broken. Samples on the microscope platform are held within an isolated plexiglass or metal box surrounding the microscope to limit exposure in these cases. Sample volumes are limited to 5.0 mL total to minimize spillage.
- Remove the culture dish or slide from its secondary transport container and place it immediately on the microscope stage. If you can perform this procedure within the plexiglass warming chamber surrounding the microscope and perform it safely, please do so!
- The culture dish or imaging chamber must have a lid, and the lid shall remain attached while moving the chamber.
- Some microscopes have an optional glass cover for long-term imaging. Once the culture dish is secured on the microscope stage, the dish lid may be carefully replaced with the microscope's imaging lid if necessary for your experiments. Do not pipette during this stage and do not remove the dish's lid from the scope chamber. Keep the old lid on the microscope stage! Do not forget to replace the imaging lid with the dish lid before removing your sample. Be sure to decontaminate the stage area where you stored the dish's lid.
- Do not remove, pipette, add reagents to, or manipulate live cells or risk group 2 samples in any way while at the microscope. Use the sample manipulation area described above.
- When done, place your sample back in its secondary container for transport back to your lab.
- Live Pathogens: For handling samples that contain live pathogen (e.g. Salmonella enterica) or parasites (Plasmodium), imaging dishes with tight-fitting and/or closable lids shall be used, e.g. ibidi or In Vitro Scientific 35 mm dishes. The lids must be parafilmed to the dish, and transported to the MCF in a crush-proof hard-sided container. At the microscope, the imaging dish will remain parafilmed at all times.
Spills
- Small spills within the microscope or within a facility room will be blotted and disinfected with CaviCide wipes. Cover the affected area with two or more CaviCide wipes and let sit for at least five (5) minutes before blotting up the spill.
- Any spills on the microscope stage or objective will be cleaned with CaviCide wipes. Do NOT use bleach on metal microscope parts or optics.
Decontamination and Return to normal risk (BL1)
- Place your sample back in its secondary container.
- Wipe the eyepieces and eyepiece pillar with CaviCide wipes.
- Wipe the microscope stage, chamber, doors, buttons, work surfaces, and anything you touched with CaviCide wipes.
- Log out from the instrument computer and wipe the keyboard and mouse with CaviCide wipes.
- Spray a large Kimwipe with 70% ethanol and wipe everything again, especially the eyepieces, microscope stage, keyboard, and mouse.
- Remove the BL2 sign from the Velcro strips outside of the door and place it on the Velcro strips inside of the door. Place it back on the Velcro strips inside of the door such that the BL2 warning is now obscured.
- Samples that require retention may be transported back to the home laboratory but they must be placed in a secondary container for transport.
- Solid waste may be disposed of in a biowaste box or sharps container (for glass) within either of the KI-MCF anterooms. Solid waste is not to be transported through the hallway between facility room blocks.
- Liquid wastes of 5 mL or less may be transported back to the home laboratory in a secondary container, or may be decontaminated in the Sample Manipulation Fume Hood (see above).
- Prepare the sample manipulation hood with a BL2 sign and fresh blotting paper.
- Prepare enough fresh 10% bleach solution to cover your sample chamber completely.
- Place your sample chamber under the decontamination solution for AT LEAST 20 minutes , swirling occasionally. Please verify sample contact time and appropriate disinfectant for your application first!
- You may dump decontaminated liquid waste in the sink and solid waste (sample chamber) in the biological waste bin next to the sink.
- Clean and return the sample manipulation hood to BL1 status as instructed above.
- Wash your hands in one of the core facility's sinks before leaving the core.