Once you have the collection material transferred to digital archival storage, you will need to make sure it is ready for processing in Archivematica.
Initial steps
If you created disk images and plan to fully process their contents in Archivematica (not just stored in Backlog until you have time to fully process) then you should go to the Disk image extraction section before doing the steps below.
Making changes to your transfer package
Ensure appraisal or rearrangement actions are reflected in the checksum file
If you have made changes to the package created with CCA tools (from logical transfer or disk image extraction), such as deleting or changing organization of the files in the "objects" folder, you will have to make changes to the appropriate checksum.md5 file within the SIP. Making sure it is accurate ensures that Archivematica will be able to check all the files transferred correctly. If not, proceed to step 4.
- Copy the checksum.md5 file into the submissionDocumentation folder and rename it original_checksum.md5
- Return to the checksum.md5 file in the metadata folder and open it in a text editor to remove the lines for the files or directories that have been deleted.
- Edit the paths listed for items that you have moved since initial package creation so they reflect their current location.
- If you have not done so, record your rearrangement and appraisal actions in the processing information note in the finding aid.
Adding required metadata files to the package
Through Archivematica we can use specific metadata files in the transfer package so metadata is transferred correctly with the package. If you have analyzed the transfer files already for possible restricted content and found that there is a restriction, proceed to the Creating and adding the rights restriction file section. If you have found no restrictions you can proceed directly to the Creating and adding the metadata file section.
Creating and adding the rights restriction file
Adding information about restrictions is done through a CSV file called "rights.csv" and is required if you have found restricted content. DDC uses this file for the options included for recording restrictions but there are also options for actual usage rights (licenses, copyright, etc.), hence the name of the file.
There is a template included in the Transfer folder that you can edit for your needs, which is titled "rights.csv", this is the same as what the file will be named that you include in the package. The template includes three rows; an example of a restriction for the full package, an example of a restriction for a folder, and an example for a restriction of an individual item.
The rights csv only works on the file level at present. If not at the file level, the Archivematica transfer will fail. We are hoping to get this changed and therefore have left the other examples in place. You can describe restrictions/rights later at the full-package level through the Archivematica dashboard following step 5b under Ingest in this documentation.
The three examples also are examples of the three most common basis types of restriction; policy, statute, and donor ("other" is also an option in rare cases where a restriction does not fit those categories). In the event there is a copyright or license situation that should be noted, you would also have an entry for copyright or license. Below are the fields used in the CSV with descriptions for each, images come from the example template.
- file: the path that the package/folder/file is located. If describing a restriction of the entire package, this will always be just "objects". In the case of folders or files you will list objects/ first and then the rest of the path. If your content is in a bag, you will need to put /data instead of /objects for folders and files so Archivematica looks in the correct place.
- basis: the basis of restriction, there are three choices we generally use: policy, statute. and donor ("other" is also an option in rare cases where a restriction does not fit those categories). In the event there is a copyright or license situation that should be noted, you would also have an entry for copyright or license.
- status: his field is only used for copyrighted content. This should always be "copyrighted" for copyrighted content.
- determination_date: the date you determined the statute applied to these records, most likely the present date. It is in YYYY-MM-DD format. This only used for restrictions with the basis: statute or copyright. It will allow us in the future to determine what version of the statute was in place at the time of the determination.

- jurisdiction: the jurisdiction where the statute or copyright applies, it is not used for the other restriction types. This will be entered using ISO 3166 alpha-2 country codes or subdivision code (often for states), most often used are "us" for United States or "us-ma" for Massachusetts.
- start_date: the start date of the restriction, if on the package or folder level, the oldest dates of a restricted file within the grouping. The start date of the copyright or license will be determined by relevant copyright law and/or donor or license agreement.
- end_date: the end date of the restriction often the restriction time period after the start date (the start date plus 50 years, for instance). If on the package or folder level, this will be the date plus the restriction period of the newest file with a restriction (newest file date plus 50 years, for instance). If the restriction end date is based on a donor policy reliant on an unknown end date (for instance the death of the creator), then this field should be left blank. The end date of the copyright or license will be determined by relevant copyright law and/or donor or license agreement.
- terms: terms is only used when describing a license. This may be when a donor retains copyright to some/all of their collection but assigns a license for use to the content. The most common being Creative Commons licenses. For instance: "This content is licensed under the Creative Commons Attribution-Share Alike 3.0 Unported license"
citation: the citation to the statute relevant to this restriction. This is only used with basis: statute. The most often used are FERPA, MA 201 CMR section 17, HIPAA, Attorney-client privilege, and Legal work product.
- note: the description of the restriction based on restriction type. For example, "student records, restricted for 75 years". In regards to copyright and license, note any additional information as necessary.

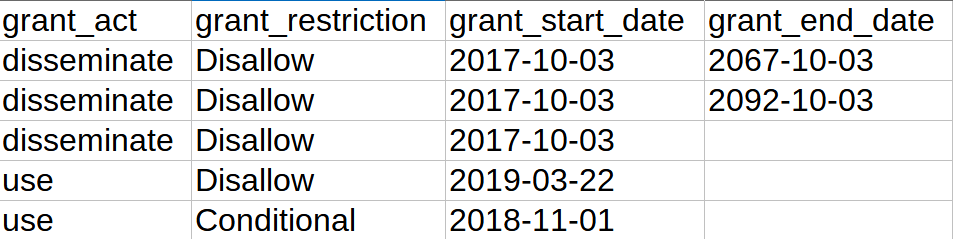
- grant_act: indicates the type of preservation repository action being described. For restricted content, this will always be "disseminate". For license/copyright it would be "use".
- grant_restriction: indicates whether the action in step 9 is allowed or not. For restricted content, this will always be "Disallow". For license/copyright this can be Allow, Disallow, or Conditional depending on the terms.
- grant_start_date: the same date listed in the first start_date field above.
- grant_end_date: the same date listed in the first end_date field above.
When finished, save a copy of file as a CSV in the “metadata” folder within the package you are transferring in Archivematica.
Note
If you have a bag where the “metadata” folder was created within the “data” folder or if you have not determined the restriction status because you are waiting to analyze the files in Archivematica, adding the restrictions metadata will wait until a later step in Archivematica and would only be for the entire package (see Archivematica processing step 5b under Ingest). In the case of this type of bag, adding it to the metadata folder now would cause the bag to be invalid.
- Move onto the Creating and adding the metadata file section.
Creating and adding the metadata file
If you have analyzed the files already for possible restricted content and/or have determined what level of digital preservation commitment these files require, you should create a metadata csv file with this information to be included with the package(s) going through Archivematica. If you have not analyzed the files yet, go to the section above. If you are just transferring the files into Archivematica Backlog for processing later, continue to step 2.
- There is a template included in the Transfer folder that you can edit for your needs, which is titled metadata.csv, this is the same as what the file will be named that you include in the package.
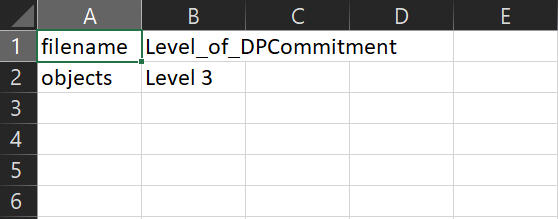
- Open the template, there should be at least two heading columns.
- Column 1 is the “filename”, this should always be “objects”.
- Column 2 is the “Level_of_DPCommitment” which should be the appropriate level for the specific package, such as “Level 3”.
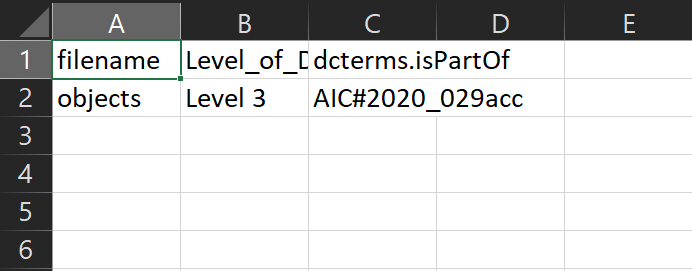
- If you are putting through multiple packages (each with it’s own metadata file) as part of the same transfer (e.g. 2020_029_001, 2020_029_002, etc.), you will need a third column called “dcterms.isPartOf”. In that field you will enter the identifier for the group of packages, adding “AIC#” to the beginning. For instance, “AIC#2020_029acc”.
Save the file as a copy in the “metadata” folder within the package you are transferring in Archivematica.
Note
If you have a bag where the “metadata” folder was created within the “data” folder or if you have not determined the level of digital preservation commitment because you are waiting to analyze the files in Archivematica, adding the CSV metadata will wait until a later step in Archivematica (see Archivematica processing step 5a under Ingest). In the case of this type of bag, adding it to the metadata folder now would cause the bag to be invalid.
Creating a zip file and uploading to the submission bucket
Once you have finalized your born-digital workflows package(s), you will need to zip it up for both ease of upload and also so some of the file system metadata remains intact (modified dates in particular) for recording in the preservation metadata. If you are processing digitized packages from the imaging lab, go to the "uploading digitization packages to the submission bucket" section below.
- Create a zip file(s) from your package(s), ensuring the zip file(s) has the same name as your package(s), for instance 2026_001acc.zip or 2026_001_001.zip.
- Access Cyberduck (the Ongoing Cyberduck use documentation) and click into the submission s3 bucket bookmark.
- Drag and drop your zip file(s) into the "Transfer" folder in the submission bucket. Fixity of the package will be checked fully when ingested into Archivematica.
- Go to the Final steps section.
Uploading digitization packages to the submission bucket
Digitization packages are currently transferred as bags to the cdps-processing/Digitized folder on the NAS. In order for a new transfer to be accessible to Archivematica, you will need to upload it to the submission s3 bucket "Digitized subfolder.
Option 1: Cyberduck
- Locate the package you want to upload in cdps-processing/Digitized
- Access Cyberduck (the Ongoing Cyberduck use documentation) and click into the submission s3 bucket bookmark.
- Drag and drop your zip file(s) into the "Transfer" folder in the submission bucket. Fixity of the package will be checked fully when ingested into Archivematica.
- Go to the Final steps section.
Option 2: AWS command line
While Cyberduck can be easy to use, it can be slow for larger packages and can take up a lot of your computer's resources depending on your settings. Another option that can be faster is the AWS command line app.
- Open your terminal
- Follow step 1a in the Connect to s3 Bucket documentation
- Locate the package you want to upload in cdps-processing/Digitized
Use the
synccommand to sync the digitization package on the NAS to the "Digitized" folder, for instance in Powershell on Windows, you could run the following below. Replacebucket-namewith the s3 submission bucket name listed in this document.aws s3 sync Q:\Digitized\2026_082RR_001\ s3://bucket-name/Digitized/2026_082RR_001 --profile Archivematica-Prod-Workloads
- Go to the Final steps section.
Final steps
Open Archivematica and click “Browse”, select the "DDC Transfer Source" or "DDC Digitized Transfer Source" from the drop down list depending on your type of package. Now you can proceed to the Archivematica processing steps.