This is a manual for creating accession records at the MIT Department of Distinctive Collections. Required and optional fields are listed and explained; examples are provided when further guidance may be helpful. Fields not mentioned in this manual should not be used in accession records.
This is a living document that will be updated to reflect changes in local practice and stay current with new releases of ArchivesSpace. The December 2016 version of this document is located here.
Cited sources: Describing Archives: A Content Standard (DACS) and Canadian Archival Accession Information Standard (CAAIS)
Table of Contents
Basic Information Section
Title (required; DACS 2.3, CAAIS 1.4)
- Other than “MIT,” acronyms and initialisms should be spelled out, e.g. Association of MIT Alumnae oral history, not AMITA oral history
- Titles should be in natural order, e.g. Shirley Ann Jackson personal archives, not Jackson, Shirley Ann personal archives (DACS 2.3.5)
For the initial accession of a new collection:
If the accession consists of one or two specific forms or items, list them individually, e.g. MIT Community Players scrapbooks (DACS 2.3.20)
If more than two forms or items are present, use “personal archives” for papers of faculty and other individuals; “records” for organizational records, including the records of specific administrators; or “collection” for assembled collections, usually from multiple sources.
- Examples:
Paul L. Penfield, Jr. personal archives
MIT Chemical Society records
MIT Office of the Dean for Student Affairs records
Collection on Ellen Swallow Richards
- For additions to existing collections:
- If the accession consists of one or two specific forms or items, list them individually, e.g. Radar Training School class of 1942 photograph and notebook (DACS 2.3.20)
- If more than two forms or items are present, the title should identify the new accession as a transfer (for AC collections) or as an accrual (for MC collections) with the year and month of the donation included.
- Examples:
- Center for Environmental Health Sciences 2018 October transfer
- MIT Collection on Student Life 2017 April accrual
- Examples:
- For digital material transferred from physical media in existing collections:
- The title should identify it as a digital media transfer with the year and month that you started the work
- Example: Lisa Redfield Peattie papers 2019 September digital media transfer
Identifier (required; CAAIS 1.2)
- Identifiers are the accession numbers. The first text field contains the four digit fiscal year and the second text field contains the next three digit sequential number with leading zeros as needed, e.g. 2019-004
Accession Date (required)
- The date when the accession arrived at DDC. If the arrival date is unknown, use the date when the accession record was created (the accession record creation date is the default for this field and should be updated if you know the arrival date).
Content Description (required; DACS 3.1, CAAIS 3.3)
- A succinct description of the topics documented and types of materials in the accession. This should just be one chunk of text; avoid line breaks.
Condition Description (DACS 4.2.5, CAAIS 4.3.2)
- A description of preservation concerns regarding the accession. Use sparingly only to describe major preservation issues such as mold, e.g. Moldy materials in flagged folder in Box 2
Disposition Note (required; DACS 5.3.4 & 7.1.8, CAAIS 4.4.2)
- A description of where materials from the accession were placed, including specific box numbers when applicable. If materials from the accession end up in more than one collection/location, this should be made clear in the description. This field should also be used to note any separated materials that were returned to the donor, transferred to another institution, or destroyed/recycled during the accessioning process. (Use the Deaccessions Section to note any separations made after the materials went through the accessioning process and were made available to researchers.)
- Examples:
- Created new collection (MC-0123)
- Added to AC-0123 as Boxes 5-6; approximately 1 cubic foot of publications determined out of scope and returned to donor
- Added to Box 10 of MC-0456; duplicate material consisting of reprints and unmarked articles by others weeded and recycled
- Created new series (Series 4: Alumni Association of New England); deleted 11 emails containing SSNs or credit card numbers
Provenance (required; DACS 5.2, CAAIS 2.1)
- The source from which DDC acquired the materials and the method of acquisition, including specific software used to acquire digital content. There should be an Agent Record for any individuals named here as donors or facilitators of records transfers (“sources”) in the Agent Links section. When the provenance is unknown, state “There is no documentation concerning the provenance of these materials.”
- Examples:
- Shipped to DDC by Jane Doe, Jr., daughter of Jane Doe, Sr.
- Annual transfer of boxes sent to DDC by office manager Pam Beesly
- Email ingested through ePADD and then transferred to DDC submission storage
- Paper records packed and picked up by Kari Smith on November 1; digital files on external USB drive received from donor on November 7
- Transferred using the Archives Transfer Tool
Inventory
- Use to note the existence of a donor-provided inventory if applicable. Do not use this field to create preliminary inventories.
- Examples
- Excel folder list created by the donor is located in the digital control file and linked as an external document
- Box inventory provided by the donor in paper form is in the physical control file
General Note
- A catch-all note to be used sparingly for information that doesn’t fit in any other field
Acquisition Type (required; CAAIS 1.6)
- Choose the appropriate option from the drop down menu
- Deposit: Manuscript collections received without guarantee of a deed of gift in the near future
- Gift: Most manuscript accessions received from individuals (including MIT faculty and alumni) or organizations that are not directly part of MIT’s administrative structure
- Purchase: Manuscript collections purchased from a private seller
- Transfer: MIT records received from academic departments and programs, administrative offices, and research labs and centers, which do not require a deed of gift
- Found in Repository: Accessions for which the provenance is unknown, e.g. materials found when cleaning out a workspace or loose in the stacks
Resource Type (required)
- Choose the appropriate option from the drop down menu
- Collection: Purposefully assembled collections, often but not always from multiple sources, e.g. MIT Collection on Student Life
- Papers: Collections of individuals (including MIT faculty), e.g. Gordon H. Pettengill personal archives
- Publications: Accessions made up entirely of published works
- Records: Collections of organizations or specific units and offices within larger organizations, including both those within and outside of MIT’s administrative structure, e.g. Office of the Treasurer records
Restrictions Apply? (required)
- This box is checked by default since there are use restrictions on all collections
Publish?
- For accession records, make sure this box is not checked
Access Restrictions?
- Check this box if there are access restrictions
Access Restrictions Note (required; DACS 4.1)
- For MIT records, note any restrictions based on the Institute Records Access Statement. For manuscript collections, note any restrictions based on the donor agreement for new collections or the access note in the finding aid for existing collections. If the access restrictions for the accession differ from those of the collection into which it is placed, the access restriction statement should reflect the accession, not the collection. If the accession is not restricted, use the statement “Materials are open.”
- Consult the Archivist for Collections if you think there is a compelling reason to impose restrictions not specified in the Institute Records Access Policy or deed of gift, e.g. privacy concerns. Note that this field should only be used to describe intellectual limits on access, not restrictions based on physical condition or technical requirements.
- Examples:
- Materials in Boxes 10-15 are closed for 75 years from the date of their creation due to the presence of student academic files. All other materials are open for research use.
All materials are restricted for 20 years from the date of their creation in accordance with MIT’s Institute Records Access Policy. Additionally, select folders are closed for 75 years due to the presence of personnel information; these restrictions are noted in the folder list for Series 2 and on the relevant boxes and folders.
Emails are restricted for 10 years in accordance with the donor agreement. All other materials are open for research use.
Use Restrictions? (required)
This box is checked by default since there are use restrictions on all collections
Use Restrictions Note (required; DACS 4.4)
- Use the following statement for archival accessions (AC collections):
- “Access to collections in the Department of Distinctive Collections is not authorization to publish. Separate written application for permission to publish must be made to Distinctive Collections. Copyright of some items in this collection may be held by respective creators, not by the creating office.”
- Use the following statement for manuscript accessions (MC collections):
- “Access to collections in the Department of Distinctive Collections is not authorization to publish. Separate written application for permission to publish must be made to Distinctive Collections. Copyright of some items in this collection may be held by respective creators, not by the donor(s) of the collection.”
Dates Section (DACS 2.4, CAAIS 3.1)
- Add new date by clicking the “Add Date” button.
Label (required)
- This is set to Creation by default
Expression
- Used only for dates or date spans spelled out in full year/month (and in rare cases day) form, e.g. 2009 September-2010 February, or if using “circa” to indicate uncertainty about dates, e.g. circa 2000-2010. This field is not used if the single date or date range is a simple YYYY or YYYY-YYYY format.
Type (required)
- Choose the appropriate option from the drop down menu
- Bulk Dates: Creation dates applicable to the majority of materials in the accession, excluding any outliers on either end
- Inclusive Dates: Creation dates applicable to all materials in the accession, including outliers on either end
- Single: Use if there is only one creation date for all materials in the accession
Begin (required)
- Numerical value of earliest (or only) creation date in the accession in YYYY, YYYY-MM, or YYYY-MM-DD format
End
- Numerical value of latest creation date in the accession in YYYY, YYYY-MM, or YYYY-MM-DD format
Certainty
- Choose “Approximate” from the drop down menu if dates are uncertain for any reason
Extents Section (DACS 2.5, CAAIS 3.2)
- Add new extent by clicking the “Add Extent” button.
The guidance below follows similar guidance as the Extent section in the processing manual.
Portion (required)
- Select “Whole” if the accession is entirely analog or entirely digital. If it’s a hybrid accession or you want to describe extents of specific types of material, select “Part” and enter analog and digital extents separately. If feasible at this stage, record separate extents for the number and the type of carrier for legacy physical digital and audio-visual material (e.g. things like floppy disks or cassette tapes)
Number (required)
- For analog materials, a numeric value for the number of cubic feet (for single items or anything less than one manuscript box in extent, use numeric value 0.1) or by container or carrier type. For digital materials, a numeric value for the storage space in megabytes, gigabytes, or terabytes.
Type (required)
- See Guide to Extent Types for more information.
Container Summary (required)
- For analog materials, used to describe the containers that the materials were initially housed in when they arrived at DDC. For digital materials, used to describe the size of the accession in digital files; also use to call out specific digital or audio-visual formats that may require special accessioning procedures. Text in the Container Summary field should be in parentheses. See Guide to Extent Types for suggested vocabulary.
- See examples in the Extent section in the processing manual.
Dimension (required depending on Extent Type)
- Required when indicated in the Guide to Extent Types as necessary for that extent type.
Agent Links Section (CAAIS 2.1)
- All records should have a minimum of one agent record linked for the creator and one agent record linked for the source, but some accessions may have multiple creators or sources. If the source or creator is not known, choose the “Unknown” agent. Add a new agent by clicking the Add Agent button (this must be repeated when adding another agent).
- Role: Choose either “Creator” or “Source”
- Agents: Choose from the available agent records or create your own. Instructions for creating agent records can be found in the Appendix.
Related Resources Section
- Connects the accession to its related resource by linking to an existing resource record or creating a new resource record. This step is especially important for new collections because ArchivesSpace serves as the source of record for collection IDs. Accession records can also be linked to multiple resource records, e.g. if materials are placed into several different assembled collections.
- Link to an existing resource record if a transfer or accrual: Click Add Related Resource and use the search function to find the existing resource record by collection IDs or collection title
- To create a new resource record if one does not already exist, spawn a resource record from the current accession record.
- Go to the top of the accession record, save the record, and then click Spawn and choose Resource.
- Complete the required fields to create a minimal resource record. See the Description section in the processing manual for guidance on how to enter the field below
- Collection identifier (collection ID) - find the next one sequentially (either AC or MC collection) by browsing Resources in ArchivesSpace
- Level of description: collection
- Title
- Language
- Extent
- Dates
- Add top containers instances at the box level (can be placeholders without barcodes)
External Documents Section (CAAIS 4.5)
The Digital Control Files are organized by collection ID and in One Drive under in the DDC Digital Control Files folder at this link https://mitprod.sharepoint.com/sites/libraries/ddc/. File names for documents in these folders contain the accession number they pertain to followed by the type of document, e.g. 2019-006_donor_correspondence.pdf. If multiple accessions are associated with a particular collection, there will be subfolders for each accession number within the folder for the collection ID.
- Link to the following types of documents from the Digital Control Files:
- Transfer form (for MIT records)
- Donor agreement form (for one-off manuscript donations)
- Deed of gift form (for larger and/or more complex manuscript donations)
- Email correspondence with the donor
- DDC email correspondence about the accession
- Inventories from the donor
- Surveys or processing plans created by DDC staff
- Notes and photographs from site visits to a donor’s home or office
- Add a new external document by clicking the Add External Document button
- Title: Name of the document or collection of documents without the underscores or file extension
- Examples:
- 2019-006 donor correspondence (if linking to specific document)
- 2018-023 documentation (if linking to subfolder for the accession that contains all of the relevant documentation)
- Examples:
- Location: Select the folder or document which you want to link to and click the copy link button at the top of the page, you can then paste in the link to the location field in ArchivesSpace
- Publish?: Leave unchecked
- Title: Name of the document or collection of documents without the underscores or file extension
Instances Section
This section is only required for accessions when it contains digital material. The instance allows us to track the location of the digital files through the accessioning and processing procedures. For digital materials, this is the “DigitalStorage” where the preservation files are located.
- Type: Use the instance type appropriate for the instance (Textual Materials for email correspondence, etc.). If there is a mix, use Mixed Materials.
- Top Container: Click the down arrow at the end of the input field and select “create”
- Container type: choose “DigitalStorage”
- Indicator: choose the package name that was created in the digital transfer steps (for instance 2017_082acc)
- Click “Add location” and choose the location where the files are stored at present:
- DIG, Submission [directory: unspecified] - general submission area
- DIG, Submission [directory: Transfer] - the Archivematica transfer folder within the submission folder
- DIG, Ingest [directory: amTransferBacklog] - the folder where files are stored when in the Archivematica Transfer Backlog
- DIG, AIPStoreA [directory: unspecified] - the digital preservation storage area for level 3 content where the files will be stored once processed through Archivematica
- DIG, AIPStore4A [directory: unspecified] - the digital preservation storage area for level 4 content where the files will be stored once processed through Archivematica
- DIG, AIPStore5A [directory: unspecified] - the digital preservation storage area for level 5 content where the files will be stored once processed through Archivematica
- Click “Create and Link to Top Container”
- As you move through the digital processing workflow, you should update the location of the container.
- When updating the location once the material is stored in digital preservation storage (i.e. AIPStoreA), change the indicator field to match the name of its base folder in storage, this will be a combination of [AIP name]-[UUID]. The UUID can be found by looking at the archival storage tab in Archivematica.
- For example: 2020_030acc-be76a2c3-52aa-4bd1-a232-081a1dc83d65
- For materials that were processed as an Archival Information Collection (AIC), you will need to do two things:
- edit your original container to reflect information about the AIC using the guidance described above (this container should only be linked to the accession record).
- One slight change is that in front of the information in the indicator field you should also add, “AIC#” with no spaces for example: AIC#2020_036acc-e919211d-af15-4d6c-972e-343274b25c11
- Add containers for each AIP within the AIC, this should follow the guidance above. For instance one of the container indicators should be something like “2020_036_001-8a39848f-4d8d-4b8c-ab62-baa3d0e605a5” and so on.
- edit your original container to reflect information about the AIC using the guidance described above (this container should only be linked to the accession record).
- When updating the location once the material is stored in digital preservation storage (i.e. AIPStoreA), change the indicator field to match the name of its base folder in storage, this will be a combination of [AIP name]-[UUID]. The UUID can be found by looking at the archival storage tab in Archivematica.
Deaccessions Section
This section is only required if materials from the accession were returned to a donor, transferred to another institution, or destroyed/recycled after they went through the accessioning procedures, requiring the alteration of finding aids or other public description. This section is not required if materials are weeded or found to be out of scope during accessioning; these separations can be noted in the Disposition Note in the Basic Information section. Multiple deaccessions can be recorded for a single accession record.
- Add new deaccession by clicking the Add Deaccession button
- Portion: Select “Whole” if the entire accession is being deaccessioned; otherwise, choose “Part”
- Description: Description of the content and type of materials being deaccessioned
- Reason: Explanation for why the materials are being deaccessioned, e.g. Requested by donor
- Disposition: Description indicating what was done with the deaccessioned materials, e.g. Returned to donor
- Notification Given?: When applicable, check this box if notification has been given to the donor or the institution where the records are being transferred
- Deaccession Date
- Label: This is set to Deaccession by default
- Type: Select Single
- Begin: Use the calendar feature to select the exact date (in YYYY-MM-DD format) when the materials were deaccessioned
- Extents
- Portion: Select “Whole” if the entire accession is being deaccessioned; otherwise, choose “Part”
- Number: Numeric value in approximate cubic feet or in megabytes, gigabytes, or terabytes
- Type: Select Cubic Feet or Megabytes/Gigabytes/Terabytes
- Container Summary: For analog materials, used to describe the types of containers, e.g. 1 manuscript box. For digital materials, used to describe the number of digital files.
Collection Management Section
This section is for internal information about how the accession will be or has been processed.
Processing Plan
- If desired, can be used to document steps for processing the accession in cases where a full processing plan/survey is not necessary, e.g. Add description as new series to AC-0123; label and barcode boxes; add to HD manifest.
Processors (required; DACS 8.1.5)
- Name of all staff members who processed the accession. This is especially important if multiple staff members are involved, as may be the case with accessions in both analog and digital formats.
Processing Status (required)
- Choose the appropriate option from the drop down menu and update as you work on the accession
- New: Indicates that this is just a placeholder accession record and no work has yet begun on the accession
- In Progress: Processing of the accession is underway
- Ready for Review: Processing is complete and the accession record is ready for the Processing Team manager to review
- Completed: All accessioning procedures are done and any suggested revisions have been made to the accession record
Events
To create an Event that is automatically attached to an accession record, you must first save the accession record and then go back to view/edit the record. There will be an option in the top right corner of the accession record to add an Event and choose the Event type. You can also create Events directly from the main Create drop down menu, but then you will need to link the Event to the relevant accession record in the Record Links section.
Agreement Signed
For collections that require a deed of gift, use to indicate the deed of gift status
Basic Information:
Type: Agreement Signed
Outcome:
Pass if the deed of gift is both signed by the donor and countersigned by MIT
Partial Pass in any of the following situations:
the deed of gift is only signed by the donor and is not countersigned by MIT
there is no formal deed of gift, but there is correspondence or other documentation in the control folder that shows the donor’s intent to donate the collection to MIT
for oral history collections:
the agreement is missing a signature from either the interviewee or the interviewer
for more recent oral history collections, both the interviewer and interviewee signed the agreement, but there is no countersignature from MIT
Fail if there is no deed of gift and no documentation showing intent to donate
Outcome Note: Use to specify additional information in the following situations. If none of the situations below apply, leave this section blank.
If the Outcome was Partial Pass because the deed of gift is not countersigned by MIT, enter “Not countersigned by MIT”
If the Outcome was Partial Pass because there is no deed of gift but there is documentation showing an intent to formally donate, enter “Evidence of intent to donate, but no deed of gift”
If the Outcome was Partial Pass because it is an oral history interview without a signature from the interviewee or interviewer or (for most recent collections) a signature from MIT, enter either “Oral history without interviewee/interviewer signature” or “Oral history without MIT countersignature” (or both if applicable)
If the outcome was Fail because there is no deed of gift and no documentation showing intent to donate, enter “No deed of gift or evidence of intent to donate”
Event Date/Time:
Date/Time Specifier: Date Subrecord
Label: Event
Type: Single
Begin:
If there is a deed of gift, enter the exact date (in YYYY-MM-DD format) when the deed of gift was signed by the donor
If there is no deed of gift, enter the accession date of the first accession record created for the collection
Agent Links
- Role: Authorizer
Agent: Use the Agent search box to link the Agent Record for the donor to the event. See Appendix for instructions on creating an Agent Record if you haven’t already done so. You can add another Agent Record if more than one person signed the deed of gift by clicking on the plus symbol or the Add Agent Link button.
Record Links
Role: Source
Record: Link to the appropriate resource record and the first accession record created for the collection
Transfer
This is for digital material. This will record when and with what tool you performed a digital transfer, if you also performed a disk image of one or more media in the accession, see the imaging event below. There can be multiple events if you have multiple items. All items that were transferred using the same tool and also had the same outcome can be grouped together as one event.
- Outcome: Pass if the files were successfully transferred; Fail if you were unable to transfer the files or they were damaged in the transfer and are unable to transfer them successfully at this time.
- Outcome note: Describe here if this event pertains to multiple parts of the accession, such as “files transferred for 2020_059_001, 2020_059_002, 2020_059_003”.
- Date/Time:
- Date: Specifier: Date Subrecord.
- Label: Event
- Expression: Leave blank
- Type: Single if describing one day, Range if describing multiple days
- Certainty/Era/Calendar: Leave blank
- Agent Links: There should be two agents:
- Role: Implementer, Agent: Your Name
- Role: Executing Program, Agent: choose the tool (with the correct version number) you used to do the transfer, such as, Exactly 0.1.5
Imaging
This is for digital material. This will record when and with what tool you performed a disk image, if you also performed a logical transfer for one or more media or group of files in the accession, see the Transfer event above. There can be multiple events if you have multiple items. All items that were transferred using the same tool and also had the same outcome can be grouped together as one event.
- Outcome: Pass if the device(s) were successfully imaged; Fail if you were unable to image the device(s) or they were damaged in the process
- Outcome note: Describe here if this event pertains to multiple parts of the accession, such as “disk images for 2020_059_001, 2020_059_002, 2020_059_003”.
- Date/Time:
- Date Specifier: Date Subrecord
- Label: Event
- Expression: Leave blank
- Type: Single if describing one day, Range if describing multiple days
- Certainty/Era/Calendar: Leave blank
- Agent Links: There should be two agents:
- Role: Implementer, Agent: Your Name
- Role: Executing Program, Agent: choose the tool (with the correct version number) you used to do the transfer, such as, Guymager 0.8.8-1
Ingestion
For digital material, this will indicate that you have moved the accessioned material through Archivematica and into digital preservation storage.
- Outcome: Pass if the ingest was successful. If outcome is otherwise, we will not record failures and will try again until successful
- Date/Time specifier: UTC Timestamp
- UTC Timestamp: You can find this under the “Archival Storage” tab in the Archivematica dashboard. The details of the relevant AIP will have a “Date stored” column, copy that into ArchivesSpace
- Agent Links: There should be two agents
- Role: Implementer, Agent: Your Name
- Role: Executing Program, Agent: Archivematica [version number]. If there is a new version of Archivematica, create a new software agent (see creating agent records below). The version number can be found in the Archivematica dashboard under the Administration tab and then by clicking on the Version section on the left-hand side of the screen.
Appendix
Creating Agent Records
Agent Records can be created for individual people, corporate entities, including the offices of administrators, or software. For example, there could be a person Agent Record for “Bourg, Chris,” but the Agent Record for “Massachusetts Institute of Technology. Libraries. Office of the Director” is a corporate entity.
Person
For individuals that have gone by multiple names (e.g. married names, pen names, fuller versions), include variant forms. Do not enter “deadnames” without consent of the person being described.
- Basic Information: Check the box for "Publish"
- Dates of Existence: Complete if known; skip if unknown. See Dates Section for further instructions.
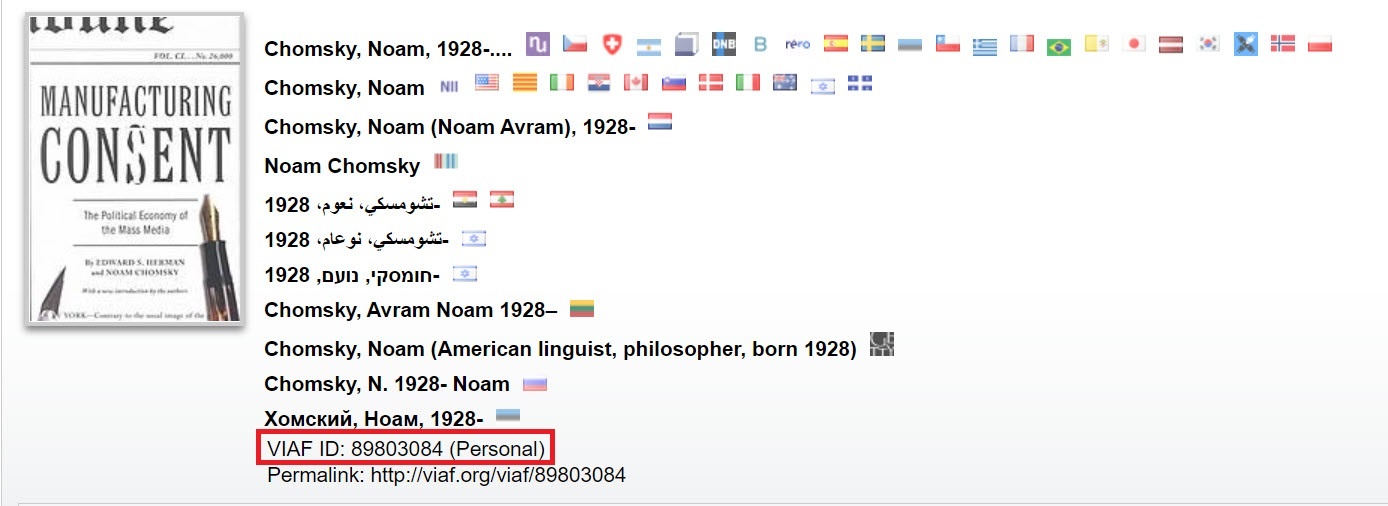
- Authority ID: For established names, this should be the VIAF ID (http://viaf.org/), so 89803084 in the example below. Leave blank if it’s a local name.
- Source (required): If the name is established, select “Virtual International Authority File (VIAF).” If the name is not established, select “Local sources.”
- Rules: If the name is established, select “Resource Description and Access.” If the name is local, select “Describing Archives: A Content Standard.”
- Name Order (required): This is set to Indirect by default
- Primary Part of Name (required): Person’s last name or surname
- Rest of Name (required): First name and middle initial (if known)
- Qualifier: For alumni, enter class year, e.g. Class of 1987
- Contact Details (required for sources): This section is required if you are creating an agent record for a Source (a donor or the person responsible for a transfer of records). Enter all of the contact information that you know (full name, mailing address, email, phone numbers).
Corporate Entity
- Basic Information: Check the box for "Publish"
- Dates of Existence: Complete if known; skip if unknown. See Dates Section for further instructions.
- Authority ID: For established entities, this should be the VIAF ID (http://viaf.org/). Leave blank if it's a local entity.
- Source (required): If the entity is established, select “Virtual International Authority File (VIAF).” If the entity is not established, select “Local sources.”
- Rules (required): If the entity is established, select “Resource Description and Access.” If the entity is not established, select “Describing Archives: A Content Standard.”
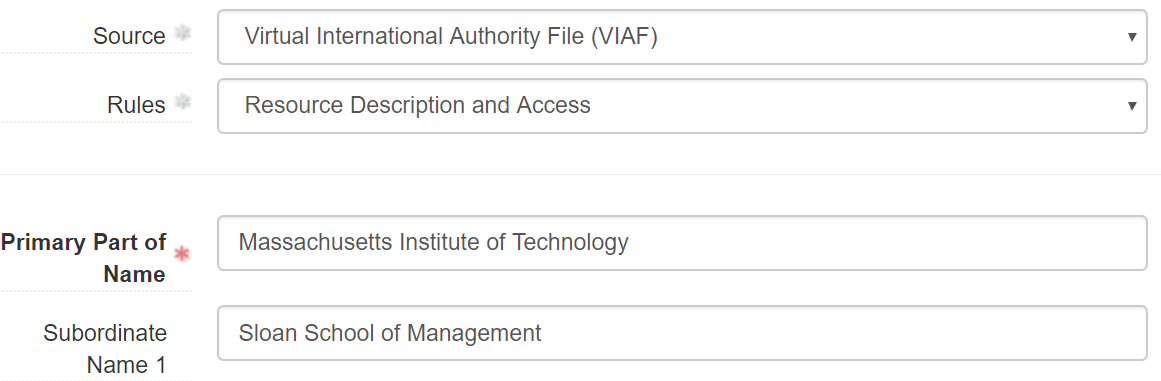
- Primary Part of Name (required): The foremost part of an entity’s name. For MIT administrative offices, academic programs, and research labs and centers, the primary part of name is “Massachusetts Institute of Technology.”
- Subordinate Name 1 (required): A hierarchical unit within the corporate entity named in the Primary Part of Name field, e.g. School of Engineering
- Subordinate Name 2: A hierarchical unit within the corporate entity named in the Subordinate Name 1 field, e.g. Biological Engineering Department
- For established entities, these formatting rules override the established formatting in VIAF. For example, the MIT Sloan School of Management should be formatted as shown in the ArchivesSpace screenshot below, even though this differs from the established version in VIAF. However, the VIAF ID should still be included as the Authority ID for established entities, unless the VIAF formatting is so different from DDC’s standard formatting that it’s uncertain if they represent the same entity.
Software
- Authority ID (optional): For established entities, this should be the VIAF permalink. Leave blank if it’s a local entity. (Software is unlikely to be in VIAF).
- Source (required): If the entity is established, select “Virtual International Authority File (VIAF).” If the entity is not established, select “Local sources.”
- Rules (required): If the entity is established, select “Resource Description and Access.” If the entity is not established, select “Describing Archives: A Content Standard.”
- Software Name (required): The name the software is generally known by, such as Archivematica
- Version (required if available): Version number of the software if you can find it, for instance 1.10
- External Documents (optional): Click add external document and provide a link to the source code if available, Title: Source Code, Location: link to source code
Accessioning Digital Theses
Theses are accessioned in a similar way as most archival content described above, except there are some specific elements to the process for certain fields and are outlined below.
Title
Theses are accessioned by degree period, so the title should reflect that. Each accession should have a titled formatted "MIT theses transfer. (degree period dates) degree period", for instance, "MIT theses transfer. 2021 June degree period."
Extent
Extent largely mirrors the procedures above for digital material (size in MB, GB, TB and number of files listed) but there should also be listed the number of theses transferred. So an example extent would look like this:
- Portion: “Whole”
- Number: Numeric value in megabytes, gigabytes, or terabytes
- Type: Megabytes/Gigabytes/Terabytes
- Container Summary: 4000 digital files or 1052 theses
Agents
It is sufficient to only list the "Source" for these accessions as there are a large amount of creators. Add a source agent for each department/degree program that transferred theses in this degree period.
Instances
Instances are largely the same as described in the general guidance above but it will be same for each instance (i.e. thesis).
- Type: Mixed Materials.
- Top Container: Click the down arrow at the end of the input field and select “create”
- Container type: choose “DigitalStorage”
- Indicator: choose the package name that was created in the digital transfer steps plus the UUID Archivematica appended. The UUID can be found by looking at the archival storage tab in Archivematica. For instance 1721.1_139564-thesis-1-be76a2c3-52aa-4bd1-a232-081a1dc83d65.
- Click “Add location” and choose the location this location for all instances created:
- DIG, AIPStoreA [directory: unspecified]
You will also need to add an instance for each AIC (i.e. Course_01_theses, etc.). That will follow the same guidance as above except with AIC# to start the indicator. You will need to edit an existing instance if you are adding this instance for a degree program that has already transferred theses in a past degree period with an existing AIC.See the Archivematica documentation for details on why this is necessary
- Indicator: AIC#course_01_theses-db3c6bcb-331f-456f-aad0-805e3652b30e