A Shibboleth authentication module, commonly referred to as shib_auth, is available for Drupal 6. It can be found at http://drupal.org/project/shib_auth
The shib_auth module allows you to configure your Drupal site to use Touchstone to authenticate users, instead of the traditional approach of creating all your Drupal user accounts by hand. When the module is installed and configured properly, when someone visits your Drupal site with a valid Touchstone login credential, a Drupal account gets automatically created on-the-fly for the user, and instead of having to type in a manual username and password, Drupal trusts the already-established Touchstone session. This vastly simplifies the administrative task of user creation.
In order to use this authentication module, you will still need to install the Shibboleth SP package on your web server and you will still need to configure and customize the configuration. Once you have done that you will also need to configure the authentication module via the Drupal GUI.
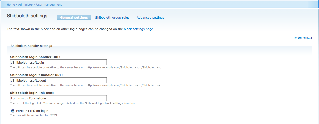
There are three tabs in the module administration for the shib_auth module: General Settings, Group Rules and Advanced Settings. Here is an example screen shot of the three tabs. Click on the image to enlarge it.

Here is an example of the Shibboleth handler settings section (in the General settings tab) for the authentication module when used at MIT, for the host name ist-dev.mit.edu. Click on the image to enlarge it.
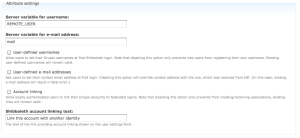
A typical attribute settings section (in the General settings Tab) is shown below. Click on the image to enlarge it.
The entries in the Shibboleth handler settings screen shot above assume that you have used the MIT gen-shib2.sh shell script to configure your shibboleth2.xml file. You should check your shibboleth2.xml file. If you are running Shibboleth SP 2.4 (or higher), you may have a single SSO element within the Sessions element; this configures the login handler location at /Shibboleth.sso/Login:
    <SSO discoveryProtocol="SAMLDS" discoveryURL="https://wayf.mit.edu/DS">
      SAML2 SAML1
    </SSO>
Pre-2.4 configurations will have a section of SessionInitiator elements within the Sessions element; the first one (default) should look like:
    <SessionInitiator type="Chaining" Location="/DS" isDefault="true" id="MIT-DS" relayState="cookie">
        <SessionInitiator type="SAML2" acsIndex="1" template="bindingTemplate.html"/>
        <SessionInitiator type="Shib1" acsIndex="5"/>
        <SessionInitiator type="SAMLDS" URL="https://wayf.mit.edu/DS"/>
    </SessionInitiator>
Note that the Location setting here is /DS, so you would use /Shibboleth.sso/DS as the URL of the login handler.
The elements shown above will direct users to the MIT WAYF/DS (Where Are You From/Discovery) server. This is appropriate if you have an application that will support users from outside of MIT as well as users that have an MIT Kerberos username.
If your application is intended to only be accessible to users that have an MIT Kerberos username then you should specify the MIT IdP entityID (https://idp.mit.edu/shibboleth) as a property of the SSO/SessionInitiator. For a SessionInitiator, an example of this, using the /Login location, is:
    <SessionInitiator type="Chaining" Location="/Login" id="MIT"
            relayState="cookie" entityID="https://idp.mit.edu/shibboleth">
        <SessionInitiator type="SAML2" acsIndex="1" template="bindingTemplate.html"/>
        <SessionInitiator type="Shib1" acsIndex="5"/>
    </SessionInitiator>
Group rules allow you to automatically map Touchstone-authenticated users to specific Drupal roles, based on values in SAML attributes. One common attribute we use here is "affiliation". Here is an example of configuring the Group Rules when using Drupal 6. Click on the image to enlarge it.
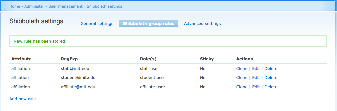
In this example, we have used the three possible values you can get out of the MIT Touchstone attribute, "affiliation" (staff, student, and affiliate) to automatically map new accounts to three new roles we created in Drupal - Staff User, Student User, and Affiliate. By default, Drupal 6 has only two roles: Anonymous user and Authenticated user. Without further configuration, any Drupal account automatically inherits the "Authenticated User" role in Drupal, but you might want to create more roles in order to provide more granular control over permissions. For example, we might want to configure our Drupal site to allow students to see certain kinds of content, but give staff a different default view.
Note that the affiliate attribute is not the only one you can use in the shib_auth module; you could also map a user to a particular role based on the form of the username or email address, giving one role to people who authenticate via the MIT IdP (who will have an email address ending in @mit.edu) and a different role to everyone else (e.g., collaboration account users).