Help is available by sending an email to csf-support@mit.edu
Have any suggestion on how improve this wiki? Please give us your feedback at csf-support@mit.edu
All instructions are for Tomcat 7.0.29. Please check with your team leader and verify which version of Tomcat you should download and install.
Quick Links to:
Download and Install Tomcat 7
If you encounter any broken links, go to the Apache Tomcat web site and select the Tomcat version from the DOWNLOAD section.
- Go to the Apache Tomcat download site. Scroll down until you reach the 7.0.29 section. Under Binary Distributions Core:, select the format for your OS and save the downloaded file to your workstation. If you cannot find version 7.0.29, then follow the directions For older versions of Tomcat below and search of version 7.0.29.
For older versions of Tomcat
If you are looking for an archieve version of Tomcat, go to the Apache Apache Tomcat download site. Scroll down until you reach the Quick Navigation section and click on Archives. Select the version of Tomcat that you want, then click on bin and select the Tomcat format for your OS and save the downloaded file to your workstation. - Unzip/untar the binaries to a new folder (e.g. /tomcat/7.0.9).
- Create an environment variable CATALINA_HOME which contains the path to your Tomcat installation. For example: CATALINA_HOME=/tomcat/7.0.29/
Download and Install Tomcat 7 is now complete
Configure Tomcat 7
- Configure tomcat-users.xml
Open ${CATALINA_HOME}/conf/tomcat-users.xml with a text editor. Create the following 2 uses:• The script user will be used to deploy your application to the Tomcat server.<role rolename="manager-script"/> <role rolename="manager-gui"/> <user username="script" password="XXXXXXXX" roles="manager-script"/> <user username="gui" password="YYYYYYYY" roles="manager-gui"/>
• The gui user will be used to access the Tomcat Manager.
Be sure to change the passwords to passwords of your choice.
When you are satisified that everything is correct, save your changes. - Install the ojdbc6-11.2.0.3.jar
Install the ojdbc6-11.2.0.3.jar in either the ${CATALINA_HOME}/lib or the ${CATALINA_HOME}/common/lib directory. The ojdbc6-11.2.0.3.jar has to go into only one directory.
If you do not have the ojdbc6-11.2.0.3.jar, you can download the ojdbc6-11.2.0.3.jar now and save it to your workstation.
- Configure context.xml
Open ${CATALINA_HOME}/conf/context.xml with a text editor.- For non-Windows systems, change the <context> tag to the following:
For Windows systems, change the <context> tag to the following"
<Context crossContext="true" useHttpOnly="false">
<Context antiResourceLocking="true" crossContext="true" useHttpOnly="false">
By setting antiResourceLocking to true, Tomcat will prevent any file locking. This will significantly impact startup time of applications, but allows full webapp hot deploy and undeploy on platforms or configurations where file locking can occur. If not specified, the default value is false.
Please note that setting this to true has some side effects, including the disabling of JSP reloading in a running server: see Bugzilla 37668.
Please note that setting this flag to true in applications that are outside the appBase for the Host (the webapps directory by default) will cause the application to be deleted on Tomcat shutdown. You probably don't want to do this, so think twice before setting antiResourceLocking=true on a webapp that's outside the appBase for its Host.By default, Tomcat 7 sets HttpOnly to false on all session cookies. This prevents any client side script from accessing the session ID.
DWR uses the session cookie (and the session ID) to protect against cross site scripting attacks. With HTTPOnly set to false, DWR will start popping up “CSRF Security Error” dialogs.
To prevent DWR from popping up “CSRF Security Error” dialogs, useHttpOnly must be set to true. - Add the following Resource Definition anywhere between the <context> and </context> tags:
If your project's JNDI name is something other than MitsisDS, then you must change MitsisDS in the above to your project's JNDI name. If you don't know what JNDI name to use, your team leader can get it for you.
<Resource name="jdbc/MitsisDS"
   auth="Container"
   type="javax.sql.DataSource"
   driverClassName="oracle.jdbc.OracleDriver"
   url="jdbc:oracle:thin:@//earth-vault-2.mit.edu:1523/sundev11"
   username="XXXXXXXX"
   password="YYYYYYYY"
   maxActive="20"
   maxIdle="10"
   maxWait="-1"
   removeAbandoned="true"
   removeAbandonedTimeout="60"
   logAbandoned="true" />

<ResourceLink global="jdbc/MitsisDS" name="jdbc/MitsisDS" type="javax.sql.DataSource"/>
Be sure to change the username and password.You can have more than 1 Resource Definition in your context.xml. The only restriction is that each Resource Definition must have a unique name. Also, for each new Resource Definition, you should also add a corresponding ResourceLink. At the bottom of this page is an example of a context that contains multiple Resource Definitions.
When you are satisified that everything is correct, save the changes.
- For non-Windows systems, change the <context> tag to the following:
- Configure setenv.bat (setenv.bat is for Windows system.)
For non-Windows systems use setenv.sh and convert the code below using the appropriate replacement for set.- Open ${CATALINA_HOME}/bin/setenv.bat with a text editor. If the setenv.bat file does not exist, create it.
- Add the following to setenv.bat:
Be sure to change the following:
set JAVA_HOME=/path/to/Java/jdk1.6.0_27 set PATH=%PATH%;/path/to/maven/apache-maven-2.2.1/bin set MAVEN_OPTS=-Djavax.net.ssl.trustStore=/path/to/keystores/serverTrustStore.jks -Djavax.net.ssl.trustStorePassword=changeit set CATALINA_OPTS=-Djavax.net.ssl.trustStorePassword=changeit -Djavax.net.ssl.keyStorePassword=changeit -Djavax.net.ssl.trustStore=/path/to/keystores/serverTrustStore.jks -Djavax.net.ssl.keyStore=/path/to/keystores/registrar.jks -Dlogs.dir=${user.home} set JAVA_OPTS=-server -Xmx1024m -Xms1024m -XX:MaxPermSize=1024m echo MAVEN_OPTS=%MAVEN_OPTS% echo CATALINA_OPTS=%CATALINA_OPTS% echo JAVA_OPTS=%JAVA_OPTS%- /path/to/Java - the path to your Java JDK installation.
- /path/to/maven - the path to your maven installation.
- /path/to/keystores - the path to your truststore JKS and/or keystore JKS.
- Test the Tomcat installation
- Open a cmd window, cd to ${CATALINA_HOME}/bin and start the tomcat server.
- Open a browse and go to the URL: http://localhost:8080/manager/html.
- When prompted for the username and password, use gui for the user name and enter the password that you choose in Step 1 above.
If everything was done correctly, you will have the following page displayed:
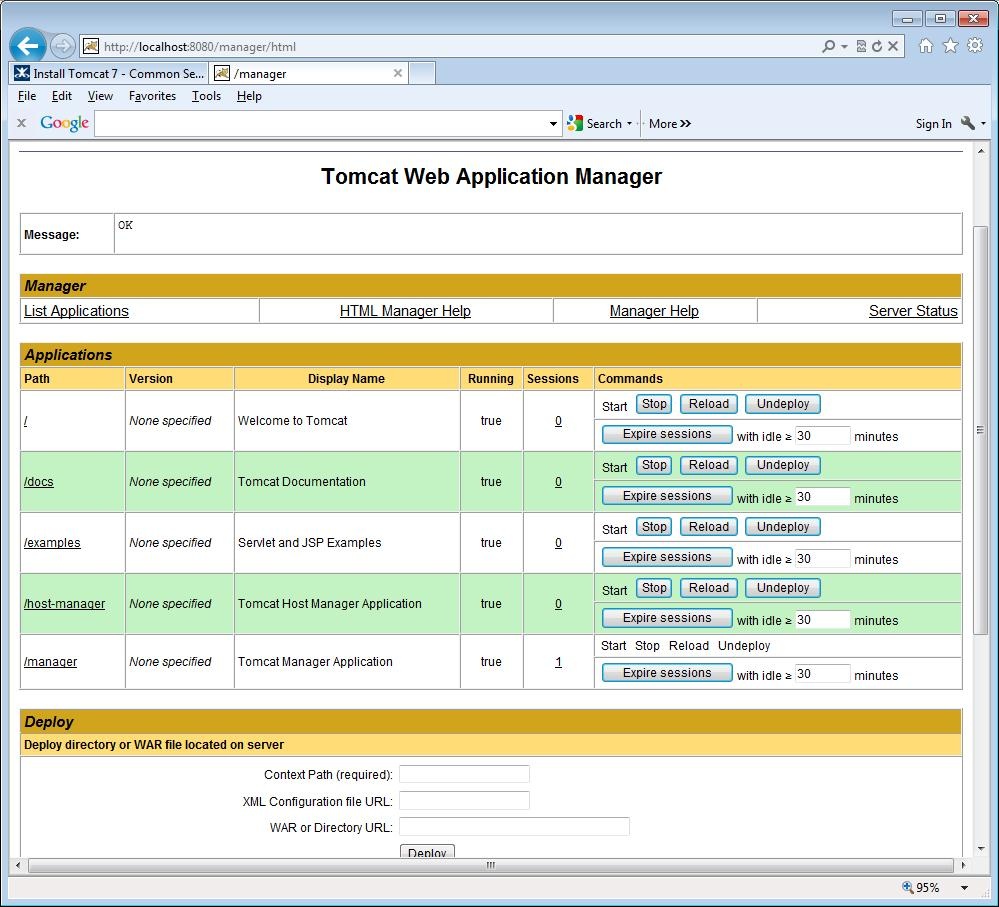
Configure Tomcat 7 is now complete
Example of a context which contains multiple Resource Definitions
In the example below, the first two Resouce Definitions are identical except for the name property.
The third Resource Definition differs not only in the name property but also differs in the type property and has an additional factory property.
In general, you can have as many Resource Definitions as you need just as long as each individual Resource Definition has a unique name property.
<Context antiResourceLocking="true" crossContext="true" useHttpOnly="false">

    <WatchedResource>WEB-INF/web.xml</WatchedResource>

    <Resource name="jdbc/MitsisDs"
        auth="Container"
        type="javax.sql.DataSource"
        driverClassName="oracle.jdbc.OracleDriver"
        url="jdbc:oracle:thin:@//earth-vault-2.mit.edu:1523/sundev2"
        username="mydbusername"
        password="mydbpassword"
        maxActive="20"
        maxIdle="10"
        maxWait="-1"
        removeAbandoned="true"
        removeAbandonedTimeout="60"
        logAbandoned="true" />

    <Resource name="jdbc/iap"
        auth="Container"
        type="javax.sql.DataSource"
        driverClassName="oracle.jdbc.OracleDriver"
        url="jdbc:oracle:thin:@//earth-vault-2.mit.edu:1523/sundev2"
        username="mydbusername"
        password="mydbpassword"
        maxActive="20"
        maxIdle="10"
        maxWait="-1"
        removeAbandoned="true"
        removeAbandonedTimeout="60"
        logAbandoned="true" />

    <Resource name="jdbc/ssb"
        auth="Container"
        type="oracle.jdbc.pool.OracleDataSource"
        driverClassName="oracle.jdbc.OracleDriver"
        factory="oracle.jdbc.pool.OracleDataSourceFactory"
        url="jdbc:oracle:thin:@//earth-vault-2.mit.edu:1523/sundev2"
        username="mydbusername"
        password="mydbpassword"
        maxActive="20"
        maxIdle="10"
        maxWait="-1"
        removeAbandoned="true"
        removeAbandonedTimeout="60"
        logAbandoned="true"/>

    <ResourceLink global="jdbc/MitsisDS" name="jdbc/MitsisDS" type="javax.sql.DataSource"/>
    <ResourceLink global="jdbc/iap" name="jdbc/iap" type="javax.sql.DataSource"/>
    <ResourceLink global="jdbc/ssb" name="jdbc/ssb" type="javax.sql.DataSource"/>

</context>