As of Spring 2018 there is no longer a constructed 6' staircase or the materials to make an identical staircase in the office, although some components of the staircase may still be there. This page remains, however, as it still has some useful tips on how one may wish to build stairs.
This page contains directions for constructing stairs from the pre-made stair kit in the office. As of Fall 2014, there was 1 constructed 6' staircase and the materials to make an identical staircase in the office. Hopefully this is still true. Otherwise, good luck on building your own stairs!
-This staircase will reach a 6’ platform, with the last step up taking you from the staircase to the platform
-Each step is 9” higher than the last step
-Each step is 9” deep
-The steps are 3’ wide, so the staircase is an inch or two wider than 3’ wide
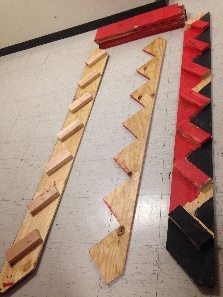
Stair inventory:
-Two side pieces, ~8’ long and 9” wide, shaped like rectangles with the corners cut off. These side pieces have 2x4s attached to them to support each step
-One center piece, ~8’ long, jagged-cut, to support the center of each step
-7 stairs, 3’ long and 9” wide
Stair construction
Note that every place you attempt to put in a screw should already have a hole drilled for you, but that not every hole should get a screw (since some holes are from railings and others are mistakes).
- Lay out the two sides and middle piece, aligning them so that the tops are on the same end and the letters align (so aL is near aRand a).
- Make sure that your 2x4s will be facing inward.
- The side marked with Ls will be on the left if you stand at the top of the staircase
- It should look like this:
-
- Lay out the stairs, aligning the letters so that they match with the letters on the sides (aL will be right next to aL, while aR will be next to aR). The painted sides of the stairs will face upward; the unpainted sides with letters on them will face downward.
- Attach each stair to the top of its left 2x4 by sinking screws through the stair into the 2x4 (holes have been pre-drilled for you). You may find this easiest to do with at least 1 person to help hold.
- Each step should look like this:
- Attach each stair to the left side piece by sinking screws through the side piece into the stair (holes have been pre-drilled for you). Try not to split the wood.
- Repeat steps 3 and 4 on the right side.
- Align the center piece with the holes along the center of the steps. This should also align with the sharpie lines drawn on the steps, and should result in the arrows on each step pointing directly toward an arrow on the center piece.
- Attach each stair to the center piece by sinking screws through the stair into the center piece. Try not to split the wood.
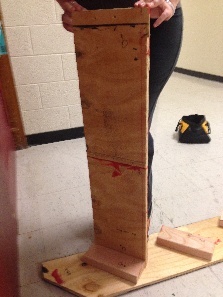
- To make your staircase stand up, attach legs to its underside, near the 4th or 5th or 6th step. You may want to attach these legs to each other as well. It is easiest to do this while near your platform, so you can get the height and angle right. You’ll probably want a few people to hold up the staircase while another person does the attaching.
- Connect your staircase to a platform by sinking a screw through the side wall of the platform and into the sides of the staircase. This will help stabilize the staircase and keep the top from wobbling side to side
- Don’t forget to add railings to the staircase!