How Do I Check Out an Eclipse Project from SVN?
To Check Out an Eclipse Project:
In Eclipse, go to the SVN Repositories window and:
- Go to idd-svn > projectyouwant > trunk
- Right-click trunk and select Check out
How Do I Configure a Struts 1.2/Spring Project?
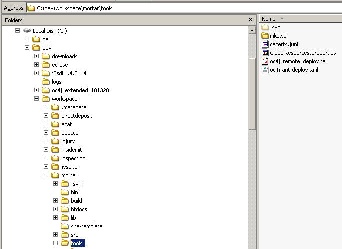
The following configuration files must be modified. Click on the file name and you will be taken to documentation on how to configure the file. To find the configuration file within your Eclipse project, view the structure for Eclipse projects via Development Framework: Eclipse Project Structure.
- settings (org.eclipse.wst.common.component)
- src -> conf (application.xml)
- WEB-INF -> action-servlet.xml
- WEB-INF -> applicationContext.xml
- WEB-INF -> classes -> ApplicationResources.properties
- WEB-INF -> struts-config.xml
- WEB-INF -> tiles-def.xml
How Do I Deploy Locally?
To Run an Eclipse Project Locally:
Before you run any project locally there are a few on one time only steps you must follow.
Once you have completed the one time only steps and checked out the project you will then need to configure the project's local site settings:
- Within Eclipse, create a new folder called "site" under the project's top level. Make sure you are in Navigator view or the new "site" folder won't appear. It will be there but it only appears if you are in the Navigator view.
- Copy the files in site-template into the new folder, "site".
- Edit site/ApplicationLocal.properties
- Change the authentication.user to your kerbname
- Set sf2_passwd value to your cert public key string:
- In your browser, go to https://mortar-dev.mit.edu/getcert.html
- Copy the client certificate which is the text between "BEGIN CERTIFICATE" and "END CERTIFICATE" following "SSL_CLIENT_CERT=".
- Paste this as the value for sf2_passwd= (this is your cert public key)
- Remove the line feeds from your certificate
- Change c:/dev/mortar in r3props to your workspace directory, e.g. c:/dev/workspace/mortar/tools/GlobalResources.properties (but this might vary - check via File->Switch Workspace... will show you current workspace directory)

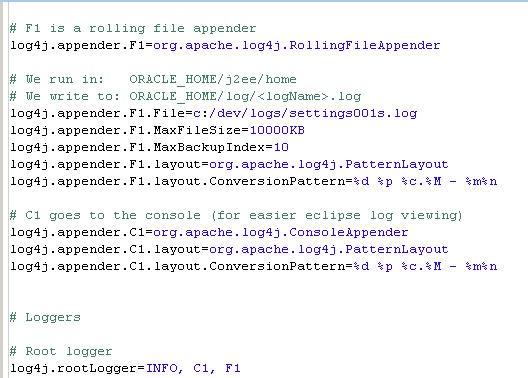
- Edit site/log4j.properties;
- Change the F1.File property to point to where you want your log file to go (the C1 is the console - so the example below shows how to send the log to both the console & the log file)
(see log4j section of the Eclipse project structure for more information on this file.
- Change the F1.File property to point to where you want your log file to go (the C1 is the console - so the example below shows how to send the log to both the console & the log file)
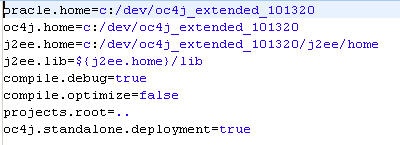
- Edit site/build.properties by opening with "Properties File Editor." Change the directory in oracle.home, oc4j.home and j2ee.home to point to your local "oc4j" directory if it's different.
- Since this is configuration for the local site, it should NOT be checked into SVN. Therefore, either mark it "Derived" via Properties or add it to SVN:ignore via Team->Add to SVN:ignore.
 or
or 
How Do I deploy to the Development Server?
Before you can deploy to the Development server for the first time, your project must be setup on the server. Send email to web-tech requesting the setup of your project on Development.
- Make sure you have kerberos tickets.
- ssh inside@earth-app-21.mit.edu
- No password will be required as long as you have your kerberos tickets.
- earth-app-21 is the development server
- cd webapps/application (e.g. cd webapps/safo)
- msr svn status -u
- Will ask for the password for the last user who updated - [return] and it will ask for
user & password and you can give it your user id & password - This command (svn status -u) will tell you everything that is out of sync with the svn repository.
- Will ask for the password for the last user who updated - [return] and it will ask for
- msr svn up
- This command (svn up) will update the earth-app-21 copy of the project's files.
- ant deploy
How Do I deploy to the Test Server?
- Make sure you have kerberos tickets.
- ssh inside@earth-app-21.mit.edu
- cd webapps/application (e.g. cd webapps/safo)
- release
- Will prompt you for your svn password twice.
- The first prompt may ask you for the password of the last user who updated, just hit [return] and then supply your userid & password.
- Note: if this is the first time you issue 'release' for a project, ignore the message: svn: URL 'release' does not exist.
- Send email to web-tech requesting your application be deployed test.
- Example: "Please deploy safo to insidemit-test"
How Do I Use sap2java to Generate Proxies for an SAP RFC?
- If you do not have the latest version of sap2java, check it out of SVN, following the instructions in "How Do I Check Out an Eclipse Project from SVN?". You will also need to create a site folder & copy the site-template files into it & modify the ApplicationLocal.properties file. See "How Do I Deploy Locally?" ignoring the section on modifying the log4j file.
- In the sap2java project, open package src/com/sap/bapi/mapper. Right-click on class, testSAP2Java, and select Run As... Run... from the context menu.
- Create a new Java Application run profile for testSAP2Java or open its previously created profile, then select the Arguments tab.
- In the Program arguments text area, enter the following lines of information:
Example
- target source code directory (wrapped in double-quotes), e.g., "${workspace_loc}/myproject/src"
- package into which the generated classes will be written, e.g., edu.mit.myproject.proxy
- name of the RFC for which Java data object classes will be generated, e.g., Z_UT_MY_RFC
"${workspace_loc}/settings001s/src"
edu.mit.settings001s.proxy
Z_CO_001_UPDATE_SETTINGS
screen shot (click to enlarge)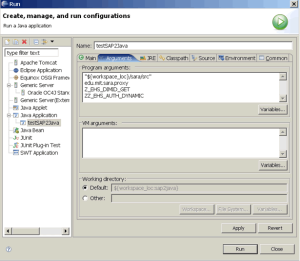
- Click the "Run" button. The Java data object classes are generated. You may need to refresh your project to see the change.
How Do I Find the Oracle application log?
- Find your Oracle directory (e.g., C:\dev\oc4j_extended_101320)
- Drill down into j2ee -> home -> application-deployments -> application of interest -> application.log