Criteria for pulling physical items from the WALL for outsourcing
The shipment with physical items for outsourced cataloging is due at the end of each month, a different schedule is negotiated for a given time period.
During the first three weeks of the month, work will be done in Connexion client (search by ISBN). Books in the following categories will be set aside for shipment to Donohue:
- Not “held” by MYG
- No ISBN
- No bibliographic records whatsoever (if MIT report, pass on to MIT Publications cataloger)
- Level of encoding 3 (check ELvl in the fixed fields)
- No subjects assigned (no fields 6xx)
- No call numbers (no fields 050 or 090)
In the last full week of the month, a total number of 50-75 titles will be shipped to Donohue. In addition to the items identified as described above, books will be pulled from the WALL in the chronological sequence of the received date, provided that they are:
- Books with no internal notes inserted
- No replacements
- No second copies
- No possible serial issues (ex.: annuals, directories etc.)
- No SERMs
- No Springer books
Notes
- Additional titles will be sent to Donohue as required to maintain a maximum time of two months on the WALL.
- If the titles don’t have records in Aleph (ex.: gifts), brief records will be created according to the preparation procedure outlined below.
- In order to avoid using the “IP” (Received/Ask for Assistance) item status in Aleph (the same as all the shelf-ready fallouts), titles outsourced will get the status changed to “CT” (In Cataloging).
- The selected material will be collected on the “Items going to Donohue” shelf.
Preparation
Truncated Steps:
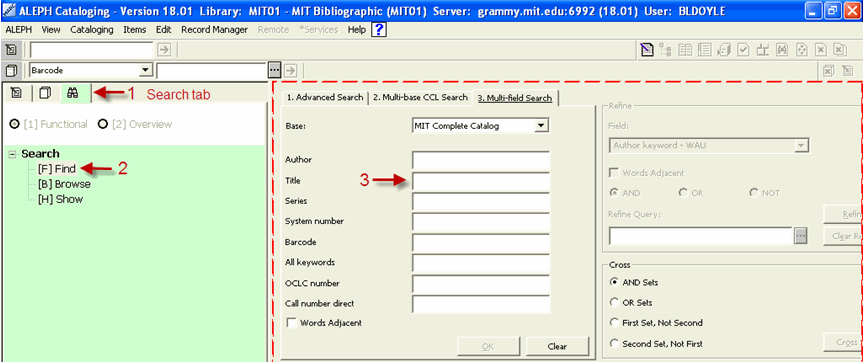
Step 1. Search for item in ALEPH (Search tab)
Step 2. Brief record (Cataloging tab)
Step 3. Item record (Items tab)
Step 4. Confirmation (Search tab)
Detailed Instructions:
STEP 1. Search for item in ALEPH
If the item in hand has a barcode:
- Insert cursor in Barcode field
- Wand barcode on item
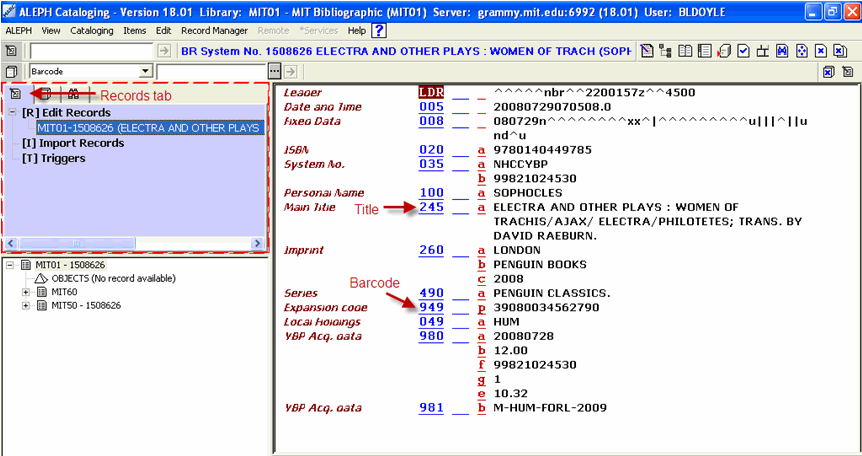
- If an item record pops up, click the Edit BIB Record icon to push the record to the Records tab
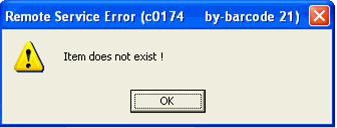
- If a dialog box indicates “Item does not exist!” search the item by title
If the item does not have a barcode -or- the barcode does not bring up an item record:
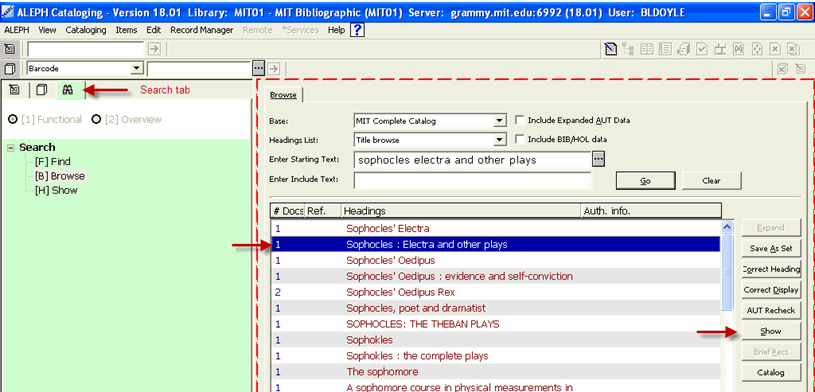
- Search the item by title in the Search tab
- Use the “Find” function
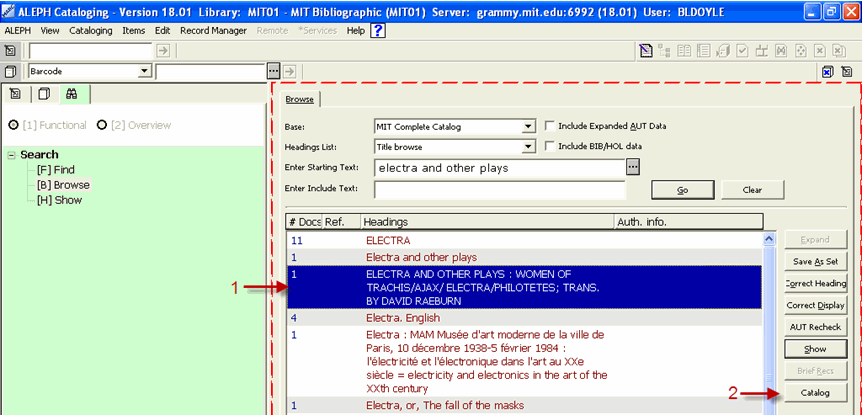
- OR the “Browse” function
- If your search locates the appropriate record, highlight the title and click the Catalog button to push the record to the Records tab
- If your search does not locate the appropriate record, you must create a new brief record.
STEP 2. Brief Record
If a brief record does exist:
- Push the record to the Records tab using either the Edit BIB Record -or- Catalog button, as instructed in STEP 1.
- In the Records tab, check match points to confirm that the record conforms to the item in hand
- Pay special attention to the 245 (title) field and the 949 (barcode) field – it is essential that both are present and accurate. Other fields may also help to confirm the relevance of a record, such as the 260 (publisher), 300 (physical description), 4XX (series) and 5XX (notes) fields.
- If the item in hand matches the existing bibliographic record, move to STEP 3.
- If the item does not match the bibliographic record, you must create a new brief record.
To create a new brief record:
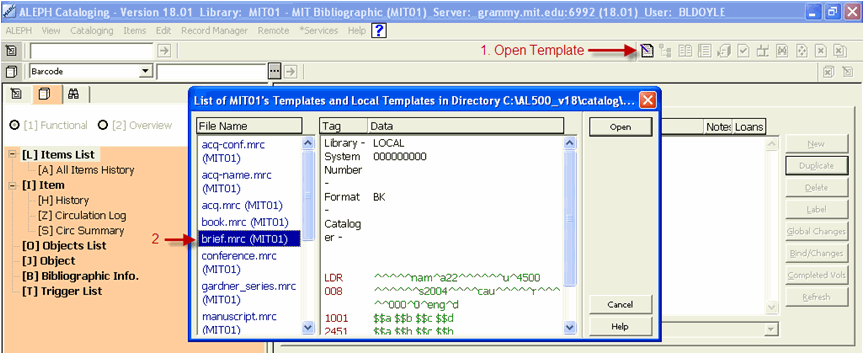
- Click on the Open Template button
- Select Brief from the list
- Click Open
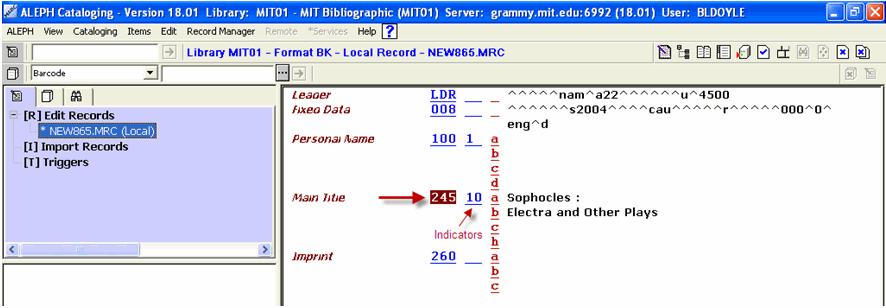
- Complete the 245 (title) field with the title established on the item in hand’s title page.
- Note that the Indicators of the 245 field should be “10” – the “1” indicates that the title is an added entry, the “0” indicates that there are no non-filing characters. If the title begins with the word “the,” the second indicator should be “4” – if the title begins with the word “a,” the second indicator should be “2.”
- Also note that the title is split between subfields “a” and “b” – subfield “a” is used for the main title, and subfield “b” is used for the subtitle.
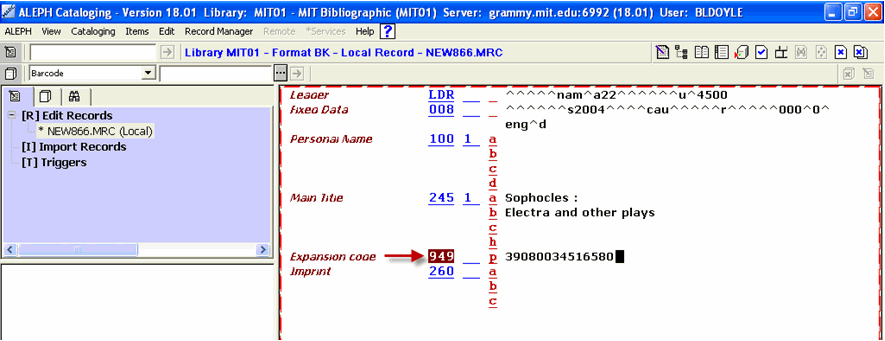
- After completing the 245 field, create a new field by pressing the F6 key on your keyboard
- Enter 949 in the blank field – leave both indicators blank, and change the subfield to “p” for “barcode”
- Wand the barcode into the 949 field
- Click the Save on Server and Local Drive button to save the new brief record
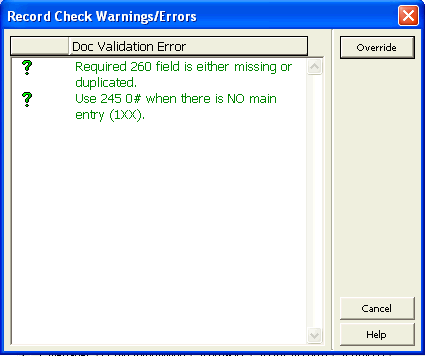
- A dialog box may pop up alerting you to errors relating to the 260 and 245 fields – you should override the following two record check warnings:
- If any additional warnings other than those above are listed, check with a supervisor to ensure that your brief record is acceptable.
STEP 3. Item Record
- After confirming or completing the brief record, click on the Search tab to search for the item in hand using your established title (note that at times there is a delay in ALEPH, so it may take a few minutes before the record is accessible through the Search tab)
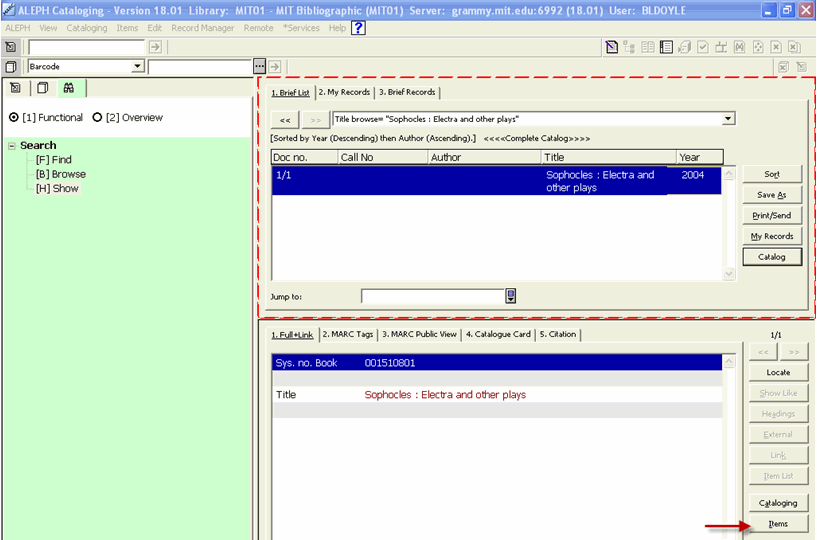
- Upon searching, highlight the appropriate title and click the Show button
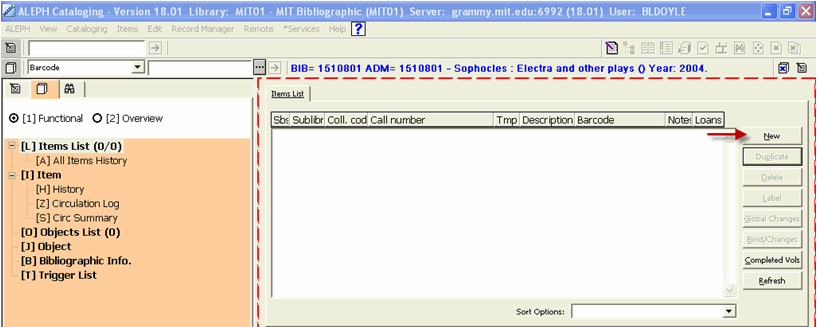
- From the Show screen, click the Items button to push the record to the Items tab
- In the Items tab, click the New button
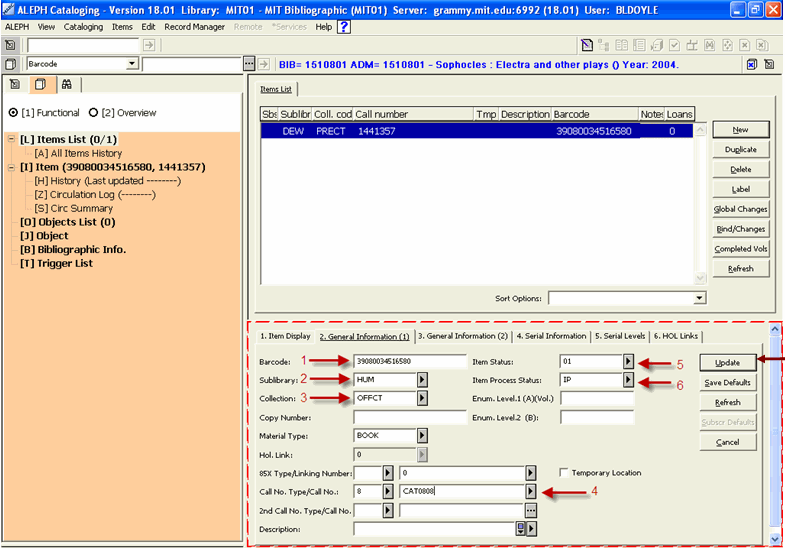
- Insert the cursor into the Barcode field and wand the barcode on the item in hand
- Input the Sublibrary code according to stamp on item in hand (AER, ENG, DEW, HUM, LIN, LSA, RTC, SCI
- Change the Collection to OFFCT
- Change the Call No. Type/Call No. to CATYYMM (example: for July 2008, input CAT0807)
- Input the Item Status according to the item in hand (AER, ENG, DEW, HUM, LIN, RTC, SCI = 01 ; LSA = 15)
- Input the Item Process Status as CT
- Double-check to ensure that the Material Type indicates Book
- After you have completed all fields in the Items tab, click the Update button to save the changes to the Item record
STEP 4. Confirmation
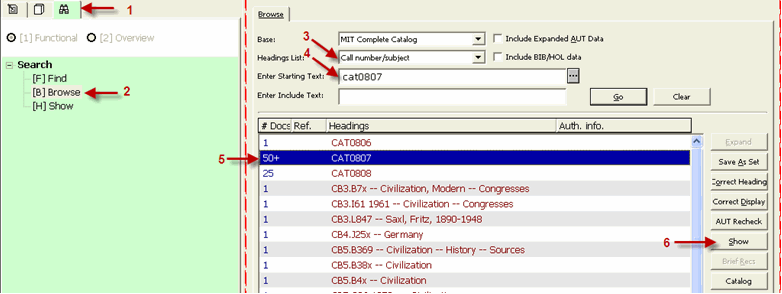
After completing Steps 1-3, you may confirm that the item in hand was added to the CATYYMM list:
- Select the Browse function in the Search tab, heading list: Call number/subject
- Type CATYYMM (ex. CAT0807) in the Browse field and hit ENTER
- The resulting list will indicate the number of items entered into the CATYYMM shipment for the indicated month
- Note: The initial list will only list the number of items up to 50 – any number above 50 will be listed as 50+. To see the total number if it rises above 50 items, highlight the appropriate CATYYMM and click Show to see the full list of items.


