How to insert an image on a wiki page
- Open your browser of choice (Firefox or Internet Explorer)
- Access the MIT Wikis Dashboard
- Select Libraries Monograph Cataloging
- Consider bookmarking this page for ease of access at later dates
- Navigate to the page in which you plan to add an image
- For the purposes of this training, we will use Cataloging work-supply as an example
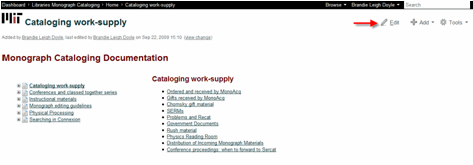
- Run your mouse over the ADD button in the upper right-hand corner. In the drop-down menu, select ATTACHMENT.
- Use the BROWSE button to locate the image file that you plan to insert in the page.
- NOTE: the file must be an image file (.gif, .tif, or .jpg). Any other type of file will not work.
- NOTE: If you plan to add more than one image to the page, click the ATTACH MORE FILES link to attach as many as 5 images at a time.

- After you have selected your file(s), click the ATTACH FILE(S) button to attach the image file to the page.
- The resulting page should reflect that your file has been attached. The file name, size, creator, and dates will appear within a green line.
- Next, click on the page in which you plan to add the image from the crumb trail at the top of the page within the black bar.

- Click the Edit button in the upper right-hand corner of the page.

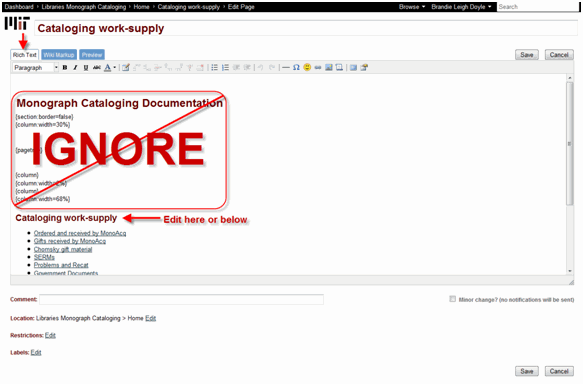
- An editing pane will open, defaulting to the Rich Text tab.
- Ignore the text found at the top of the page, from “Monograph Cataloging Documentation through "column:width=68%." DO NOT EVER MAKE ANY CHANGES TO THIS TEXT! It sets the parameters of the page and should be left alone.

- Insert your cursor in the place where you would like to insert the image, then click on the INSERT/EDIT IMAGE button on the toolbar (it looks like a photo of mountains)

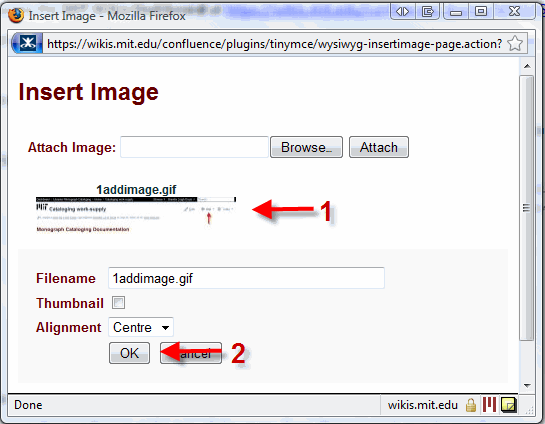
- A dialog box will open prompting you to “insert image.”

- All images attached to your page should appear in the middle of the dialog box (see #1, above). Click on the appropriate image, then click OK.
- The image should now appear within your documentation in the Rich Text tab.
- To preview your page, choose the Preview tab.

- When you have finished adding all images, click the Save button in the lower right-hand corner.

- After clicking save, you will see the final page.
{"serverDuration": 124, "requestCorrelationId": "6adf66f86b94e74c"}


