Virtual machine - made cloud computing possible
Harvard class:http://cm.dce.harvard.edu/2010/01/13450/L07/seg1/index_FlashSingleHighBandwidth.html
VM types:
- Xen -free
- VMware - commercial, used by industry, full virtualization
- Parallels - tailored for Mac users
Amazon uses Xen, will be used by this class
Hyperviser - VM 0-layer
'Amazon web services'
single Front: multiple back ends machines doing the work
Jargon:
- AMI - Amazon Machine Image , it is a file on a disk
- Instance - IMA executed to become a machine
- EBS Volume- elastic block store volume, secondary storage allocated elsewhere
Various types of AMI, we will use Fedora - a version of Red Hat Linux
On-Demand Instances:
- c1. small, $0.10 per hour
- c1.medium , 2 virtual cores
- c1.xLarge, 8 virtual cores, $0.80 per hours
All resources are described at http://cs50.net/wiki/CS_264
Private cloud computing: http://aws.amazon.com/
And this is my 1st VM on the claud
|
|
|---|
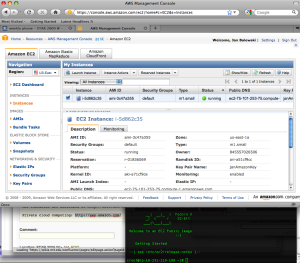
|
|
my 1st VM on cloude
|
Steps to fire VM & ssh to it (after you set up all credentials)
- login to AWS page
- select: Amazon Elastic Compute Cloud
- TOP-UP: 'Your Account' , select 'AWS Management Console'
- TOP-UP-Yellow: 'Sign in to AWS console'
- 'Lunch Instances'
- select type of VM (e.g. Fedora for regular linux), press select
- in lunch wizard 'Skip this'
- select # of machines & CPU power (star with 1, small)
- in 'Key Pair Name' select ssh Keys you have created earlier
- if you want output to survive after VM is shut down in options select: Availability Zone & remember it
- press 'Lunch' at the bottom
Now find it , it is beta-version, pressing 'Refresh' screen in the browser may help
 - to ssh to this machine you need to know:
- Public DNS, sth like: ec2-75-101-246-229.compute-1.amazonaws.com
- absolute path to your ssh keys, e.g. janAmazonKey.pem
- from the local prompt execute:
ssh -i ~/janAmazonKey.pem root@ec2-75-101-246-229.compute-1.amazonaws.com
If ssh hangs forever, you need to open fire wall.
- On the left, go to 'Security Groups'
- select 'default' fire wall (unless you have sth else already)
- add & save : SSH tcp 22 22 0.0.0.0
- now try ssh again
Mounting EBS (permanent) volume to the instance (it was not reliable for me, between sessions data were partially corrupted)
- 1st time it need formating
- Browser: Create volume , using 'Volumes', pick 300GB (it is small and not pricy)
- Browser: right click on the volume, attache it to running Instance of VM, remember name, e.g.: /dev/sdf
- ssh to VM
- partition this disk , e.g. using fdisk
- fdisk /dev/sdf
n : new partition
p : primary
1 : partion #1
1 : (default begin)
enter : (default end)
p : print
w : write partition
- fdisk /dev/sdf
- format disk using mkfs
mkfs.ext3 /dev/sdf1 ('1' is partition selected earlier)
agrre on any question by pressing 'enter' - mount disk as home dir named storage
mkdir /storage
mount /dev/sdf1 /storage
cd /storage
ls
SCP file from AMI to local machine
- partition this disk , e.g. using fdisk
scp -i ~/janAmazonKey.pem root@ec2-174-129-63-11.compute-1.amazonaws.com:"/bla_lis" .
You are done. Well, you need to pay for it. This is my 1st bill:
|
|
|---|

|
|
1st bill: $0.64
|
Full price list
Bundling & registering AMI
It works the best in a machine w/ installed Java and some EC2 software. This is reasonable instruction:http://www.linuxconfig.org/Howto_CREATE_BUNDLE_UPLOAD_and_ACCESS_custom_Debian_AMI_using_ubuntu
It is written for Ubuntu 9.04 machine, so I selected this VM:
ami-2bfd1d42 binarymillenium/ec2/ubuntu/version2/image.manifest.xml
and added the following:
next I added:
mkdir ~/aws
cd ~/aws
wget http://s3.amazonaws.com/ec2-downloads/ec2-api-tools.zip
wget http://s3.amazonaws.com/ec2-downloads/ec2-ami-tools.zip
sudo unzip -d /opt/ ec2-api-tools.zip
sudo unzip -d /opt/ ec2-ami-tools.zip
export EC2_HOME=/opt/ec2-api-tools-1.3-42584/
export PATH=$PATH:$EC2_HOME//bin/
export JAVA_HOME=/usr/
If c-shell is used do:
setenv EC2_HOME /opt/ec2-api-tools-1.3-46266/
setenv PATH $PATH":$EC2_HOME/bin/"
Now I was able to test the following command does sth
ec2-register
I probably should also have set
export EC2_PRIVATE_KEY=~/.ec2/pk-K5AHLDNT3ZI28UIE6Q7CC3YZ4LIZ54K7.pem
export EC2_CERT=~/.ec2/cert-K5AHLDNYYZI2FUIE6R7CC3YJ4LIZ54K7.pem
export EC2_ACCNO=155678941235
export ACCESS_KEY=1WQ6FJKYHJMPTJ3QR6G2
export SECRET_KEY=VDYxRzosnDWvxrJ97QntVpsSUBAavGHE1QJELEyY
If 'ruby' is missing execute:
sudo apt-get install ruby
Alternative:
sudo apt-get install ec2-ami-tools
Below are steps leading to bundling & registering
- copy X.509 certificate
scp -i ~/XXXXAmazonKey.pem ~/pk-XXXXXXXX.pem ~/cert-YYYYYYC.pem root@ec2-174-129-63-11.compute-1.amazonaws.com:"/mnt/" - bundle external image
ec2-bundle-vol -d /mnt -k /mnt/pk-XXXXXXXX.pem -c /mnt/cert-YYYYYYYYY.pem -u nnnn-mmmm-kkkk -r i386 -p star-sl08b-image -v /bla_image --generate-fstab
- Uploading the AMI to Amazon S3
ec2-upload-bundle -b <your-s3-bucket> -m /mnt/sampleimage.manifest.xml -a <aws-access-key-id> -s <aws-secret-access-key>
- Register Image at EC2
ec2-register star-sl08b-s3-bucket/star-sl08b-image.manifest.xml
Conversion of VMware to EC2
http://thewebfellas.com/blog/2008/9/1/creating-an-new-ec2-ami-from-within-vmware-or-from-vmdk-files