Assignments

Click 'Assignments' to jump to the 'Assignments/Exam' form. The 'Assignments/Exam' form displays all added course assignments/exams. The form information will vary according to the Configuration options enabled by the Instructor.
To change how this page is displayed to Students, or to enable/disable grade weighting, click 'Change These Settings' to jump to the configuration form. You can also choose Configure (on the Navigation bar) to jump to the configuration form for setting grading options.
The 'Assignment/Exam' page includes:
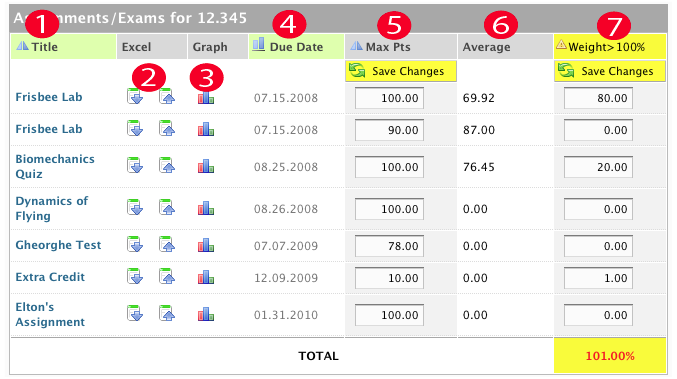
- Title - Lists each assignment/exam for the course. Assignments/exams that have been deleted will appear at the top of this list with a 'Restore' link next to the deleted assignment/exam.
- * Click on a 'Title' to jump to the 'Summary/Grading Table' form for the assignment/exam. Use this form to edit and delete assignment/exam properties, and to enter or change scores for the assignment/exam. See the 'Assignment Summary/Grading Table Form' for information on how to enter or modify assignment points, assign a makeup grade, and edit/delete assignment/exam properties.
- Excel - This is the option to export the assignment information to an XLS file in an excel spreadsheet. The down arrow is for exporting an XLS file; the up arrow is for importing an XLS file. This includes the title, short name, due date, max points, whether the assignment is accessible to graders, and whether it has been removed.
-
The exported spreadsheet of an assignment has expandable and collapsible columns and rows. Clicking on the
 at the top of the Excel sheet displays the original and make-up grades for each student.
-
The on the side of the spreadsheet displays dropped students.
When importing an excel sheet into the Gradebook, you must use the same file you exported - you cannot copy and paste the data into another spreadsheet. There is hidden information contained within the exported spreadsheet that is required for the file to be recognized by the Gradebook.
-
The exported spreadsheet of an assignment has expandable and collapsible columns and rows. Clicking on the
- Graph - Select a 'Graph' icon to jump to the 'Grading Summary' page.
- Due Date - The date each assignment is due. The 'Due Date' is established when the assignment is created on the 'Add/Edit Assignment' form.
- Maximum Points - The maximum points that can be earned for each assignment/exam. The fields in this column can be edited. When edited, the input field changes to yellow. Press either Enter, or the 'Save Changes' button, to save your changes and update the total Maximum Points number. This column is sortable.
- Class Average - The class average for the assignment/exam. The 'Class Average' column cannot be edited.
- Weight - (Optional. See Configuring the Gradebook) This column is only shown when the Gradebook is configured for weighted scores. The fields in this column can be edited. When edited, the input field changes to yellow. Press either Enter, or the 'Save Changes' button, to save your changes and update the total weighted score percent. This column is sortable.
The Total field and the Weight column heading are highlighted in yellow when the weighted scores do not add up to 100%.


The Assignment Summary/Grading Table Form
Here you can:
- Enter or modify assignment scores/points
- Assign a Makeup Grade
- Edit/delete assignment/exam properties

- Summary/Grading Table Form /- details the Student roster where grade information is entered and maintained for an assignment/exam. Use the Back and Forward arrows to scroll through each assignment/exam.
- 'Summary' portion of the form can be edited using the 'Edit Assignment/Exam form. The assignment/exam can also be deleted unless a grade/score is issued to any Student in the course.
Note: The 'Delete' button is unavailable once a score has been assigned to any student in the course. - The 'Grading Table' portion of the form shows the name of each Student, the 'Section' each Student is assigned to, (if Sections were created for the assignment), the grade 'History' icon, the 'Points', the 'Add Makeup Grade' icon, and whether the grade is approved or not.
- 'Summary' portion of the form can be edited using the 'Edit Assignment/Exam form. The assignment/exam can also be deleted unless a grade/score is issued to any Student in the course.
- Show/Hide Grade History - Click the grade history button to toggle a drop-down overlay of the changes that have been made to a Student's letter grade. The History drop-down tells you the current letter grade, the date and time it was entered, the action - Create (new, not approved), Change (edit, not approved), Original, Makeup or Approve (final); the grader's name, and the role of the grader.
- Points - Enter the Point value (score) of the grade for each Student. Click Update to enter or modify an individual score. Click 'Approve' to finalize an individual score. Once a score is approved, Students can see their score for the assignment/exam.
- Add Makeup Grade - Click the makeup grade icon to issue a Makeup Grade for an assignment/exam. Both the original Grade and the Makeup Grade may be maintained in Stellar, however, the Grade must be approved before Students can see it. When a Makeup Grade is entered, the 'Add Makeup Grade' icon becomes
 to indicate that the points shown are for a Makeup Grade. The Makeup grade field will auto-populate the Actual grade field. The Makeup grade is the final grade for an assignment/exam.
 - Grade Status - Displays the current status of each score entered in the POINTS column. Click 'Approve' to finalize an individual score for the assignment/exam. Click 'Approve All' to finalize all entered scores in the 'Points' column