...
| Cloak | ||||||||||||||||||||||||||||||||||||
|---|---|---|---|---|---|---|---|---|---|---|---|---|---|---|---|---|---|---|---|---|---|---|---|---|---|---|---|---|---|---|---|---|---|---|---|---|
| ||||||||||||||||||||||||||||||||||||
|
Adding Materials
- Click
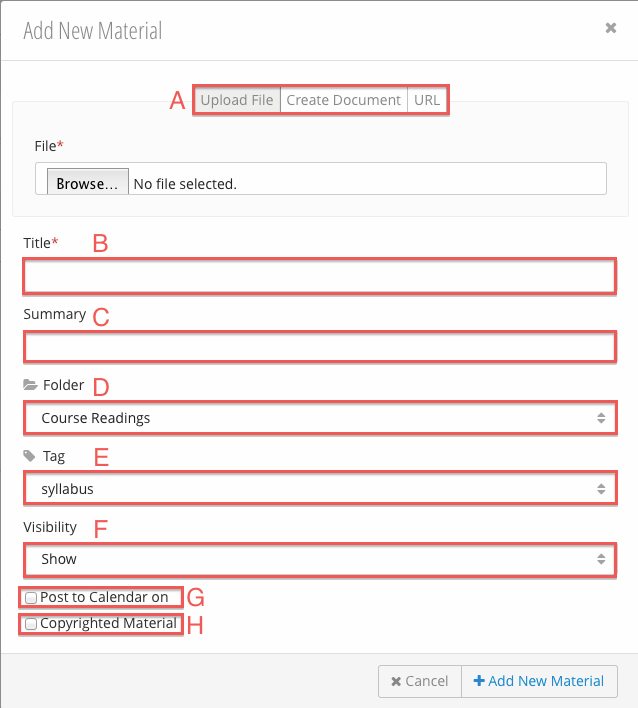
 (2) from the Materials Table. The Add Materials form will display. Required fields are marked with *.
 - Fill in the Add Material form:
- *Material Type - the type of material.
- Upload File - select a file to upload. Please note: there is a file size limit of 250 MB.
- Create Document - enter material content via en editor.
- URL - material will link to an online resource.
- *Title - title of the material.
- Summary - description of the material.
- Folder - which folder the material will be listed under. See Working with Folders.
- Tag - tags include: syllabus, lecture note, reading, etc. The Materials table can be sorted by tag.
- Visibility- when and if the material will be displayed to students.
- Show - the material will be displayed to students.
- Hide - the material will be displayed to staff only.
- Release On - the material will be hidden to students until the specified date.
- Post to Calendar On - choose the date the material will be listed in the calendar.
- Copyrighted Material - checking the copyright checkbox will mark the material as Restricted Use. When the material is accessed, the user will be prompted with a copyright disclaimer.
- Work Title - the title of the copyrighted material.
- Author - the author of the copyrighted material.
- Citation - the citation for the copyrighted material.
- *Material Type - the type of material.
- Click Add Material.
...