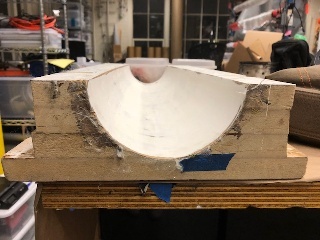


Above: Hermes 1 nose cone mold (4 layers of 1" thick MDF, sanded and finished with gel coat), manufactured by Raul Largaespada.
Overview of Nose Cone Design
Hypersonic optimum The shape of the nose cone for Hermes 2 is a hypersonic optimum (AKA 3/4 power series, fineness ratio 5.5:1) with a 2" straight section for the payload coupler
5.5:1 fineness ratio
10 layers of fiberglass, around 0.125"
NC tip material: __________
What size bolt?
Phenolic washer
to fit into. For the first attempt, we applied ablative coating (Fibreglast Systems 3000 epoxy with 15% by weight of phenolic microballoons) straight into a mold that we routed out of MDF, and used 10 layers of fiberglass (5.7 oz S-glass) on either side of the mold. The mold was prepared with wax and Fibrelease before the ablative coating was added, and vacuum-packed after the fiberglass layup was complete. The thickness of the fiberglass was around 0.125". The ablative coating broke off in several parts when the part was released from the mold, so for the second attempt (flight nose cone), we applied the ablative coating after taking the part out of the mold.
Fiberglass Nose Cone Manufacturing Procedure
Overview of Nose Cone Design
...
Alignment pins, pry slits

Manufacture Mold
To route the mold we are using the router in Gelb (next to Todd's shop). You will need an STL file of your nose cone mold. Make sure to wear a dust mask while routing and use the vacuum because a LOT of dust will be generated.
...
- 3/4" or 1" thick MDF (we used 3/4")
- Epoxy (WHAT KIND)
- Pins (??)
- Ruler
- Router
- Table saw or Bandsaw
- PPE: safety goggles, gloves
Procedure
- Created design of mold in Solidworks (using "Solidworks mold tools" --> helpful tutorial: https://youtu.be/yqROZFStz6c) and save as an .STL file.
- Calculated how much MDF needs to be used (based on thickness, dimensions of nose cone). Make sure to account for extra area for pry slits and alignment pins.
- Cut the MDF using a bandsaw and glued together (using what epoxy?). The piece of MDF we used was 25" x 97" so it required two people to cut it on the bandsaw because it was so large. It would be better to use a table saw to get the sides more even so that aligning the mold on the router will be easier.

- Mark where pry slits and alignment pins go.
- Verified that the tool head would not run into the wall of the nose cone while routing (this can happen if you're cutting too steep of an angle: see image below)


- Find some way to clamp the mold to the router table (if it moves around while routing, the mold will be ruined). Since we already glued the pieces of MDF together we decided to attach L-brackets to the side of the mold so that it can be bolted to the router table. We forgot to plan for this ahead of time so it was annoying and we had to increase the size of the holes in the L-brackets to fit the screws that attach to the table. An alternative would be to cut slots in the MDF before you glue the layers together so that it can be clamped down.


- When routing:
- Make sure the router is routing the correct shape- pause if necessary (instead of stopping the router altogether, set the speed to 1% so you don't have to re-zero everything after. It won't technically be "stopped" but it will be moving very slowly so you're effectively pausing it)
- Lots of sawdust will be generated, so follow the router tip with a vacuum to get most of it.
Lessons Learned:
- Make sure to account for the fact that the mold will have to be clamped down before you glue the MDF layers together
Notes about Gelb router:
- Program is called "Cut3D" and is a dedicated toolpath for CNC machining
- Make sure to orient part correctly, paying attention to the axis along which you want to cut it. There is usually more than one way to orient the part, just make you set it up on the router according to how you defined it in the software
- Cut3D gives you the ability to scale parts if you need
- The "roughing cut" removes most of the material. For this mold Cut3D says it takes 23 minutes (will vary depending on what you're routing)
- The "smoothing cut" finishes the mold by smoothing the surface. Cut3D says it takes 56 minutes for this mold.
- Make sure you select the proper "feed rate" and "plunge rate." This depends on the material you're using.
- Make sure that the toolpath is correct and save it. Give the file time to download onto the USB
- When routing, make sure that the tool does NOT intersect the table
- Put a foam block under the tool when you turn the power off or it will crash into the table.
- You can either use the vacuum attachment while routing or vacuum periodically while it's routing.
Mold Preparation
Required Materials:
- Sandpaper (400 - 2000 grit)
- Gel coat (WHAT KIND)
- PPE: Respirator, gloves
- Sand the mold, starting with 400 grit and working up to 1000 and 2000. This will take a long time!
- Apply 5 layers of gel coat (respirator required)
Nose Cone Layup
Required Materials:
- Fiberglass (WHAT KIND)
- Epoxy (WHAT KIND)
- Partall Paste #2 (#1016 Parting Wax)
- PVA (polyvinyl alcohol) Film
- Spray gun
- Squeegees
- Acetone
- Epoxy boats
- Popsicle sticks
- Scissors
- PPE: gloves
- Cut fiberglass layers (HOW BIG)
- Mold release/lubricant (more than you think you need!)
Nose Cone Tip
Required Materials:
- Steel
- Bolt
- Washer
- Lathe
Nose Cone Layup
Required Materials:
- Fiberglass (5.7 oz S-glass)
- Epoxy (Fibreglast 3000)
- Wax
- Fibrelease
- Phenolic microballoons
- Spray gun
- Squeegees
- Acetone
- Epoxy boats
- Popsicle sticks
- Spear tool
- Scissors
- PPE: gloves
Procedure
- Cut fiberglass layers and vacc bag (HOW BIG) the day before layup (smoothed fiberglass in mold, taped down, drew lines, accounted for tab and cut out 20 identical)
- Applied Fibrelease
- Prepped ablative coating (15% by weight phenolic microballoons --> SHOW 3 EQUATIONS USED)
- Degassed ablative coating mixture (put it in a vacuum pump for ~20 minutes, or until bubbles stopped forming). Make sure it's in a large container because it expands a lot when you degas it.


- Applied ablative coating to mold (not recommended, this should be done afterwards next time)

- Started layup --> first plies weren't wet enough, so make sure you're not skimping on epoxy

- Applied starting from the tip, lining up one end flush with the mold (use same side for each half --> align it well the first time because it's difficult to cut)
- Trimmed edges

- Smoothed SLOWLY and don't put down more fiber until bubbles are gone
- Attached halves, make sure fibers not caught in sides
- Shined light on one end
- Used rod tool to smooth fibers from each end

- Applied two extra strips along seams (two on each seam) and smooth with tool and by hand for good measure. Cut end of strip so it's not on linear coupler section because this will make it easier to sand later
- peel ply difficult to apply, use blue tape
- use cone shape for rest of vacc bagging materials (taped narrow end to rod and pushed it in, worked pretty well)


- Waited until vacuum pump dropped to around -27 inHg. It took a while for it to drop because we had to seal some gaps in the vacuum bag. (In the picture below, the vacuum wasn't quite strong enough)


Lessons Learned:
- Spear tool (two pieces of disposable squeegee attached using 5-minute epoxy to a long rod) works well for smoothing fibers on the inside of the nose cone
- Make sure fiberglass plies are wet enough or you risk delamination
- Do not use Fibrelease, just use wax
- Don't put the ablative layer on the outside --> apply if after the layup
- When vacuum bagging, use cones instead of two separate halves because this will be difficult to apply
- Make sure the outside of the mold is epoxied and waxed so that fiberglass doesn't overhang and stick to either end (makes mold release more difficult)
- Make smaller, and more pry slits so that mold release is easier
- Take the time to vacuum tape WELL so that you aren't looking for leaks later
- Consider using Vaseline for mold release after all (messy but it might help avoid delamination)
...