Once you have the collection material transferred to digital archival storage, you will need to make sure it is ready for processing in Archivematica.
Initial steps
- You will need to ensure the items are in the correct folder accessible to Archivematica, which is on the submission drive in the Transfer folder. If it is not currently in that location, copy and paste using Teracopy on Windows (fixity will be fully checked when ingested into Archivematica).
- If you created disk images and plan to fully process their contents in Archivematica (not just stored in Backlog until you have time to fully process) then you should go to the Disk image extraction section before doing the steps below.
Making changes to your transfer package
Ensure appraisal or rearrangement actions are reflected in the checksum file
If you have made changes to the package created with CCA tools, such as deleting or changing organization of the package, you will have to make changes to the appropriate checksum.md5 file within the SIP. Making sure it is accurate ensures that Archivematica will be able to check all the files transferred correctly. If not, proceed to step 4.
- Copy the checksum.md5 file into the submissionDocumentation folder and rename it original_checksum.md5
- Return to the checksum.md5 file in the metadata folder and open it in a text editor to remove the lines for the files or directories that have been deleted.
- Edit the paths listed for items that you have moved since initial package creation so they reflect their current location.
- If you have not done so, record your rearrangement and appraisal actions in the processing information note in the finding aid. (link)
Adding required metadata files to the package
Archivematica has specific metadata files that can be added to the transfer package so metadata is transferred correctly. If you have analyzed the transfer files already for possible restricted content and found that there is a restriction, proceed to the Creating and adding the rights restriction file section. If you have found no restrictions you can proceed directly to the Creating and adding the metadata file section.
Creating and adding the rights restriction file
Adding information about restrictions is done through a CSV file called "rights.csv" and is required if you have found restricted content. DDC uses this file for the options included for recording restrictions but there are also options for actual usage rights (licenses, copyright, etc.), hence the name of the file.
There is a template included in the Transfer folder that you can edit for your needs, which is titled rights.csv, this is the same as what the file will be named that you include in the package. The template includes three rows; an example of a restriction for the full package, an example of a restriction for a folder, and an example for a restriction of an individual item. The three examples also are example of the three most common basis types of restriction; policy, statute, and donor ("other" is also an option in rare cases where a restriction does not fit those categories).
- file
- basis
- status
- determination_date
- jurisdiction
- start_date
- end_date
- citation
- note
- grant_act
- grant_restriction
- grant_start_date
- grant_end_date
- grant_note
Creating and adding the metadata file
If you have analyzed the files already for possible restricted content and/or have determined what level of digital preservation commitment these files require, you should create a metadata csv file with this information to be included with the package(s) going through Archivematica. If you have not analyzed the files yet, go to the section above. If you are just transferring the files into Archivematica Backlog for processing later, continue to step 2.
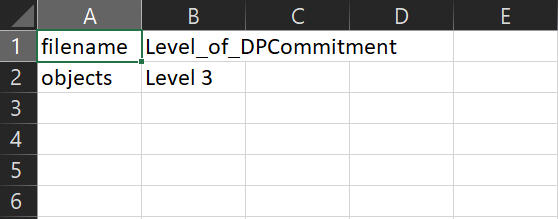
- There is a template included in the Transfer folder that you can edit for your needs, which is titled metadata.csv, this is the same as what the file will be named that you include in the package.
- Open the template, there should be at least two heading columns.
- Column 1 is the “filename”, this should always be “objects”.
- Column 2 is the “Level_of_DPCommitment” which should be the appropriate level for the specific package, such as “Level 3”.
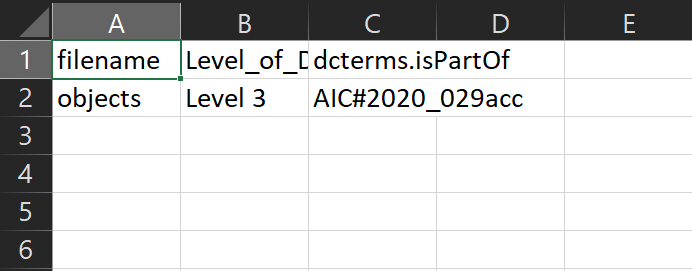
- If you are putting through multiple packages (each with it’s own metadata file) as part of the same transfer (e.g. 2020_029_001, 2020_029_002, etc.), you will need a third column called “dc.isPartOf”. In that field you will enter the identifier for the group of packages, adding “AIC#” to the beginning. For instance, “AIC#2020_029acc”.
Save the file as a copy in the “metadata” folder within the package you are transferring in Archivematica.
Note
If you have a bag where the “metadata” folder was created within the “data” folder or if you have not determined the level of digital preservation commitment because you are waiting to analyze the files in Archivematica, adding the CSV metadata will wait until a later step in Archivematica (see Archivematica processing step 6 under Ingest. (link) In the case of the bag, adding it now would cause the bag to be invalid.
Open Archivematica and click “Browse” and make sure the folder is available. Now you can proceed to the Archivematica processing steps (link)