HAB Chassis Design Report

Structures Team Members: Aaron Khal, Akshay Kapur, Angelina Costa, Izaan Rizvi, Mirabelle Kakushadze, Mira Levine, Sebastian Perdomo Hernandez, Sophie Nguyen
Task: Design a chassis for a high-altitude balloon test. The design must protect the interior components from temperature fluctuations and environmental exposure. Some sensors had their own individual requirements when implemented in the chassis:
- The spectrometer's sensor must be exposed through one of the sides of the chassis, pointing upwards exposed to the sun.
- The Go-Pro must be secured on the outside of the chassis, pointed to the horizon.
- The second live camera must be exposed through one of the sides, pointing just under the horizon.
Additionally, the chassis must not exceed a total weight of 6 lbs (excluding the balloon) due to §101.1(a)(4)(ii) (Hard Limit 6 lbs/package - Hard per-package weight cap)
Internal Design:
The chassis was inspired by the public-source CubeSat design: Universal 1U Cubesat by Juliano85 - Thingiverse and 3D printed with PLA. PLA was chosen over other potential materials such as PETG because PLA was stiff, durable, and lightweight. The thickness of the walls was 0.15' to optimize weight and durability while allowing the screws (particularly the eye bolts) to fully fit through the walls. The interior space of the design was 7.5x8x7' mostly because of the spectrometer and muon detector, whose dimensions were 6.3x4.3x3.5' and 2.7 x 2.25 x 3.3 in (when stacked on top of each other) respectively.
Image 1: Sample image of a SPOT Trace. In Launch '26, sensor was fixed to the divider wall with two zip ties. Its purpose is to track the payload.
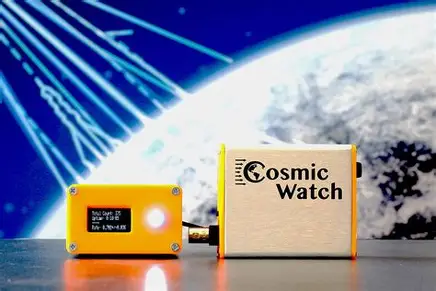
Image 2: Sample image of a muon detector. The initial design was to stack two of them on top of each other and place them unfixed in the bottom of the payload. Its purpose is to (you guessed it) detect muons.

Image 3: Image of Launch '26 spectrometer. Main determiner for the size of the chassis. Special structural consideration that the sensor attached to the wire needed to be exposed to the sun.
The following sensors were planned to be put in the payload:
- SPOT Trace
- Battery
- Altitude/Motion Sensor
- GPS Tracker
- Temperature Sensor
- Pressure/Humidity/Temperature Sensor
- An Air tag
- Video transmitter (VTX)
- Muon Detector
The structure would be a cube with a horizontal divider plate in the middle. The spectrometer and secondary camera were placed unfixed on the bottom floor because the spectrometer was tightly fitted with the divider plate. As for the Argus Board, battery, and miscellaneous (temperature, pressure) sensors, those were fixed with zip ties to the divider plate to minimize movement. The top of the chassis was originally planned to be where the eye bolts were fastened but then was omitted from the final design to optimize weight. The top was redundant due to there also being foam covering it and to make opening the contents of the chassis easier. To remove the top chassis, the bottom chassis had drilled holes to fasten the balloon.

Image 4: Ver 3.0 CAD of HAB Chassis

Image 5: CAD of second floor. Corners were rounded and sanded so that the strings of the balloon could be attached through the floor.

Image 6: Sketch of how the sensors were organized inside the chassis. Sensors were placed for even weight distribution to minimize spinning. Ultimately discarded due to time constraints.
External Design:
The chassis was covered in 3/4" insulation foam for temperature regulation and protection. 2cm of foam was more than enough based on this article, which was why we decided to go with 3/4" of foam. To attach the Go-Pro to the surface of the chassis, we ended up poking holes and jamming screws into the Go-Pro.

Image 7: Outermost layer of the chassis
Results (Launch):
The chassis was not completely assembled at launch time. The foam was attached to the interior chassis with duct tape and last-minute placed bolts. At the time of launch (2.5 hours after arrival), there was not enough helium in the balloon to lift the payload. The VTX and second battery were removed to save weight.

Image 8: Chassis construction at launch site
After the balloon popped, the payload fell at a max recorded height of 51k ft and a speed of 19.7 ft/s. all the components survived the landing sans the interior chassis, which broke off at the corner. The temperature inside the chassis had a final reading range of 44.54 to 60.76 degrees Fahrenheit (update for average temp).

Image 9: Inside of the chassis after landing and all components were taken out.
Future Considerations:
The chassis successfully completed its task of protecting all the components inside from temperature fluctuations and mechanical damage, despite breaking at landing.
The progress on the chassis was slow in the beginning and rushed to completion at launch. In the future, the first prototype of the chassis should be completed at least a month beforehand so that there is time to play around and test with the physical model prior to launch. There were many tiny details that were not considered in the final design and had to be fixed with last-minute adjustments, such as:
- There were no bolt holes for the eye bolts and the Go Pro.
- There was little space for bulky cables connecting the components.
- Tolerance was too tight for the divider plate, so the plate had to be pushed into the cube with a lot of difficulty.
In the future, we should:
- Train every member in the structures team on CAD and basic manufacturing (3D printing, soldering, handheld tools) before beginning the project.
- Establish a clear timeline with deadlines for each member.
- Allocating better tolerances for the slider and consider wiring when determining dimensions of the components.
- Calculate head emitted of active components. Foam had more than enough insulation for the electronics.
- Consider using PETG instead of PLA to increase durability (but mind that would make the chassis heavier).