Original by James Wall, G
Introduction
3D printing is a useful tool for props and small set pieces when used strategically. Don’t be discouraged if you don’t have CAD (computer-aided design) or 3D printing experience; free 3D models exist online, and usually at least one person in the production has access to a 3D printer (this is MIT, after all). The following guidelines are intended to be accessible to a beginner 3D printer. Intermediate/advanced 3D printers may still benefit from the props-specific commentary.
Should I 3D Print this Prop?
Pros:
- Can create shapes that are difficult to make by hand
- Can create props that are unique to a show and thus not worth purchasing
- Can create props unique to the dirstaff’s vision and thus not available for purchasing
- If comfortable with 3D printing, can be less effort than hand-making props.
- Inexpensive (free in some makerspaces)
Cons:
- Timing concerns: Printing can take many hours. Prints may fail, and you may not know until you go to pick up the piece the next day. Leave time to sand and paint. Don’t leave 3D printing to the last-minute.
- Material is strong perpendicular to layers in tension/compression but shears parallel to layers.
As a loose rule of thumb, if you can make it out of cardboard in less than a day, don’t 3D print. If you can purchase it for less than $10, don’t 3D print. If it can be made from rectangles and cylinders, don’t 3D print.
How do I design a 3D printed prop?
Props can be custom-designed, found online, or some combination of the two. Thingiverse is a great database of free designs. For custom design, Fusion360 has free student licenses, is better for collaborative design than other software, and saves files to the cloud (it’s basically the Google docs of CAD). The interface and restricted capabilities can be frustrating for the advanced designer, but it is great for rapid prototyping and thus prop-making. Here are some beginner Fusion360 tutorials.
If combining existing designs and custom designs, merging bodies will be your friend. Often, designs you find online will be .stl or .step files, which are covered in triangular surfaces (i.e., you don’t have a large flat surface on which to cut and extrude), so they are difficult to edit. For example, to make the Hello Kitty cupcake for Ride the Cyclone (Summer '25), a Hello Kitty head was found online, a cupcake base was custom-designed, and the two bodies were overlapped and merged.
Where do I 3D print my prop?
Currently, MTG prints at Metropolis Makerspace. Any student can sign up for a quick training/orientation. Keep in mind there is one print per person at a time. If you want to print in parallel, recruit your friends who are also makerspace trained!
There are other locations to print on campus, including one or more dorms. Please update the Wiki if you know of them!
How do I 3D print my prop?
You first need your design in .stl format. If a CAD file is analogous to a Microsoft Word document, the .stl file is analogous to a pdf. If downloading an existing design online, there is often an .stl option. If using Fusion360, right click on the body, then click “save as mesh.” The format should be “stl binary” and the unit type should be “millimeter.” Important: change your default units in Fusion to millimeter in advance (you can do this under document settings at the top of the browser tree on the left).
A “slicing” software converts your design to a file the 3D printer can interpret (a .gcode file). If using Prusa-brand printers (like those in the Metropolis Makerspace), use PrusaSlicer software. Other slicer softwares exist that are compatible with a range of printer brands.
Once you’ve imported your .stl file into the slicing software, you need to orient it on the print bed. A good rule of thumb is to put as much flat surface on the bed as possible so that you don’t need too many supports and/or can avoid having supports over detailed parts of the design. If your prop might undergo loads, consider that the prints are weaker along the layer lines.
Next, select print settings (top right of screen):
- Layer thickness. Thicker layers take less time to print; thinner layers are better for detail. A “normal” thickness is typically 0.2 mm.
- Filament: Generic PLA.
- Printer type. For most of the 3D printers in Metropolis, select “Original Prusa i3 MK3S & MK3S+.” For the one printer that takes a USB instead of SD card, select “Original Prusa MK4 Input Shaper 0.4 nozzle.” This one printer is substantially faster and nicer than the others.
- Supports. If any part of your design overhangs, it needs supports so that the printer isn’t depositing material into thin air. To change the type of support, go to “Print Settings” on the top left. Organic supports are great and easiest to remove. There are two situations in which to avoid organic supports: (1) If they are short/low to the ground, use rectilinear/grid instead or the print will fail, (2) If you are struggling to fit the whole design on the print bed, use snug/tight.
- Infill: This is how much material fills the inside of the object. 10-30% is typical. If you want it very strong, consider a high infill but not close to 100% (if you’ve taken mechanics, remember how failure from bending often occurs before failure from tension/compression - a solid, 100% filled body will experience bending moments, whereas an object with triangular infill will distribute the moments as normal force throughout the “beams.” Though, honestly, if you’re getting to that level of analysis, consider choosing a method stronger than 3D printing to begin with…).
- Brim: If your design is tall and skinny, a brim is necessary so it doesn’t fall over.
Then click “slice now,” and the program will flag any issues! Then save the .gcode file to an SD card/USB associated with the printer.
Choose a filament color that will be neutral under your intended paint color.
Ask a makerspace mentor for guidance if you have never used the 3D printers before. Metropolis Makerspace has the rule that you will have to sit there while your entire first layer prints to watch for any failures. This can take awhile (~30min), so bring something to do.
What do I do with my freshly 3D printed prop?
If you printed with supports, you can remove them with pliers in the makerspace. Tricky pieces can also be removed with the snips.
The piece will need to be sanded if (1) obvious layer lines need to be removed and/or (2) roughness is needed to hold the acrylic paint.
Then paint! Acrylic paint and spraypaint both work well. You will need multiple coats.
If you want to use the original filament color and avoid painting, do not sand. It looks bad/fuzzy sanded but not painted. So, a downside to keeping the original filament color is that there may be noticeable bumps from layer lines. You could mitigate this with a thinner layer thickness (~0.1mm).
Examples of 3D printed props with commentary
Crystal Ball Base (Ride the Cyclone, Summer 2025)
(1)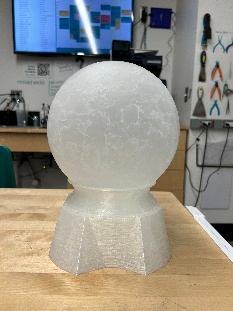 (2)
(2)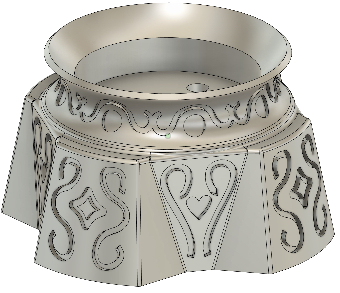 (3)
(3)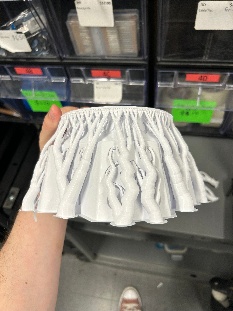 (4)
(4)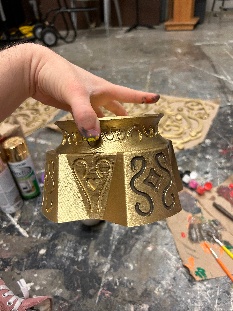 (5)
(5)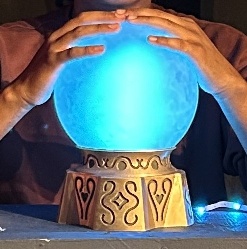
(1) Prototype base printed quickly with low infill, draft mode, 0.3mm layer thickness to check geometric compatibility with glass sphere
(2) Custom design in Fusion360
(3) 3D print with organic supports
(4) Spray painted gold and acrylic painted brown "patina." Sanding was skipped because spraypaint stuck well and layer lines were not noticeable.
(5) Final product
Hello Kitty Cupcake (Ride the Cyclone, Summer 2025)