The following is a stepped process for verifying the design and functionality of the Raft-3 application.
This should be run manually before releasing each version to production.
It should be run on the following platform/browser combinations (Mike Please Verify):
- Mac:
- Safari
- Chrome
- Firefox
- IE
- PC:
- Safari
- Chrome
- Firefox
- IE
Login Page:
Visual Reference:

- Verify the "Help" link in the footer opens a pop up with the Raft page of the Knowledge Base.
- Verify the 'About this Application' link in the footer opens a pop up with the Raft Wiki page.
- Verify the "Frequently Asked Questions" link in the left column opens a pop up with the Raft page of the Knowledge Base.
- Verify that there is a Date in the right side of the footer section with a last updated Date.
- Verify the screen is displayed as seen above ( make sure the image is up to date).
- Click on the Sign In button and verify that you can login to the Raft-3 app.
Home Page:
Visual Reference:
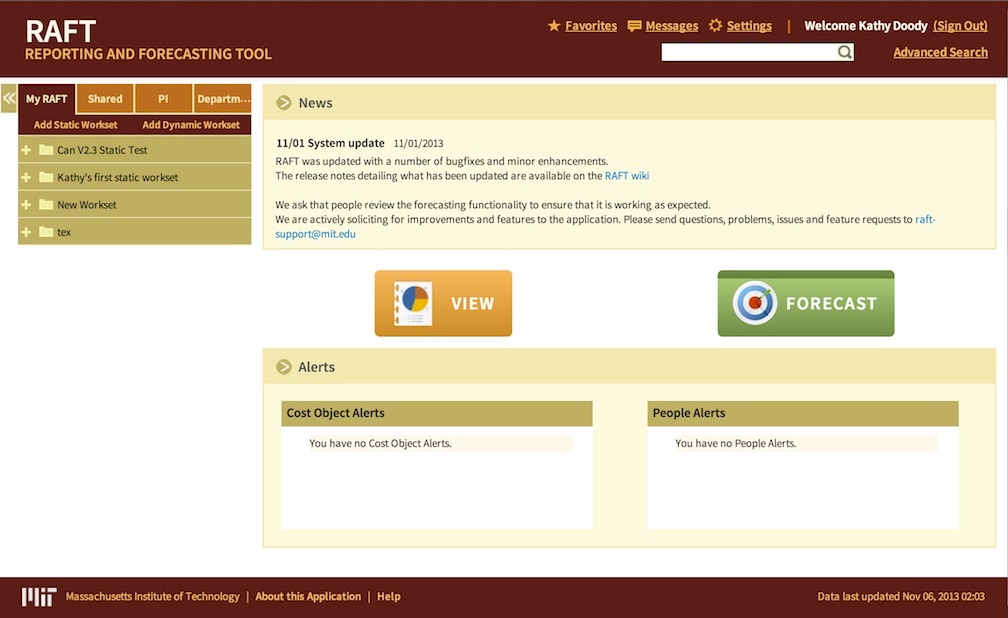
- Verify the screen is displayed as seen above ( make sure the image is up to date).
- Click on each of the 4 navigation tabs in the left navigation panel and verify the list of worksets changes to reflect the selected tab.
- Click on 'Add Static Workset' link in the left navigation tabset and verify the 'Create New Workset' pop-up opens.
- Using this pop -up, enter data to create a new workset. Click 'OK' and verify that the new workset is added to the list of worksets in the current navigation grid.
- Click on 'Add Dynamic Workset' link in the left navigation tabset and verify that the navigation grid collapses and the Create Dynamic Workset page is displayed.
- In each of the search text inputs, type at least 3 characters and verify that the autocomplete search displays either a list of matches or a 'No results Matched' message.
- with data in at least one input, click the 'Search' button and verify that either a list of Cost Objects or a message saying 'Search returned no results' is displayed in the right panel.
- Create a search that returns at least one Cost Object and click 'Save Query as Workset', fill in the required data in the pop-up and click the "Save Query as Dynamic Workset' button. Verify this new workset is listed in the left navigation grid.
- In the left navigation grid. click on a plus icon and verify that the folder is toggled 'open' to list its children (worksets or cost objects) and that the main panel now displays the data for the selected workset.
- Verify that the News section in the main panel is at the top and contains the latest RAFT news.
- Click on the "View" button and verify that a 'Navigate to Cost Object View' pop-up appears.
- Enter at least 3 characters in the "Enter Workset" text input, select a workset and verify that the cost object selection list is populated.
- Select a cost object and verify that the pop-up closes and the main panel displays the Cost Object view for the selected cost object / workset.
- Return to the Home screen.
- Click on the "Forecast" button and verify 'Navigate to Cost Object Forecast' pop-up appears.
- Enter at least 3 characters in the "Enter Workset" text input, select a workset and verify that the cost object selection list is populated.
- Select a cost object and verify that the "Then chose a forecast" list is populated.
- Select a forecast and click the "Go To Forecast" button. Verify that the pop-up closes and the forecast page is loaded in the main panel and that the left navigation grid is collapsed.
- Return to the Home screen.
- Verify that the "Alerts" section contains 2 lists of alerts (Cost Objects and People) - Note is you have no alerts the list boxes should contain text to tell you so (See image above).
- Click on an item in the cost object alert list and verify that the main panel now displays the cost object screen.
- Return to the Home page and do the same for a Person Alert.
- In the header, click on the "Favorites" link and verify a pop-up opens with a list of your favorite worksets and/or cost objects.
- Click on an item in the favorites list and verify that the pop-up closes and the selected item is loaded in the main panel.
- In the header, click on the "Messages" link and verify a pop-up opens with any messages. Close the messages pop-up.
- In the header, click on the "Settings" link and verify a pop-up opens with 3 selection inputs for Budget Version, GL Hierarchy & Default Workset.
- Type at least 3 characters in the quick search text input and verify it returns a list of matching results.
- Click on a result and verify that the selected workset/cost object is loaded in the main panel.
- Click on the "Advanced Search" link and verify that the Advanced Search Screen is loaded and the left navigation grid is collapsed.
- Enter at least 3 characters in one or more text inputs and click "Search". Verify that the matching results ( or "No search results found") are listed in the results pane.
- Click on an item in the results list and verify that the data for the selected item is now displayed in the main panel and that the left navigation grid has been toggled open.
Workset View:
Visual Reference:
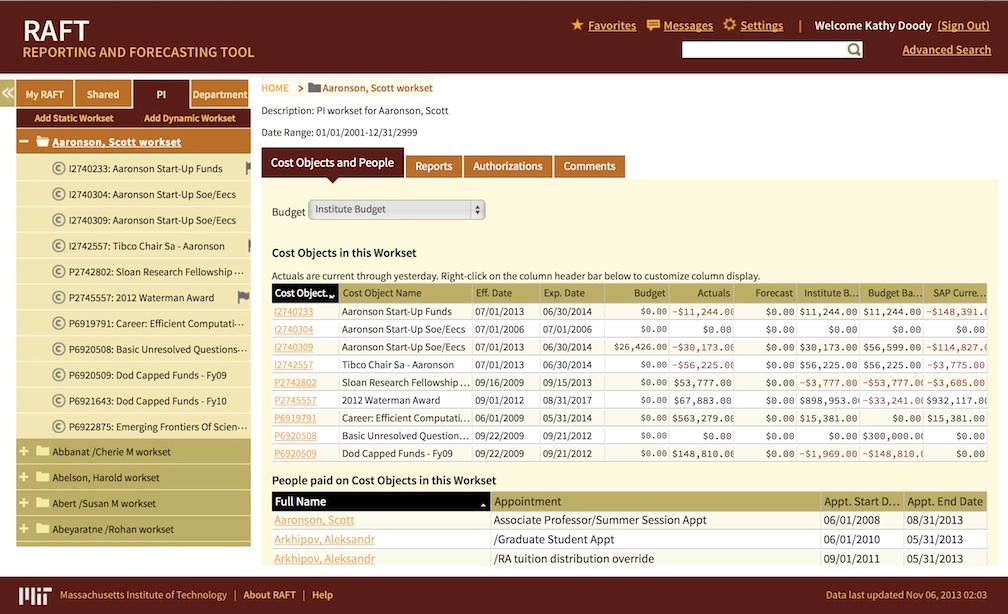
- Verify the screen is displayed as seen above (make sure the image is up to date).