Required Materials
- 60-2000 grit sandpaper
- Spray bottle with water
- Shop towels
- System 3000 resin + hardener
- Phenolic microballoons
- Vacuum bagging materials
- Vacuum bag
- Vacuum tape
- Release film
- Peel ply
- Bleeder fabric
- Cabosil (fumed silica)
- Long rod
- Layup jig
- Mold release wax
- PVA film
- Mallet
- Popsicle sticks
- Fine-haired brush
- Heat gun
- Sharp scissors
Manufacturing Procedure:
- Wet sand mold to 2000 grit using sanding block (made of foam)
- Wax mold (3 layers of Mold Release Wax, yellow container)
- Apply PVA film with fine-haired brush, let set for 20 minutes
- Mix cabosil + epoxy and apply to mold (thick on edges)
- Layup- don't wet plies before laying down
- Tab at least 1" at base, shorter at tip
- Attach halves of mold carefully, making sure tab doesn't get stuck
- Vacuum bag
- Cut bag in cone shape
- Press vacuum bag firmly on edges to make sure there are no gaps, as this will cause bubbles later
- Use "spear tool" (long, thin rod) to push vacuum bag through mold
- Mold release: use chiseled popsicle sticks and hammer (add more until pops open)
- Apply ablative (using layup jig)
- Set up layup jig (looks like a spit with a pole running across it that can be rotated by hand)
- Put old nose cone or some coupler inside the nose cone and put both over the pole. The coupler or whatever you can find to fit inside the nose cone gives you something to grab onto so you can turn it after you apply the ablative.
- Mix 100g Systems 3000 resin + 18g Systems 3000 hardener + 17g phenolic microballoons
- Use heat gun to dry (don't overwork)
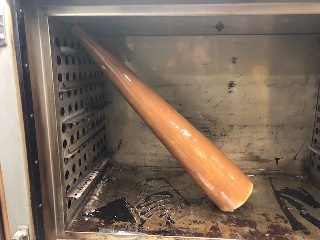
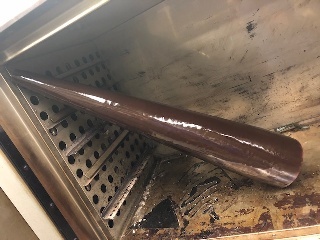
- Oven cure
- Wearing gloves, move the nose cone to the oven.
- Position nose cone carefully such that the surface is not touching the oven, as shown below.
- Follow cure cycle for System 3000 epoxy. The color of the epoxy will change from light brown to dark brown/cherry red, as shown below.
- Sand outside
- Sand inside (seam)
- Plane ends
- Fill low spots with ablative + epoxy mixture
- Sand with 60 grit to roughen up because epoxy doesn't stick well to itself. You might have to use a file to get to smaller low spots
- Wipe down surface of nose cone with acetone
- Mix 10g resin + 1.8g hardener (System 3000) + arbitrary amount of phenolic microballoons (just eyeball it until it's about the same consistency as the mixture you made for the ablative coating)
- Carefully apply mixture to low spots, scraping off excess
- Let cure for at least 24 hours and sand
- Paint
Lessons Learned:
- Don't coat the mold multiple times with epoxy - just once, let soak and WIPE, then cure and sand
- Protect edges with aluminum or something rigid and straight to prevent them from getting rounded
- Do not wipe mold with acetone once PVA film has been applied or it will come off