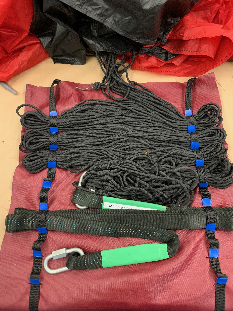
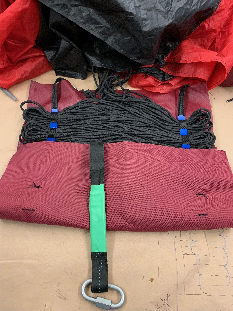
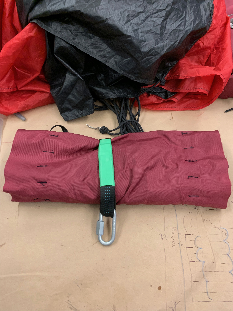
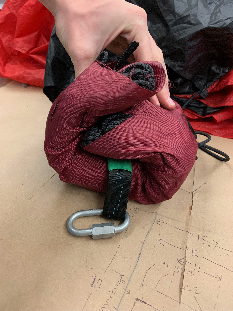
Hermes FT 1 Main Bag
Made of the red fabric. Constructed dimensions are 7.5 by 17.12 inches.
Drogue bag is 15.7 and something deep.
Main bag improvements:
- Move demogorgon jaw grommet down to new center. Make jaw shorter
- Sew wider flap on jaw base. About 1/2 inch on either side.
- Use heaver webbing.
- store lines in bag with rubber bands so they don't catch other things
- make sure TD loops are big enough
Drogue bag improvements:
- Make angle between paws a little more obtuse.
- Test materials for locking loops on drogue.
- Use paracord with 1 cm spacing for locking loops.
- test placement of locking loops
- consider making the bag a tad larger
- tighten line locking loops and space them out more so the end of the loop has less to catch on
- build sleeve so drogue bag slides over main. Part sleeve.
Integration improvements:
- Eye - kevlar loop - TD - quicklink or kevlar loop - TD - kevlar permanently looped into bag - bag - swivel - riser - drogue
- Face TDs towards center of cup so the tops have room to pop off
- Where to place fin QK on eye?
- finger trap two 100 lb drogue lines into a 750 lb line
Hermes II Main Bag
Requirements:
- When closed, the main parachute bag shall completely enclose all components of the main parachute system from the vent of the parachute to one foot above the bottom of the main riser.
- All compartments of the bag shall not open under ascent vibration loads and drogue deployment shock loads
- After drogue deployment, the top of the bag shall be flush or below the top of the cup.
- The bag shall ensure lines first deployment.
Notes:
- Keep paracord
- Ewing style locking loop
Plan: Add a cylinder to the top of the bag for the stowed lines to slide into. The cylinder will have another mouth on top to close the lines. When packing the parachute, the cylinder can be rolled down.
Goals:
Make new locking loop
- Make a bight test article
- Make a rubber bands compatible lines container
Pieces:
- Fabric: Main rectangle, bottom, flaps (demogorgon), line stow rectangle, line stow container, line stow demogorgon
- Webbing: parachute loop, bridle, reinforcement bands, line stow loops
- Locking loop
Dimensions for main rectangle:
- Tube ID = 5.622-5.637" use minimum diameter
- Parachute volume = 225 in3 w/0 lines
- Cutting tolerance = 3/16 in
- Clearance of bag in tube = 1/8 in minimum
- Lap seam width = 1/2 in
- Leave 1/2 in for attaching flaps
- Height = 10.2395" V/[pi*((ID-2*clearance)/2)^2] - tolerance
Width = 17.1891"
Dimensions for demogorgon flaps:
- Sewed to rectangle: 1/2 in tall, 4.172" wide
- Circumference = 16.6891"
- Diameter = 5.312"
- Flap height = D/2 + .75 (grommet) = 3.406" (can add extra for bulge)
- Flap height + 1.2" sewed part = 3.906"
- Grommet = 1" diameter, flap 1/4" past edge
- Extra fabric for finishing seam = 1/2"
- Width of top of trapezoid = 1.25"
Dimensions for bottom:
- Circumference = 16.6891"
- Flaps 1" wide, 1/2" tall
Dimensions for line stow container:
- Height = 4.5"
- Width = 17.1891"

Manufacturing Process:
Definitions:
Standard Stitch: Size E (69) thread, straight stitch, 2.4 mm stitch length
I - Mark and Cut the Fabric
- Cut pieces of fabric for main rectangle, lines rectangle, 8 flaps, and the bottom using dimensions and stencils (in deployment bag box)
II - Make the Demogorgon Flaps
- Fold over the hem twice. This will use will use a Edge Finish KFb.
- Pin the hem.
- Sew hems on flaps by folding edges over twice
- Add grommets to flaps using arbor press. The smaller arbor press inside the shop is preferable.
III - Sew on the Flaps and Tapes
- Sew flaps to main and lines rectangles
- Notes: Try to keep overlap on the same side of the flaps so when they are sewed into a cylinder the overlaps line up. Since the width of the rectangles is slightly longer than four flaps + overlap, spread out the flaps to keep them even.
- Cut 5 pieces of webbing:
- 3 the width of the rectangles for the top, middle, and bottom seams
- 2 loops for the TDs/bridle (pictured above)
- 52" long. Mark at 8, 5, 14, 8, 8, and 8
- Sew the two rectangles together with a piece of webbing on the outside to cover the seam.
- Ideally the line stow would also be sewed in between the rectangles but I forgot, oops
- Sew the line stow to the lines rectangle, add webbing to reinforce if needed
- Locking loops?
- Sew on the webbing for the TD loops
- Inside out, sew the rectangle into a cylinder
- Sew the bottom circle on and add webbing over the seam
Line Stow Sewing Procedure
Materials: 1/2" polypropylene webbing, fabric, 1/2" electrical tape
Manufacturing:
- Mark the fabric with a ballpoint pen
- Mark the webbing with the tape on the places where it will be sewed down
- Pin the webbing to the fabric on one side of the tape (the pins should not be on the tape)
- Sew the webbing on. The stitches should be on the edges of the tape
Issues:
- Takes a while
- Add marks on the fabric on either side of the webbing. The sewn lines were not quite parallel.
Packing:
- Fold the lines into a loop and pull through the webbing loops with another piece of paracord. Repeat, weaving the lines back and forth across the fabric.
| Hermes I | Hermes II | ||
|---|---|---|---|
| Cup ID | |||
| Bag OD | |||
| Parachute | Lines | Swivel | Riser | ||
|---|---|---|---|---|---|
| Required Volume (in^3) | |||||
| Designed Volume (in^3) |
Line Stows
The Hermes I bag did not stow or restrain the main parachute suspension lines or riser. There was concern that the unrestrained lines and riser could tangle with themselves or with the various hardware at the confluence. This could have caused the lines to abrade.
Hermes II Main Bag Improvements
The first generation of the Hermes II main bag was sub-par so we deemed it a prototype. We are making the following improvements to the design.
- Move the bottom tape towards the mouth to allow for the full seam allowance.
- Single exterior rectangle.
- Make wider (and thus shorter)
- Add loops through closures
- Remove line holding flap. Replace with rubber bands
- Add grommet in bottom for bridal to pass through
New Dimensions:
Rectangle:
- Height = 14.875" Seam allowance = 3/8"
Width = 17.2" Seam allowance = 1/4" per side
Bottom:
Flaps:
- Trapezoidal flaps
- bottom length 4.175" = circumference / 4
Sources
- Dimensions for main rectangle: