![]()
Below are the detailed steps for creating the Sample Student VM from the Base VM.
These steps were done using the Base VM (limited access) created by Blake Skinner on 6/2/2010 as a starting point.
- Download software installers for packages to be included on Host machine. We will share to that folder rather than downloading into the VM to expedite the process and be able to reuse it later.
- MIT Software Download Site
- Kerberos for Windows 3.2.2
- Secure CRT/FX 6.2.3
- Firefox 3.6.6 (installed as 3.6.3 updated to 3.6.6)
- Matlab (student) R2010a
- Emacs 23.1 (not an installer)
- VLC 1.1.0 (Video Lan Client - video player)
- OpenOffice 3.2.0 - 3.2.1 is now available
- Eclipse and NetBean& JDK bundle
- JDK 6 update 20 with NetBeans 6.9 - jdk-6u20-nb-6_9-windows-ml.exe
- Skipping printing for now
- MIT Software Download Site
- Setup Student VM
- Download and unzip the Base VM
- Rename folder to Windows 7 - x32 - Student.vmwarevm
- Rename vmx configuration file to Windows 7 - x32 - Student.vmx
- Rename Disks - do we want to do this? Is there an easier way. Have to update the .vmdk file and the .vmx file to match - use Emacs on Windows or other CRLF smart text editor
- Launch VM by double clicking on .vmx file
- Edit the VM before powering on
- make sure CDROM set to AutoDetect
- Enable Sharing (Always Enabled) - we'll come back to enable mirroring later
- Add a mapping to the folder with the installers from above
- Power on the VM (this can take 10-15 minutes)
You will see the Starting Windows followed by Setup is updating the registry settings followed by Setup is starting services, followed by Setup is installing devices, followed by Setup is applying system settings, followed by Setup will continue after reboot. Reboot happens. Starting Windows followed by Setup is preparing your computer for first use. - You will automatically be logged in as an administrator
- We always recommend selecting Public Network for the Network Location as it is the most locked down.
- You will see the System Preparation Tool 3.14 dialog - you can safely close that by clicking the red X (DO NOT click OK at this point!)
- Update Windows and AV definitions
- The Base VM is already configured to take updates from MIT WAUS and AV updates from McAfee, but you can speed the process along.
- Be sure to Defer the Virus Scan until you are ready for it as it will hog resources and slow down the process
- Start -> All Programs -> Windows Update
- Install updates
- Update VirusScan Enterprise
- Right click on the VirusScan Shield and select Update Now (you will need to click the little up triangle in the system tray to see it)
- You may not see a dialog
- Confirm the update happened by Right Clicking on the shield and selecting About VirusScan Enterprise. The data should be today's or yesterdays date.
- Reboot (Click Restart now) after updates are installed.
- Updates will finish configuring
- Double check AV update if that didn't finish.
- Now we are ready to install the software.
- Install Custom Software for Students
- The order actually does matter as some applications have dependencies on other apps. Unless otherwise stated, assume we went with the defaults for the install.
- Browse to the Shared Folder mapped as Z: probably and launch the installers
- KfW 3.2.2
- SecureCRT/FX 6.2.3
- Firefox 3.6.6
- uncheck use Firefox as my default web browser
- uncheck Launch Firefox now - it doesn't help to import things from IE yet as this account will not be used by the user
- VLC media player 1.1.0
- check Mozilla plugin
- uncheck Run VLC media player 1.1.0
- OpenOffice 3.2.1
- Leave settings at Windows User and MIT
- Matlab R2010a (student version) see instructions linked above for installing Matlab - takes about an hour
- JDK 6 update 20 with NetBeans 6.9
- unchecked at end of the install:
- Contribute to the NetBeans project...
- Register the NetBeans IDE and Java SE Development Kit
- unchecked at end of the install:
- Double check Windows Update and Virus Definitions - see above
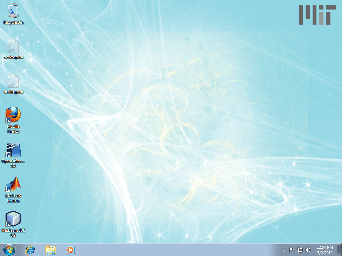
Your VM should look something like:
- Shutdown VM
- Save a copy
- Browse to folder, right click and drag - Select Copy
- Power up VM
- Generalize Windows
- In System Prepration Tool box, select
- Enter System Out-of-Box Experience (OOBE)
- Check Generalize
- Set Shutdown Options to Shutdown (very important!)
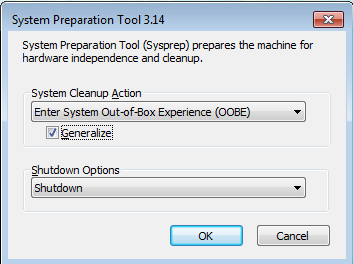
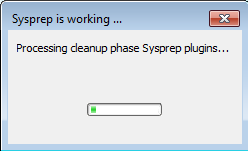
- Click OK - Sysprep will now make this installation of Windows general (aka unique)
- In System Prepration Tool box, select
- DO NOT POWER ON THE VM
- Make the VMware configuration general following these instructions
- Delete the following 4 lines from .vmx file
ethernet0.addressType = "generated"
uuid.location = "56 4d 74 2d ed 64 c2 ea-30 27 34 52 25 87 f8 a4"
uuid.bios = "56 4d 74 2d ed 64 c2 ea-30 27 34 52 25 87 f8 a4"
ethernet0.generatedAddress = "00:0c:29:87:f8:a4" - Replace
sharedFolder0stuff with the following to enable mirroring on the MacsharedFolder0.present = "TRUE"
sharedFolder0.enabled = "TRUE"
sharedFolder0.readAccess = "TRUE"
sharedFolder0.writeAccess = "TRUE"
sharedFolder0.hostPath = "~/Desktop"
sharedFolder0.guestName = "My Desktop"
sharedFolder0.expiration = "never"
sharedFolder1.present = "TRUE"
sharedFolder1.enabled = "TRUE"
sharedFolder1.readAccess = "TRUE"
sharedFolder1.writeAccess = "TRUE"
sharedFolder1.hostPath = "~/Documents"
sharedFolder1.guestName = "My Documents"
sharedFolder1.expiration = "never"
sharedFolder.maxNum = "4"
hgfs.redirectShellFolder.maxNum = "4"
sharedFolder0.shareTags = "auto,desktop"
sharedFolder1.shareTags = "auto,documents"
hgfs.redirectShellFolder0.name = "desktop"
hgfs.redirectShellFolder0.enabled = "TRUE"
hgfs.redirectShellFolder1.name = "documents"
hgfs.redirectShellFolder1.enabled = "TRUE"
sharedFolder2.present = "TRUE"
sharedFolder2.enabled = "TRUE"
sharedFolder2.readAccess = "TRUE"
sharedFolder2.writeAccess = "TRUE"
sharedFolder2.hostPath = "~/Music"
sharedFolder2.guestName = "My Music"
sharedFolder2.expiration = "never"
sharedFolder2.shareTags = "auto,music"
hgfs.redirectShellFolder2.name = "music"
hgfs.redirectShellFolder2.enabled = "TRUE"
sharedFolder3.present = "TRUE"
sharedFolder3.enabled = "TRUE"
sharedFolder3.readAccess = "TRUE"
sharedFolder3.writeAccess = "TRUE"
sharedFolder3.hostPath = "~/Pictures"
sharedFolder3.guestName = "My Pictures"
sharedFolder3.expiration = "never"
sharedFolder3.shareTags = "auto,pictures"
hgfs.redirectShellFolder3.name = "pictures"
hgfs.redirectShellFolder3.enabled = "TRUE" - Delete all files except
vmdk folder, Windows 7 - x32 - Student.vmx
This includes things like.vmxf, .vmsd, .nvram, .logfiles and thecachesfolder - Put in enable_sharing.vbs script (to allow Windows VM hosts machines to change to enable Mirroring)
- Zip up using 7zip (us the .zip format - we used the 2GB disk file sizes to be able to extract correctly on XP 32 bit)
- Upload to server - Student VM Beta 07/02/2010
- Delete the following 4 lines from .vmx file
Overview
Content Tools
Activity