...
- Print a negative mold of the shell using PLA.
- Perform three consecutive epoxy layups in the negative mold using three layers of fiber glass composite, abiding by the general procedures of epoxy layups.
- Vacuum bag the negative mold and hold near/complete vacuum for 24 hours using a vacuum pump.
...
Detailed Manufacturing Instructions
Materials/Equipment Master List
- 3D Printer
- Sandpaper
- Acetone
- Wax
- Gloves (and optionally a mask)
- PVA release film
- Vacuum bag plastic
- Vacuum tape (double sided)
- 1x1" squares of heat resistant glass
- Glass scorer (Metropolis has some)
- Glass-breaking pliers (Metropolis has some)
- Thin-woven fiber glass sheet (Gelb Lab)
- Woven fiber glass sheet (Gelb Lab)
- 2-part epoxy resin
- Peel ply (Gelb Lab)
- Breather
- Vacuum pump
Obtaining and 3D Printing the Negative Mold
Materials: 3D Printer
- Obtain CAD file of a negative mold of the exterior shell (YouTube tutorial for creating a negative mold linked here; CAD for this iteration of the Aeroshell has already been developed).
- Convert the CAD to a .STL file. Print the negative mold on a 3D printer using low infill (10-20%) and material PLA.
Mold Preparation Steps
Materials: Sandpaper, acetone, wax, gloves, mask (optional), PVA release film
- Sand down the inside of the mold to get rid of any burrs and smooth out surfaces. A few minutes of sanding will suffice.
- Remove all the dust from the inside by washing and drying or wiping with acetone.
- Rub down the inside and top planar surface of the mold with wax until glossy and smooth. A pea-sized portion of wax should be sufficient.
- The wax is toxic if ingested, so wash your hands after use.
- Put gloves on (and optionally a mask) and move to a well-ventilated area, preferably outside. Apply a coat of PVA release film by gently rubbing it in a layer over the wax. A bottle cap of PVA should suffice.
- Recommended to do this outside and stand upwind because plastic fumes are not good to breathe in.
- Visually, the layer should appear shiny.
- Optionally: If you want multiple coats, wait until the first coat dries (drying time listed on the bottle).
Vacuum Bag Preparation Steps **@Vealy can you describe this process?**
Materials: Vacuum bag plastic, vacuum bag double-sided tape *Vealy what are these actually called?*
- Vacuum Bag Prep (with pleats)
- Vacuum Pump Tube Prep
- Leaving one side open
Epoxy & Fiber Glass Layups
Materials: Vacuum Pump, thin-woven fiber glass sheet, thick-woven fiber glass sheet, 2-part Epoxy Resin, peel ply, breather, gloves, mask (optional)
- Cut one rectangle of thin-woven and two rectangles of regular-woven fiber glass (per Aeroshell) in a sufficient size to fit inside the negative mold cavity.
- Cut a layer of peel ply slightly larger than the fiber glass rectangles.
- Cut a rectangular layer of breather roughly equal in size to the upper planar face of the negative mold.
- Put on gloves.
- Thoroughly mix __grams of epoxy and resin in the correct ratio (per Aeroshell).
- Once they are mixed, there is a limited time window in which this process can be successfully completed. We have found that after about half of the listed epoxy working time, it becomes stickier and difficult to work with.
- Coat fully the inside of the negative mold with a layer of epoxy, using about 1/3 of the total epoxy allotted for one Aeroshell.
- Lay the thin-woven layer of fiber glass into the negative mold cavity. Gently press/move the layer until it contacts the surface of the cavity and nearly every point.
- This process is difficult and requires practice. Tips:
- Start from the deepest point in the mold.
- Provide excess material at first and flatten it out later.
- Don't overstretch the material.
- Use nails to lightly fit the sheet into sharp corners.
- This process is difficult and requires practice. Tips:
- Repeat the above process two more times but using the regular-woven sheets of fiber glass cut out earlier and 1/3 of the remaining epoxy each time.
- Press the precut sheet of peel ply into the mold covering all of the fiber glass.
- Place the breather on top of everything else.
- When this is done proceed quickly to the following section.
Holding a Vacuum
- Put the mold and layups into the open end of the previously prepared vacuum bag.
- Close the vacuum bag.
- Turn on the pump. The bag should quickly pull a vacuum and the shape of the negative mold will become visible.
- Not recommended but sometimes necessary: The vacuum can be tested by turning off the pump briefly and observing how quickly air is let back in. Sometimes the pump has trouble turning back on if this is attempted.
- If the bag is not holding a vacuum well at all, the manufacturing process may be compromised.
- Not recommended but sometimes necessary: The vacuum can be tested by turning off the pump briefly and observing how quickly air is let back in. Sometimes the pump has trouble turning back on if this is attempted.
- Leave the pump on for 24 hours.
- When the process is complete, leave the pump on and cut a large hole in the bag near the pump tube. Allow the pump to run freely (not pulling vacuum) for a few minutes before shutoff.
Removing the Aeroshells from the Mold
- This process can be a little bit tricky, so try not to damage the Aeroshells in the process.
- Separate the shells from the mold. There is no real procedure, so use the following tips:
- Try to separate by pulling up on the corners of the peel ply or the fiber glass itself.
- Use a blunt and thin tool, like a skinny screwdriver, to carefully disconnect the edges of the shell from the mold.
- Support the sharp corners at the edges of the cavity of the shell as you pull the shells out.
- You will visibly see the areas which are free of the mold. Use these to continue to make progress on getting the shells out – they won't come out in one piece.
3D Printing the Skeleton
Materials: 3D Printer
- Convert the CAD file into a .STL file. Material as PLA and 0.2mm thickness are sufficient.
- When slicing the file, change the following settings:
- The side which touches the MPT should be normal to the print bed (even though it is not flat).
- Infill should be >70%
- Supports set to ON EVERYWHERE.
- Brim set to ON.
- Make sure to remove all the excess material from the screw holes and supports after printing.
Cutting the Aeroshell to the Proper Size *Conrad return to this 5/16/2024
Glass Pane
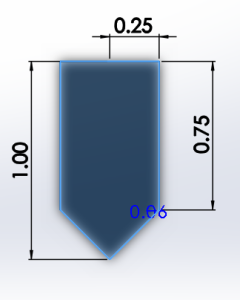
Materials: 1x1" square of heat resistant glass, marker, glass scorer, glass-breaking pliers, sandpaper
- Break the 1x1" square in half into two pieces.
- Use a marker to draw a line divided the glass into two equal rectangles. Score along the midline on both sides of the glass.
- Carefully break the glass in two using the glass breaking pliers. A useful technique is to hang the excess glass corner over an edge and repeatedly hit (rather softly) the overhanging piece using the glass-breaking pliers.
- In theory, each glass panel should yield two useful glass pieces.
- Cut the glass into the correct shape to fit into the aeroshell.
- Use a marker and ruler to trace the correct five-sided shape on the 0.5x1" glass panel
- Score the glass along the lines using a glass scorer on both sides.
- Carefully break off the excess glass using the glass-breaking pliers.
- Sand down the edges until the desired dimensions are achieved.
- Caution: Don't scratch up the glass surface through which the camera is viewing.
- Break the 1x1" square in half into two pieces.
Attaching the Glass to the Shell *Conrad return to this 5/16/2024
Results
These Aeroshells flew on the Prometheus test flight in April 2024. All four remained intact through subsonic flight speeds and an estimated apogee of 5,000 feet (**double check this CC 5/16/2024). Only one Aeroshell carried a live camera, and the footage captured was deemed sufficient documentation of the booster recovery system deployment. The camera did not overheat during flight or on the pad.
...
- The exterior screws should be angled to keep the screw heads normal to the face of the exterior shell.
- The exterior screws are currently threaded directly into the PLA of the skeleton. A future design should add a threaded metal component on the skeleton in order to better secure the assembly together.
- The aerodynamics of the up- and down-facing aeroshells are similar but not identical. Perhaps a new glass shape could be designed, or non-planar glass could be used.
- The cross-sectional profile could be further reduced by using a parabolic shape instead of circular, although a redesigned shell must retain adequate room for the structural supports of the skeleton.
- The field of view could be increased. .
Future Manufacturing Process Improvements (as of May 2024)
- The skeleton could be printed in two parts to get rid of the roughness on the face bordering the MPT.