Beyond being a controller card that allows USB access to legacy floppy drives, the Kryoflux software it is also a software tool for imaging these floppy disks. We use the Kryoflux software for all 5.25 and 8 inch disks and 3.5 inch disks that don’t image properly with Guymager or FTK Imager.
- In Windows, launch the KryoFlux graphical user interface, or GUI, either by clicking the desktop icon, or by opening the DTC folder where the GUI installer is located and double-clicking on the file called kryoflux-ui.jar.
- At the beginning of each imaging session, without a disk in the drive, calibrate the floppy drive.
- Select the correct drive from the Drive menu (drive 0) on the stop of the software window and then select Calibrate from the same menu. You should only need to calibrate the drive once per imaging session and any time you switch between 3.5-inch and 5.25-inch disk drives.
- Select the output directory for your newly-created disk images and log files.
- Select File → Settings and click on the Output tab. Browse to the appropriate path in the shared folder for the disk images of this accession or create one based on the accession such as 2020_029acc. Ensure that the Logs button is checked, and then click OK.
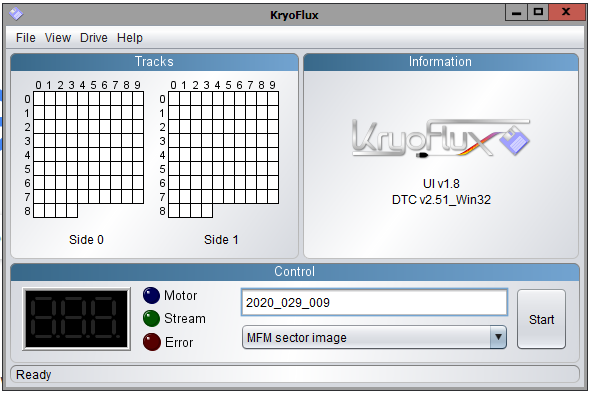
- For each disk, enter a unique identifier associated with the disk based on the accession number, such as 2020_029_001
- Click on the field labeled Enter name… and type in the unique ID as mentioned above in this step. The text entered here will become the filename for any disk images and log files created. Do not include the extension of the file name.
- Click on the field labeled Enter name… and type in the unique ID as mentioned above in this step. The text entered here will become the filename for any disk images and log files created. Do not include the extension of the file name.
- Select the image format(s) for the disk image using the dropdown list below the filename field. (see the table here below step 5 for the most commonly used options)
- In order to choose multiple outputs, hold down the Control (Ctrl) key while making your selections.
- In most cases, selecting an image format to obtain a sector image requires that you know something about the media in hand. If you are unable to determine the correct format, create an image with an output of a stream file. This will create an image with all the data on the disk irrespective of format, it can be used later to create a formatted disk image.
- In order to choose multiple outputs, hold down the Control (Ctrl) key while making your selections.
- After you have selected the appropriate image format, insert a disk and select Start. You should see the green Stream indicator flash on and off, and see the cells in the Tracks display on the left-hand side of the window fill with different colors. Go here to look at the explanation of each color. In general green/orange mean imaging was successful, red means not imaged successfully, and grey is unknown. If creating stream files, they will all be grey.
- Once the disk stops spinning and the green Stream indicator stops flashing, the imaging process has completed. The disk image(s) and log file for the disk you just imaged can be found in the directory you selected in step 3.
- If you created a stream file, you can now use that as a source and try creating different types of disk images. In what’s called “deviceless mode”, which is outlined here. Follow the naming guidance from the earlier steps above.
- It will take some troubleshooting to determine if you have found the correct format, the BitCurator Image Access tool and the HxC Floppy Emulator tool can provide ways of examining the disk images. If no trouble was encountered imaging, you can proceed to step 10.
- The BitCurator Image Access tool allows you to open common disk image types, browse their structure, and export the files if desired.
- The HxC Floppy Emulator is a tool that allows for opening of floppy disk images, browsing some types, exporting files, and convert disk image formats. It also allows you to visual the tracks of a disk image, to see where the errors/data are.
- HFS explorer is tool that allows you to open HFS formatted disks, browse their structure, and export the files if desired.
- If you feel that you have captured a sufficient image, proceed to the disk processor section. (link)