Procedure for Manufacturing FireBolts Version III
Purpose
FireBolts, a term coined by the Team, are 1/4-20 bolts with E-matches glued in. They are used in Tender Descender modifications and also to ignite pyrotechnically operated pistons on the Team.
Materials
For Machining:
Raw Materials:
- 1/4-20 3/8" stainless-steel hex-head machine screw
Tooling:
- Center Drill
- #29 Drill
- Collet chuck for a 1/4-20 screw - In drawers by lathe
- Machining Oil
For E-match Insertion:
Raw Materials:
- e-match
- AeroEpoxy PH3660 Epoxy Hardener
- Aeropoxy PR2032 Epoxy Resin
Tools and Supplies:
- Multimeter
- Popsicle Sticks
- Mixing Trays
- Acetone
- Paper Towels
- Bottle Brush
- Gloves
- Sharpie
- Scale
Fabrication
Machining
FireBolt fabrication is simple. First, purchase 1/4-20 3/8" stainless-steel hex-head machine screws.
. One by one, perform the following procedure:
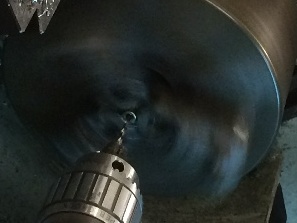
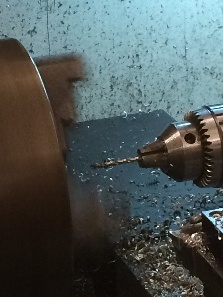
- Secure the bolt in the chuck (preferably a collet chuck for a 1/4-20 screw) of a lathe (head end pointing outward).
- Using a center drill, create an indentation in the cap.
- Using a #29 drill size, slowly drill through the bolt. Use coolant or oil to prevent overheating of the drill bit or part.
- Used a speed of 400 RPM and a feed of about 0.001" per 1-2 seconds.
- Drill approximately halfway through the bolt, bring the drill bit out, re-oil it, and continue drilling.
- Do not let the drill bit sit inside the screw without moving it.
E-match Insertion
This process requires two people. Because this process involves solvents and epoxy, wear gloves and work in a well ventilated area. Fill out the FireBolt Manufacturing Log so that we can better assess reliability. We have had numerous issues with FireBolts in the past and the log is designed to help us improve the manufacturing process and find trends in the data.
I - E-match Testing and Serialization
- Give each e-match a unique serial number.
- Starting 2 inches from the igniter head, mark the serial number in binary on the igniter wires. (most significant bit is towards the head) Use the Sharpie.
- Zero: 1/4" tick parallel to the wire
- One: Tick perpendicular to the wire
- Log the serial number and the color of the sharpie. Log the type of e-match.
- Starting 2 inches from the igniter head, mark the serial number in binary on the igniter wires. (most significant bit is towards the head) Use the Sharpie.
- Measure the resistance of every e-match with the multimeter.
- Log the resistances.
- Dispose of any shorted or open e-matches.
- Short the e-matches by twisting the leads together.
- Log the date and your name.
II - Epoxy Preparation
- Mix 100 parts PR2032 and 27 parts PH3660. Log the time.
- Put the epoxy in the vacuum chamber and vacuum for 45 minutes.
III - Bolt Preparation and Insertion
- De-grease and clean the machined bolts with acetone. Use the bottle brush to clean the insides. Let the bolts dry for at least five minutes. Any residual grease or acetone will inhibit the bond.
- Slide in the e-matches
- For Standard FireBolts, slide one e-match through the hole in the 1/4-20 bolt.
- For FireBolt Jumbos, slide two e-matches through the hole in the 1/4-20 bolt
- Put teflon tape over the threads once dry
IV - Gluing
- Using a popsicle stick, place a pea-sized drop of mixed Aeropoxy on the head end of the screw where the e-match meets the hole.
- Slide the e-match back and forth to get all the epoxy into the hole
On the other end of the screw, you may be able to push a small amount of epoxy on, but don't get it in the threads. Log the time. (ELABORATE AND QUALIFY)
- WHAT SHOULD A GOOD FIREBOLT LOOK LIKE? (PHOTO) WHAT ARE THE ACCEPTABLE LIMITS FOR AIR POCKETS IN THE EPOXY? ARE THERE OTHER VERIFICATION STEPS?
- Let the epoxy dry for 10 minutes.
V - Inspection
- Test the resistance of all e-matches with the multimeter. Log the resistances.
- If the resistance has dropped, then the e-match has shorted. Record the probable cause of the short in the table.
- Dispose of the FireBolt.
- If the e-match is open, record the probable cause of the break of the circuit in the table.
- Dispose of the FireBolt.
- Short the e-matches by twisting the leads together
- If the resistance has dropped, then the e-match has shorted. Record the probable cause of the short in the table.
VI - Cure and Follow up
- Let the FireBolts cure for at least 24 hours.
- Fill out the FireBolt Firing Log when firing the Firebolt.
- Hydrostatic test the firebolt.