You are viewing an old version of this page. View the current version.
Compare with Current
View Page History
« Previous
Version 40
Next »
Design 1:
Home Screen:
|
|
|
|
|
|
 
|
When Joe starts LocaShare,he sees
the home screen shown in the figure.
At a glance, he can see (i) how many
social contacts are near him,
(ii) whether (and how many) people
have added him as a contact and
(iii) the number of offers by stores near
his current location. There are also two
tabs that he can use to access his
social and commercial contacts.
Upon clicking the link “view” near
(i), he sees the names of social contacts
that are near his current location. By
clicking on the button “View Contact”,
he can view further details. He can also
choose to return back to the home screen.
Upon clicking the link “view” near (ii), he
sees the names of people who added
him as a contact. The relationship between
Joe and that person (e.g., Susan) is not
established till Joe also adds Susan as his
social contact. By pressing the button “Set
Permissions”, Joe can add Susan to his
list. If he does not want to share his location
information with Susan, he can choose to
“Deny Request” and Susan would not be
able to track his location (since he will not
appear as her social contact). By selecting
either “Set Permissions” or “Deny Request”,
he can remove the person’s name from this
screen (otherwise, LocaShare will keep
reminding him till he takes one of the two
actions). As in the previous case, he can also
choose to return back to the home screen.
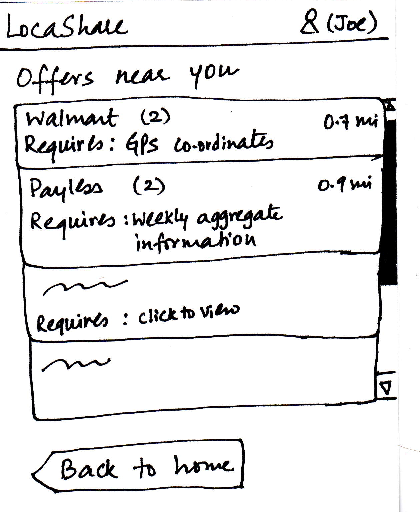
Upon clicking the link “view” near (iii), he sees
a list containing thenames of stores that are
offering discounts or sales in exchange for his
location information. The list is sorted by the
number of offers per store (decreasing order)
and the distance of the store from Joe’s current
location (increasing order). Also, the list can
be color-coordinated (based on the amount
and type of location information required) to
help Joe decide quickly whether or not to view
the offer(s) from the store. As in the previous
cases, he can also choose to return back to
the home screen.
|
|
|
|
|
Task 1: Add Social Contacts:
|
|
|
|
|
|
|
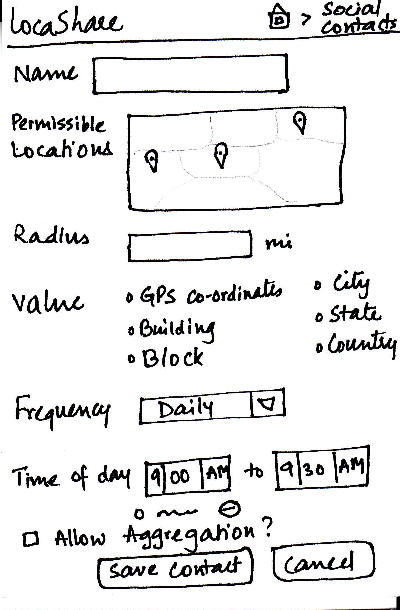
Joe starts from the home screen and clicks on the
tab “Social Contacts”. He is then taken to the screen
shown here that can be considered the “Home
Screen” to handle his social contacts. Here, he can
(i) search for an existing social contact or (ii) add a
new one. Since Bob is not on his contact list, he
selects “Add New Contact”. He is then taken to the
screen that shows the various settings he can use
to control the amount and type of his location
information that Bob can view. He first enters the
contact’s name (Bob) in the text field. Since he is
primarily interested in sharing his location information
with Bob during the ski trip, he selects “Sunday River”
on the map by clicking on the appropriate location
(by zooming in/scrolling across the map/using
other features that the map API provides). After
receiving the selection from the click, Joe sees a
feedback in the form of a keyhole marker. He can
choose to add additional permissible locations, but
in this scenario, he does not want to. He then enters
2 in the textfield for radius and selects the option of
GPS coordinates for the value. Now, Bob will be able
to see his GPS coordinates in a 2 mile radius around
Sunday River. Joe can also select the frequency of
share and selects it to be daily (since he wouldn’t be
moving too far from Sunday River on an hourly basis).
He selects a time range during which Bob can view
his location. Here he selects 9am-9:30am. Suppose
that he also chose to share between 11:30am and
4pm. In that case, Bob will not be able to view Joe’s
location at 6pm (for example). He choose not to let
Bob see his aggregated information and thus leaves
the checkbox titled “Allow Aggregation?” blank. He
then clicks the button called “Save Contact”. He can
also cancel the form and start it again, if he wants to.
Now, Bob will receive a notification on his “Home
Screen” that Joe added him as a contact. If he would
also like to share his location, Bob can add him as
a contact and the relationship would be established
on LocaShare.
|
|
|
|
|
Task 2: View real-time location of social contacts:
|
|
|
|
|
|
 |
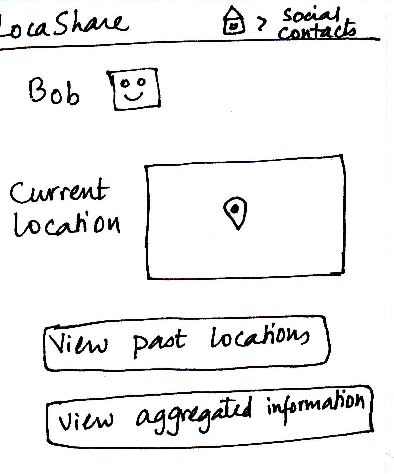
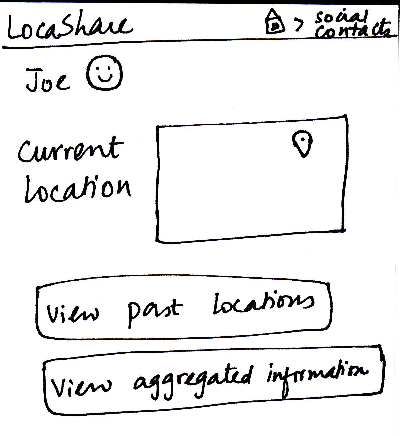
Once Bob adds Joe as a contact, Joe can
now search for Bob in his social contacts.
He sees the screen shown here that
indicates Bob’s current location (depending
on what Bob allowed him to view). Joe can
also choose to view historical locations
visited by Bob or Bob’s aggregated information.
On the similar screen on Bob’s application,
where Bob would be viewing Joe’s profile,
Bob would see that the button “View
Aggregated Information” would be disabled since
Joe did not allow Bob to view his aggregated
information.
Suppose that a month has passed since Joe
added Bob to his contact list. Joe can view Bob’s
historical data by clicking on the button called
“View Past Locations”. He would then see this
screen that shows Bob’s locations using markers
on three different maps. These three maps
correspond to a daily, weekly and monthly summary
of Bob’s locations (based on the permissions
that Bob set for Joe).
|
|
|
|
|
Task 3: View offers and opt-in to create commercial contacts:
|
|
|
|
|
|
|
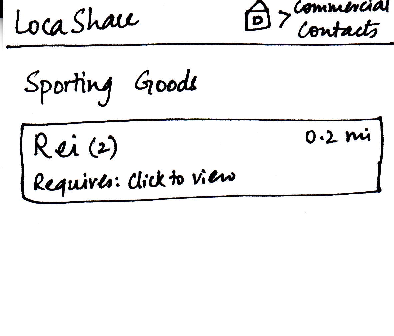
Joe starts from the home screen and clicks
on the tab “Commercial Contacts”. He is
then taken to the screen shown here that can
be considered the “Home Screen” to handle
his commercial contacts. Here, he can view
various categories of products on a wheel.
This visual representation helps him view
various categories in a quick glance. Tiny
numbers enclosed in circles indicate the
number of offers by merchants/stores
belonging to that category. Since Joe is at
a ski resort and wants to buy some gear,
he selects the wedge titled “Sporting Goods”.
He is then taken to the next screen that shows
him the list of stores selling sporting goods
and having offers. Here, Rei happens to be
the store offering the two discounts in this
category. Since the two offers require different
location information (either in type or amount),
the actual location value is not displayed here.
<ac:structured-macro ac:name="unmigrated-wiki-markup" ac:schema-version="1" ac:macro-id="482883bd-9874-4db0-b2eb-90427073c6de"><ac:plain-text-body><![CDATA[ [Note: you can view the sketch in the “Home
]]></ac:plain-text-body></ac:structured-macro>
screen” section to see an example of the
location information displayed below the store
names]. The distance from his current location
to Rei is also displayed (0.2 mi). Once he clicks
on the region, he is taken to the next screen
where he can see the two offers. Here we see
that Rei is offering a 10% off in exchange for raw
GPS coordinates. By default this would mean
GPS coordinates in that state. We display Joe’s
current GPS lat/long coordinates to help him
visualize the exact information he will be sharing.
The second offer involves a 25% discount in
exchange for a weekly aggregate information
. This means that LocaShare will aggregate
Joe’s information into meaningful chunks and
share them with Rei. In both cases, Joe can
choose to accept or delete the offer by pressing
the “Accept” or “Delete” buttons respectively.
If he returns to the previous screen, these offers
do not disappear from the screen and will be
shown to him the next time he views the “Home
Screen” for commercial contacts. Suppose that
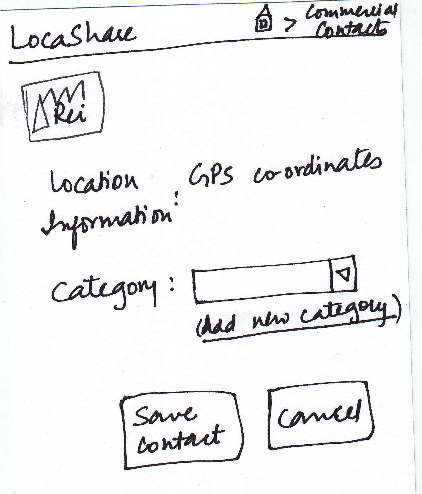
Joe decides to take Rei up on the first offer. He
would now see the following screen that summarizes
the information that Rei will receive and gives Joe to
add Rei to a category (in case he wants it to be
displayed in another category, or create a new category
for this merchant/store). He can then save Rei as a
contact by pressing the “Save Contact” button or cancel
the offer by clicking “Cancel”. If he clicks on “Cancel”,
he will be taken back to the “Home Screen” for
commercial contacts.
|
|
|
|
|
Task 4: View aggregate information of social contacts:
|
|
|
|
|
|
 
|
Since Alice wants to view Joe’s aggregate information,
she first searches for Joe on her “Home Screen”
for social contacts. She then sees Joe’s profile as
seen in this sketch. At a glance, she can see that he
is near Sunday River and so she is relived that he
reached the resort safe and sound. When she clicks
on “View Aggregated Information”, she sees the
following screen. She can see a summary of Joe’s
location on a daily, weekly and monthly basis. Instead
of a map view that showed Bob’s locations using
markers, in this aggregated view, Alice can see a pie
chart/wheel showing the amount of time Joe spent at
various places. This data can be collected from
Google Places API. Google Places API supports
categorizing locations based on their “type” (such
as, church, restaurant, store, bank, university, gym).
Alice can choose to drill down and get additional
details by selecting a wedge from the wheel. Suppose
that she selected the category “Campground”
(shown as a shaded region), she can see a list of
places related to “Campground” that Joe has been
to and the amount of time he spent at each place.
Thus, she is able to keep track of her family
member using LocaShare.
|
|
|
|
|
Task 5: Edit social contacts: |
|
|
|
|
|
 |
Since Joe wants to modify the location permissions
for Bob, he first searches for Bob on the “Home
Screen” for social contacts. After he comes to
Bob’s profile, he clicks on Bob’s icon/photo and
comes to this screen. Here he view the amount
and type of information that Bob can view about
<ac:structured-macro ac:name="unmigrated-wiki-markup" ac:schema-version="1" ac:macro-id="595ed268-b275-45c3-8213-675b579a104e"><ac:plain-text-body><![CDATA[him. [Note: Suppose that during the trip Joe
]]></ac:plain-text-body></ac:structured-macro>
allowed Bob to view his aggregated information.]
Joe can see that Bob can see his current location
as the lat/long in Cambridge, MA (his current
location). He also sees the pie chart/wheel that
describes the categorization of places that Bob
was able to view about him. He can now choose
to modify the permissions by clicking on the button
called “Modify Permissions” or can choose to
return by clicking “Cancel”. Once he clicks “Modify
Permissions”, he taken to the permissions sketch
described in task 1. |
|
|
|
|
Task 6: Edit commercial contacts: |
|
|
|
|
|
 |
Since this task started with Joe seeing an offer from Rei,
he is led to this sketch by clicking on Rei’s icon in the
screen described in task 3 (that shows the two offers
provided by Rei). In this screen, Joe can view the
current and aggregate information that Rei is able to
view about Joe. Since a commercial contact is not
editable by Joe (it was tied to the specific offer), he
can only choose to continue sharing the information
or delete the contact. If he happens to accept
multiple offers from Rei (that require different types
and/or amounts of location information), this screen
would show a summary of entire information set
that he is sharing with that one store. In that case,
clicking on “Delete Contact” will stop Rei from accessing
any of the pieces of information it was able to access
previously. This is a more intuitive approach since it gives
Joe control over the specific types and amount of location
information he wants to share with Rei.
|
|
|
|
|