...
As of 11/7/18 there is an unresolved issue with the e-match shorting on the steel screw. One proposed solution is to use nylon screws instead.
Materials
For Machining:
Raw Materials:
- 1/4-20 1/2" stainless-steel cap-head machine screw
Tooling:
- Center Drill
- 8-32 Tap Drill
- Center
- 8-32 Tap
- Tap Handle - LOCATION
- Collet chuck for a 1/4-20 screw - LOCATION
- Machining Oil
For E-match Insertion:
Raw Materials:
- e-match
- 5-Minute Epoxy
Tools and Supplies:
- Multimeter
- Popsicle Sticks
- Mixing Trays
- Acetone
- Paper Towels
- Bottle Brush
- Gloves
- Sharpie
Fabrication
Machining
Version I
Version I FireBolts were used in the 2017/2018 school year. They flew on Hermes I. They consisted of an untaped FireBolt fabrication is simple. First, purchase 1/4-20 by 1/2" stainless-steel cap-head machine screws. One by one, perform the following procedure:
...
bolt
...
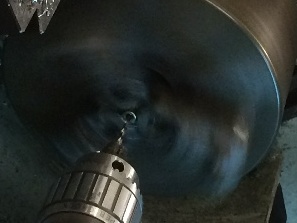
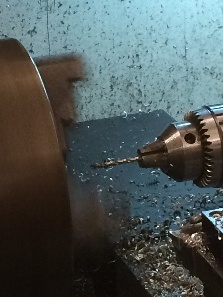
- During the initial production round, we used a speed of 400 RPM and a feed of about 0.001" per 1-2 seconds.
- Drill approximately halfway through the bolt, bring the drill bit out, re-oil it, and continue drilling.
- Do not let the drill bit sit inside the screw without moving it.
...
- Turn OFF the lathe.
- Replace the drill bit with a center.
- Tap through the bolt with good form.
E-match Insertion
...
I - E-match Testing and Serialization
- Give each e-match a unique serial number.
- Staring 2 inches from the igniter head, mark the serial number in binary on the igniter wires. Use the Sharpie.
- Zero: 1/4" tick parallel to the wire
- One: Tick perpendicular to the wire
- Log the serial number and the color of the sharpie. Log the type of e-match.
- Staring 2 inches from the igniter head, mark the serial number in binary on the igniter wires. Use the Sharpie.
- Measure the resistance of every e-match with the multimeter.
- Log the resistances.
- Dispose of any shorted or open e-matches.
- Short the e-matches by twisting the leads together.
- Log the date and your name.
II - Bolt Perpetration and Insertion
- De-grease and clean the machined bolts with acetone. Use the bottle brush to clean the insides. Let the bolts dry for at least five minutes. Any residual grease or acetone will inhibit the bond.
- Slide in the e-matches
- For Standard FireBolts, slide one e-match through the hole in the 1/4-20 bolt.
- For FireBolt Jumbos, slide two e-matches through the hole in the 1/4-20 bolt
III - Gluing
...
with one e-match. There was a variant called FireBolt Jumbos with two e-matches per bolt.
No manufacturing procedure was recorded.
Version II
Version I FireBolts were used in the Fall semester of 2018. They... Unknown User (premc@mit.edu)
FireBolt Manufacturing Procedure - Version 2
...
On the other end of the screw, you may be able to push a small amount of epoxy on, but don't get it in the threads. Log the time. (ELABORATE AND QUALIFY)
...
IV - Inspection
- Test the resistance of all e-matches with the multimeter. Log the resistances.
- If the resistance has dropped, then the e-match has shorted. Record the probable cause of the short in the table.
- Dispose of the FireBolt.
- Dispose of the FireBolt.
- If the e-match is open, record the probable cause of the break of the circuit in the table.
- Dispose of the FireBolt.
- Short the e-matches by twisting the leads together
- If the resistance has dropped, then the e-match has shorted. Record the probable cause of the short in the table.
V - Cure and Follow up
...
Version III
FireBolt Manufacturing Log
...