Purpose
FireBolts, a term coined by the Team, are 1/4-20 bolts with E-matches glued in. They are used in Tender Descender modifications and also to ignite pyrotechnically operated pistons on the Team.
There are two types of FireBolts. Standard FireBolts (simply called FireBolts) have one e-match glued in. They are used when there are redundant separation devices (e.g. Tender Descenders). FireBolt Jumbos have two e-matches glued in. They are used when there is only one separation device with only one propellant charge (e.g. HADES piston or AARDs).
As of 11/7/18 there is an unresolved issue with the e-match shorting on the steel screw. One proposed solution is to use nylon screws instead.
Materials
For Machining:
Raw Materials:
- 1/4-20 1/2" stainless-steel cap-head machine screw
Tooling:
- Center Drill
- 8-32 Tap Drill
- Center
- 8-32 Tap
- Tap Handle - LOCATION
- Collet chuck for a 1/4-20 screw - LOCATION
- Machining Oil
For E-match Insertion:
Raw Materials:
- e-match
- 5-Minute Epoxy
Tools and Supplies:
- Multimeter
- Popsicle Sticks
- Mixing Trays
- Acetone
- Paper Towels
- Bottle Brush
- Gloves
- Sharpie
Fabrication
Machining
FireBolt fabrication is simple. First, purchase 1/4-20 1/2" stainless-steel cap-head machine screws. One by one, perform the following procedure:
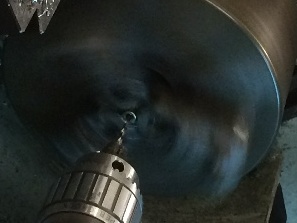
- Secure the bolt in the chuck (preferably a collet chuck for a 1/4-20 screw) of a lathe (head end pointing outward).
- Using a center drill, create an indentation in the cap.
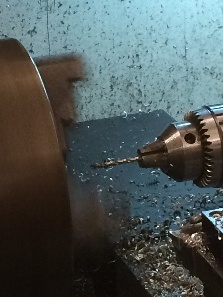
- Using a 8-32 tap drill size (size 29), slowly drill through the bolt. Use coolant or oil to prevent overheating of the drill bit or part.
- During the initial production round, we used a speed of 400 RPM and a feed of about 0.001" per 1-2 seconds.
- Drill approximately halfway through the bolt, bring the drill bit out, re-oil it, and continue drilling.
- Do not let the drill bit sit inside the screw without moving it.
- Tap the hole with an 8-32 tap.
- Turn OFF the lathe.
- Replace the drill bit with a center.
- Tap through the bolt with good form.
E-match Insertion
This process requires two people. Because this process involves solvents and epoxy, wear gloves and work in a well ventilated area. Fill out the FireBolt Manufacturing Log, so that we can better assess reliability. We have had a numerous issues with FireBolts in the past and the log is designed to help us improve the manufacturing process and find trends in the data.
I - E-match Testing and Serialization
- Give each e-match a unique serial number.
- Staring 2 inches from the igniter head, mark the serial number in binary on the igniter wires. Use the Sharpie.
- Zero: 1/4" tick parallel to the wire
- One: Tick perpendicular to the wire
- Log the serial number and the color of the sharpie. Log the type of e-match.
- Staring 2 inches from the igniter head, mark the serial number in binary on the igniter wires. Use the Sharpie.
- Measure the resistance of every e-match with the multimeter.
- Log the resistances.
- Dispose of any shorted or open e-matches.
- Short the e-matches by twisting the leads together.
- Log the date and your name.
II - Bolt Perpetration and Insertion
- De-grease and clean the machined bolts with acetone. Use the bottle brush to clean the insides. Let the bolts dry for at least five minutes. Any residual grease or acetone will inhibit the bond.
- Slide in the e-matches
- For Standard FireBolts, slide one e-match through the hole in the 1/4-20 bolt.
- For FireBolt Jumbos, slide two e-matches through the hole in the 1/4-20 bolt
III - Gluing
- EPOXY MIXING INSTRUCTIONS HERE. Log the time.
- Only glue two FireBolts per mixing. If you try to do more than two the epoxy will start to set.
- Using a popsicle stick, place mixed 5-minute epoxy on the head end of the screw. (HOW MUCH? WHERE?)
- Slide the FireBolt in. (HOW FAR?)
On the other end of the screw, you may be able to push a small amount of epoxy on, but don't get it in the threads. Log the time. (ELABORATE AND QUALIFY)
- WHAT SHOULD A GOOD FIREBOLT LOOK LIKE? (PHOTO) WHAT ARE THE EXCEPTABLE LIMITS FOR AIR POCKETS IN THE EPOXY? ARE THERE OTHER VERIFICATION STEPS?
- Let the epoxy dry for 10 minutes.
IV - Inspection
- Test the resistance of all e-matches with the multimeter. Log the resistances.
- If the resistance has dropped, then the e-match has shorted. Record the probable cause of the short in the table.
- Dispose of the FireBolt.
- Dispose of the FireBolt.
- If the e-match is open, record the probable cause of the break of the circuit in the table.
- Dispose of the FireBolt.
- Short the e-matches by twisting the leads together
- If the resistance has dropped, then the e-match has shorted. Record the probable cause of the short in the table.
V - Cure and Follow up
- Let the FireBolts cure for at least 24 hours.
- Fill out the FireBolt Firing Log when firing the Firebolt.
FireBolt Manufacturing Log
| Serial Number and Sharpie Color | Date of Manufacture | Name of Manufacturer | Type of e-match (e.g. MJG Firewire) | Initial Resistance | Initial Resistance Inspection Pass/Fail | Type (Standard/Jumbo) | Firebolt Material (SS/Nylon) | Mixing Time | Gluing Time (end) | Sealant Inspection Notes + Pass/Fail | Final Resistance | Resistance Inspection Notes + Pass/Fail | Other Notes |
|---|---|---|---|---|---|---|---|---|---|---|---|---|---|
| 0 | 11/11/18 | Madeline J + Prem C | Off brand | 1.4 | Pass | Standard | SS | 5:09:45 | 5:15 | Pass | 1.3 | Pass | a little indent |
| 1 | 11/11/18 | Madeline J + Prem C | Off brand | 1.4 | Pass | Standard | SS | 6:40 | Fail | 1.3 | Pass | bubble | |
| 2 | 11/11/18 | Madeline J + Prem C | Off brand | 1.1 | Pass | Standard | Nylon | 6:25 | Pass | 1.2 | Pass | Very nice | |
| 3 | 11/11/18 | Madeline J + Prem C | Off brand | 1.15 | Pass | Standard | Nylon | 6:00 | Fail | 1.1 | Pass | deep, thin hole | |
| 4 | 11/11/18 | Madeline J + Prem C | Off brand | 1.3 | Pass | Standard | Nylon | 6:25 | Pass | 1.3 | Pass | Very nice | |
| 5 | 11/11/18 | Madeline J + Prem C | Off brand | 1.1 | Pass | Standard | Nylon | 6:40 | Pass | 1.1 | Pass | very nice | |
| 6 | 11/11/18 | Madeline J + Prem C | Off brand | 1.2 | Pass | Standard | SS | 6:40 | Fail | 1.1 | Pass | deep, thin hole | |
| 7 | 11/11/18 | Madeline J + Prem C | Off brand | 1.2 | Pass | Standard | Nylon | 6:25 | Pass | 1.2 | Pass | ||
| 8 | 11/11/18 | Madeline J + Prem C | Off brand | 1.2 | Pass | Standard | SS | 6:00 | Fail. 1/4 sealant hole. | 1.1 | Pass | Don't be afraid to fail parts | |
| 9 | 11/11/18 | Madeline J + Prem C | Off brand | 1.3 | Pass | Standard | Nylon | 6:00 | Pass | 1.25 | Pass | Very nice | |
| 10 | 11/11/18 | Madeline J + Prem C | Off brand | 1.2 | Pass | Standard | SS | 6:00 | Pass | 1.2 | Pass | ||
FireBolt Firing Log
| Serial Number and Sharpie Color | Date of Firing | Individual(s) Responsible for Integration | Pre-Integrated Resistance | Use (flight, test, inventory inspection) | Pyrotechnic Device | Type of Pyrotechnic | Amount of Pyrotechnic | Notes on Setup | Resistance at Current Source | Name of Current Source | Current and Voltage Used | Notes on Firing (success/failure/unsure, blew out, melted, etc.) |
|---|---|---|---|---|---|---|---|---|---|---|---|---|
| 4 | 11/13/18 | Prem | 1.9 | Piston Test | --- | --- | --- | Cap sheared off | --- | --- | --- | Cap sheared off while screwing into NPT plug |
| 5 | 11/13/18 | Prem | --- | Shear force testing | --- | --- | --- | Reasonable resistance caused shearing | --- | --- | --- | Nylon is weaker than stainless steel |
| 3 | 11/20/18 | Prem + Jakob | --- | Recovering Plug | --- | --- | --- | --- | --- | --- | --- | Impressive cloud of smoke released |